How to Install OpenLiteSpeed Server in CloudStick?
Overview
OpenLiteSpeed is a high-performance, open-source web server that excels at handling high-traffic WordPress sites. Unlike traditional Nginx or Apache stacks, OpenLiteSpeed uses its native LSPHP handler to process PHP requests with significantly lower memory overhead and built-in caching support through LSCache. For WordPress users, this translates directly into faster page loads, better scalability under concurrent traffic, and less server resource consumption — making it ideal for production WordPress deployments on a modest VPS.
This guide walks you through deploying a new CloudStick-provisioned server with OpenLiteSpeed selected as the web server stack. The entire process — from choosing your cloud provider to watching real-time installation logs — is handled through the CloudStick dashboard without any terminal access required. Once the server is ready, you can immediately deploy WordPress or any other PHP application.
This guide covers purchasing a new server through CloudStick using a connected cloud provider account such as Vultr or DigitalOcean. If you want to connect an existing server you already own, use the Connect Your Own Server option instead — see the How to deploy your own server in CloudStick guide.
Step 1: Log In and Click Add Server
Begin from the CloudStick dashboard, which shows all servers currently connected to your account along with real-time CPU, RAM, and disk statistics. The + Add Server button in the top-right corner opens the server creation wizard.
1. Sign in: Go to dash.cloudstick.io and log in with your CloudStick credentials.
2. Click + Add Server: In the top-right corner of the dashboard, click the + Add Server button to open the server deployment wizard.
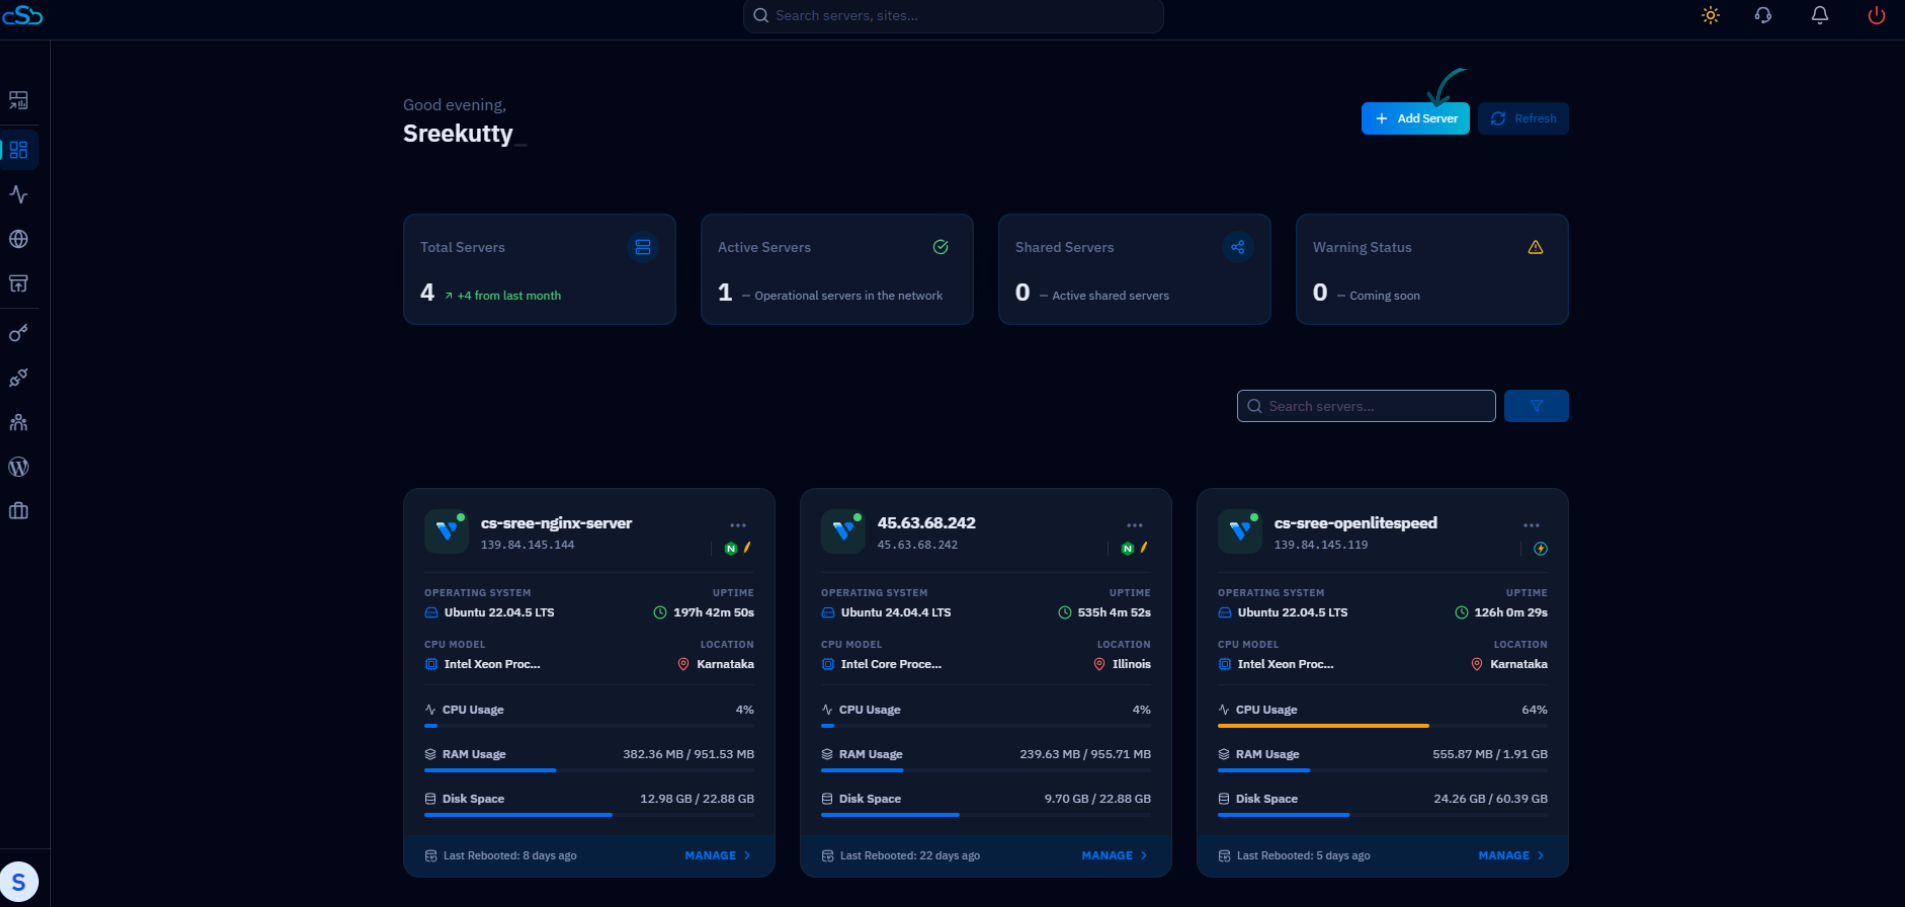
Fig. 01 — CloudStick dashboard with the + Add Server button highlighted in the top-right corner.
Step 2: Choose Your Provider and Select a Region
The server wizard opens on the Purchase Server page. Here you first select which cloud provider account to deploy the server to, then choose the datacenter region closest to your target audience — lower latency means faster website response times for your visitors.
1. Select your provider: Under 'Purchase from', choose the connected cloud provider account you want to use (e.g. your Vultr or DigitalOcean account). If you have not connected a provider yet, click Add Vultr or Add DigitalOcean to link your account.
2. Select a region: The wizard advances to the Region step. Browse the datacenter list by continent and click the location nearest to your users to select it, then click Next.
Choosing a region close to your users reduces network latency. For WordPress sites with a global audience, consider a provider with global CDN support or pair your server with Cloudflare after setup.
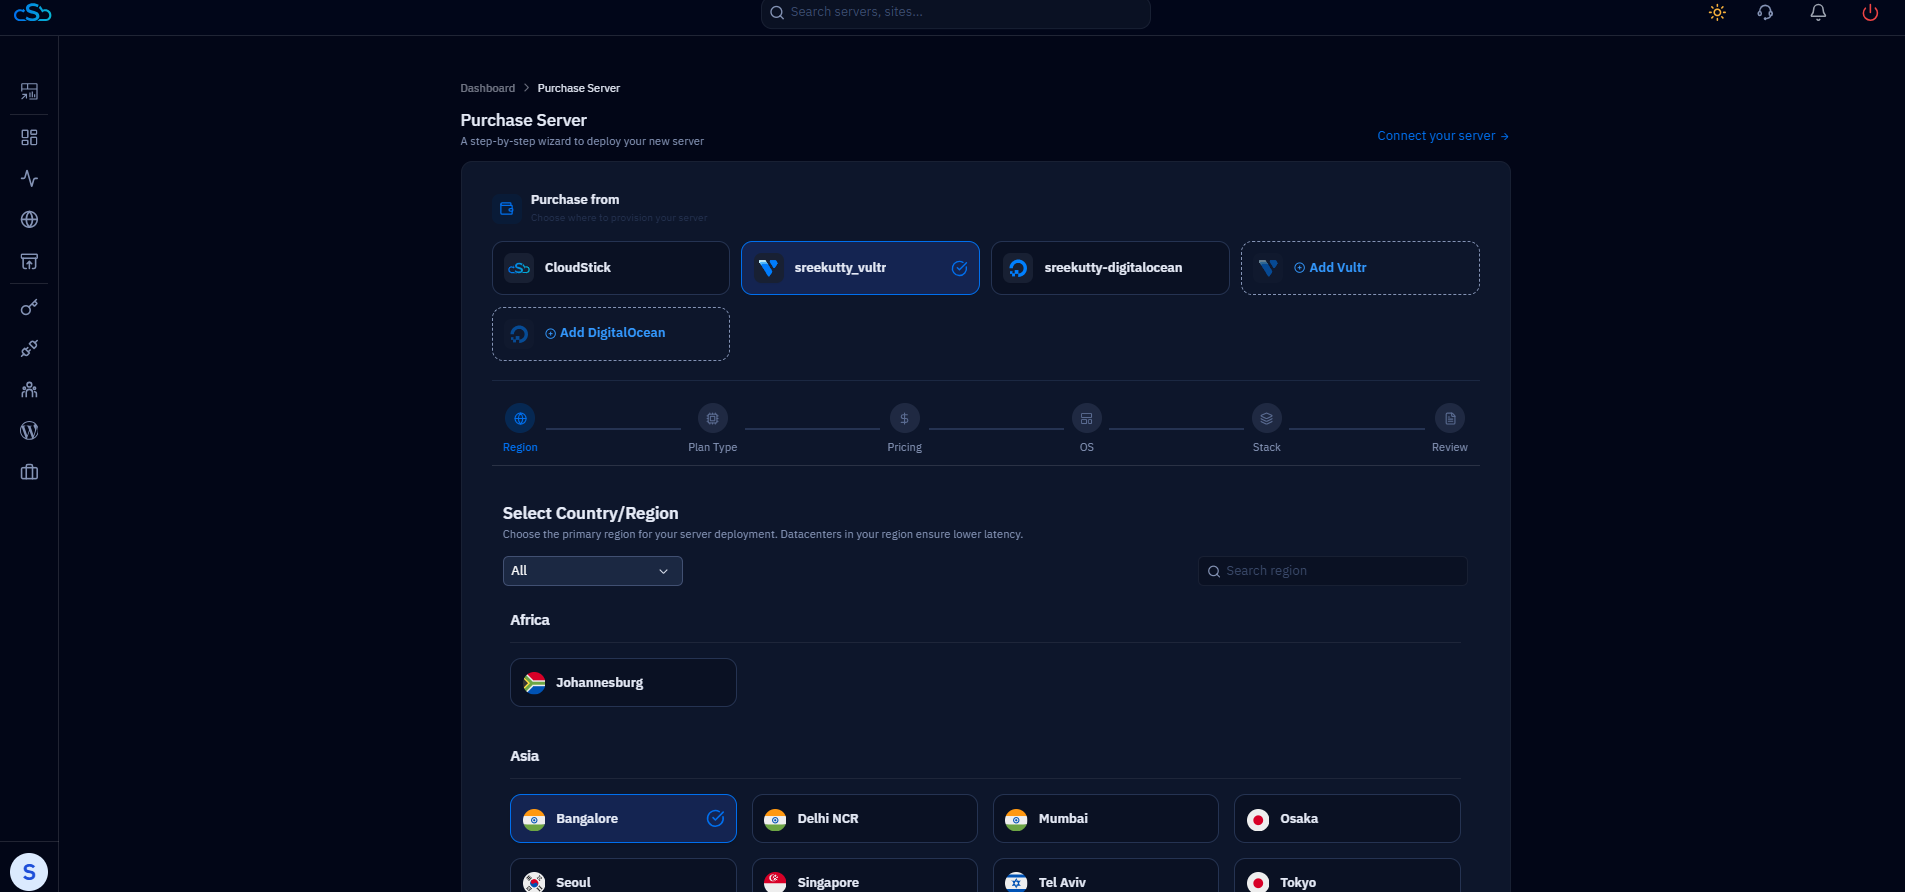
Fig. 02 — Purchase Server wizard showing the Region selection step with datacenter locations grouped by continent.
Step 3: Select Server Plan Type
After selecting a region, the wizard moves to the Plan Type step. This determines the CPU allocation model for your server — whether CPU resources are shared with other customers on the same physical host, or exclusively dedicated to your server.
Cloud GPU: High-performance GPU compute instances for AI/ML workloads — not typically needed for WordPress.
Dedicated CPU: CPU cores reserved exclusively for your server. Best for production sites with consistent high traffic or CPU-intensive workloads.
Shared CPU: Burstable CPU instances that share physical resources. Cost-effective for development, staging, or lower-traffic WordPress sites.
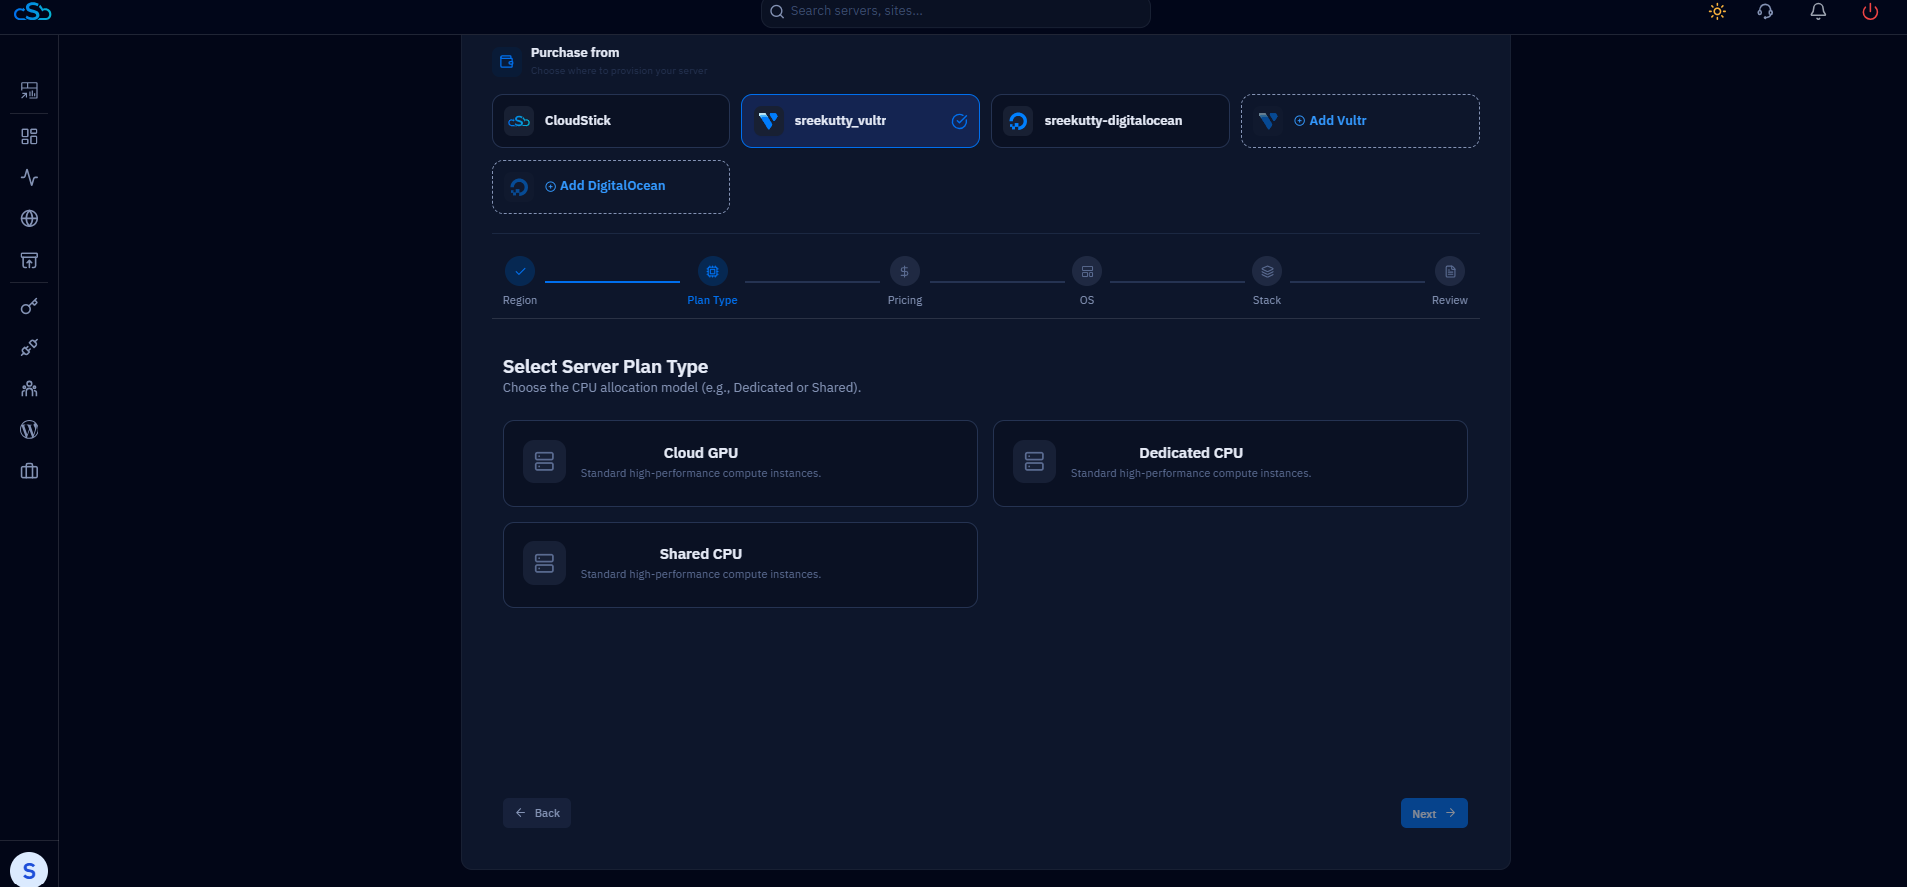
Fig. 03 — Select Server Plan Type step showing Cloud GPU, Dedicated CPU, and Shared CPU options.
Step 4: Choose Your Server Plan
With the plan type selected, the Pricing step displays all available server sizes. Each plan card shows the vCPU count, RAM, disk size, bandwidth, and monthly price. For a new WordPress site with OpenLiteSpeed, a 1–2 vCPU plan with 1–2 GB RAM is a solid starting point and can be scaled up later.
1. Review the plan cards: Each card shows vCPU, RAM, disk size, bandwidth, and monthly cost. Use the Filter by Category dropdown to narrow the list if needed.
2. Select a plan: Click the plan card that matches your workload requirements. The selected plan shows a blue checkmark. Click Next to continue.
OpenLiteSpeed is more memory-efficient than traditional stacks — a 1 GB RAM server can comfortably run a WordPress site that would require 2 GB on a Nginx + PHP-FPM setup. Start small and scale up as traffic grows.
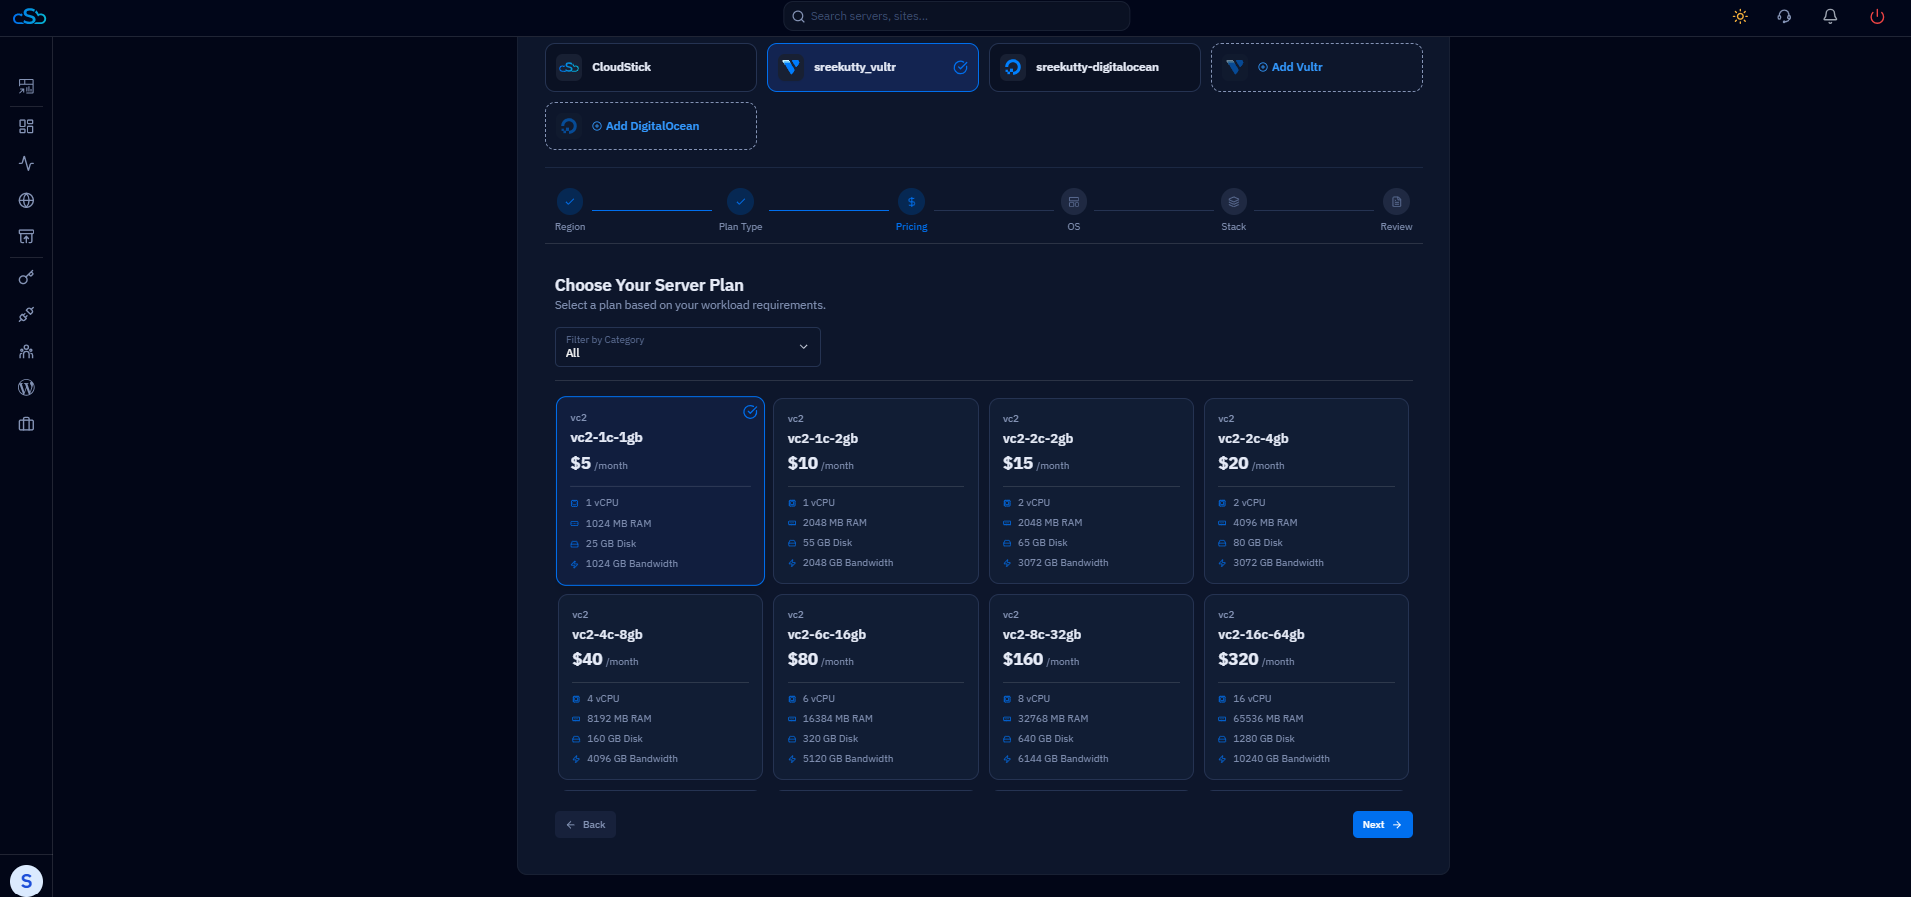
Fig. 04 — Choose Your Server Plan step showing available plans with vCPU, RAM, disk, and pricing details.
Step 5: Select the Operating System
The OS step lets you choose the base operating system for your server. CloudStick currently supports two Ubuntu LTS versions, both of which are fully compatible with OpenLiteSpeed.
Ubuntu 22.04 LTS x64: The previous long-term support release. Stable and well-tested with all CloudStick features.
Ubuntu 24.04 LTS x64: The current long-term support release. Recommended for new servers — includes a newer kernel and system libraries.
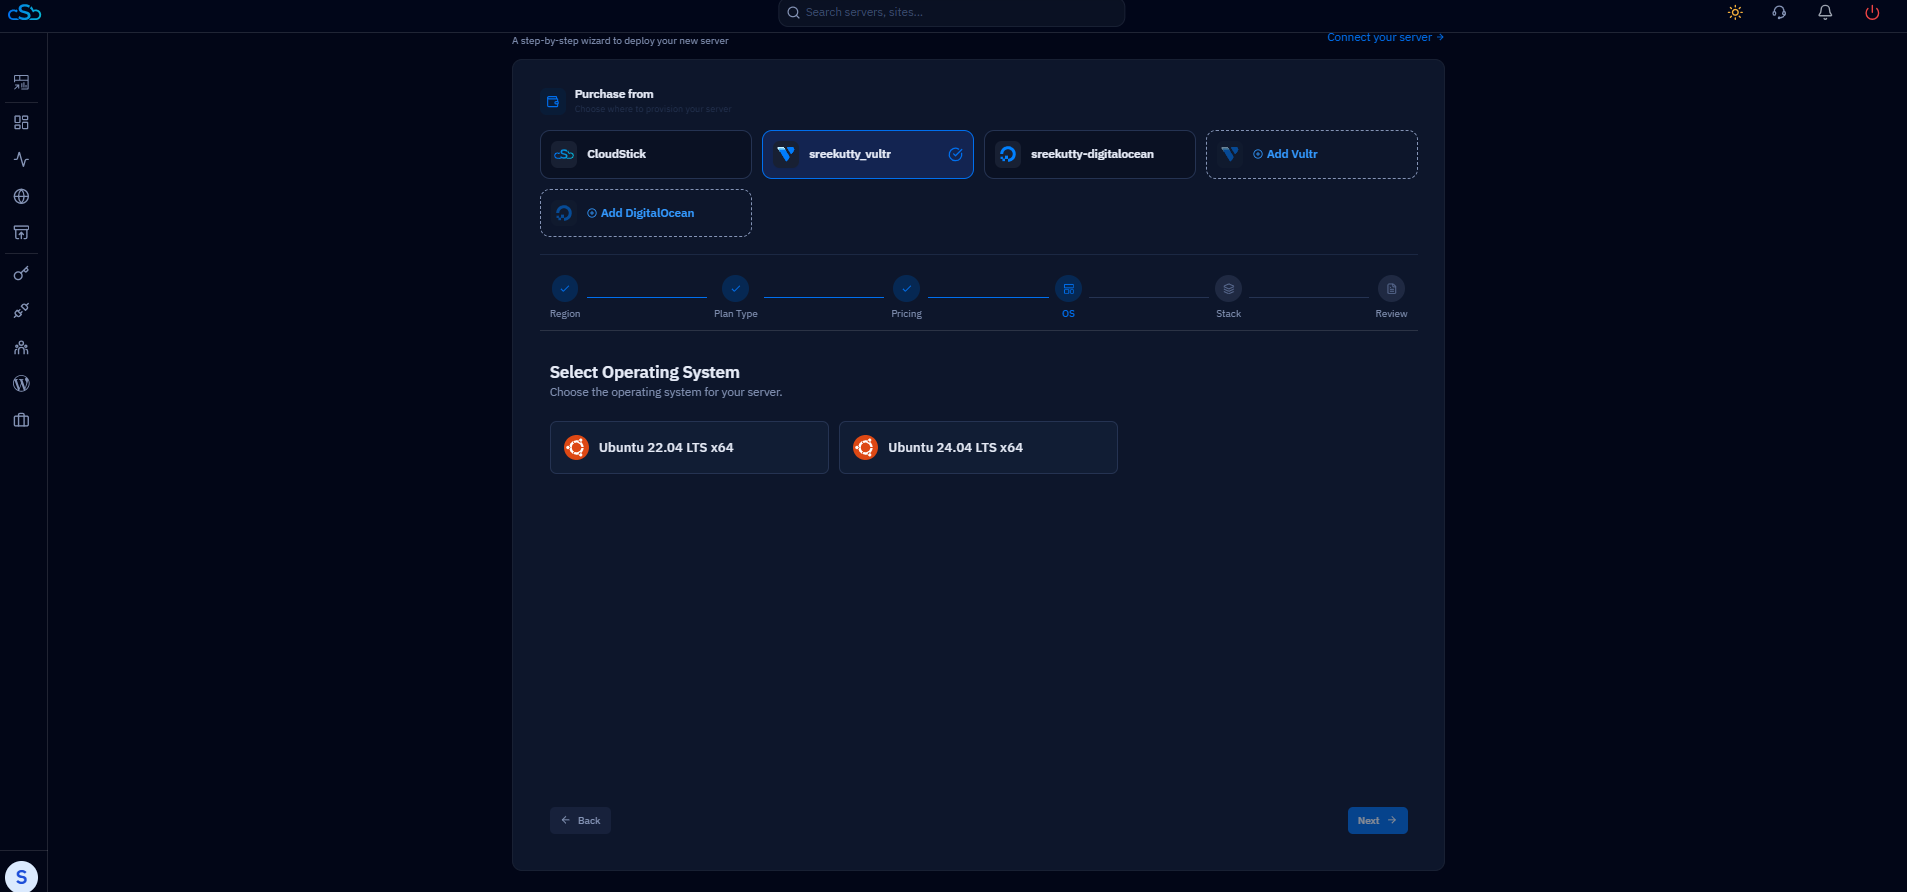
Fig. 05 — Select Operating System step showing Ubuntu 22.04 LTS and Ubuntu 24.04 LTS x64 options.
Step 6: Select OpenLiteSpeed as the Web Server Stack
This is the key step — the Stack selection determines which web server CloudStick installs and configures on your server. Choose OpenLiteSpeed for its performance advantages with WordPress: native LSCache support, built-in HTTP/3, and efficient PHP handling through LSPHP.
Nginx: The default stack (Nginx or Nginx + Apache). Best for general-purpose PHP apps, Node.js, and mixed workloads.
OpenLiteSpeed: High performance — ideal for WordPress. Select this option for your WordPress-optimised server.
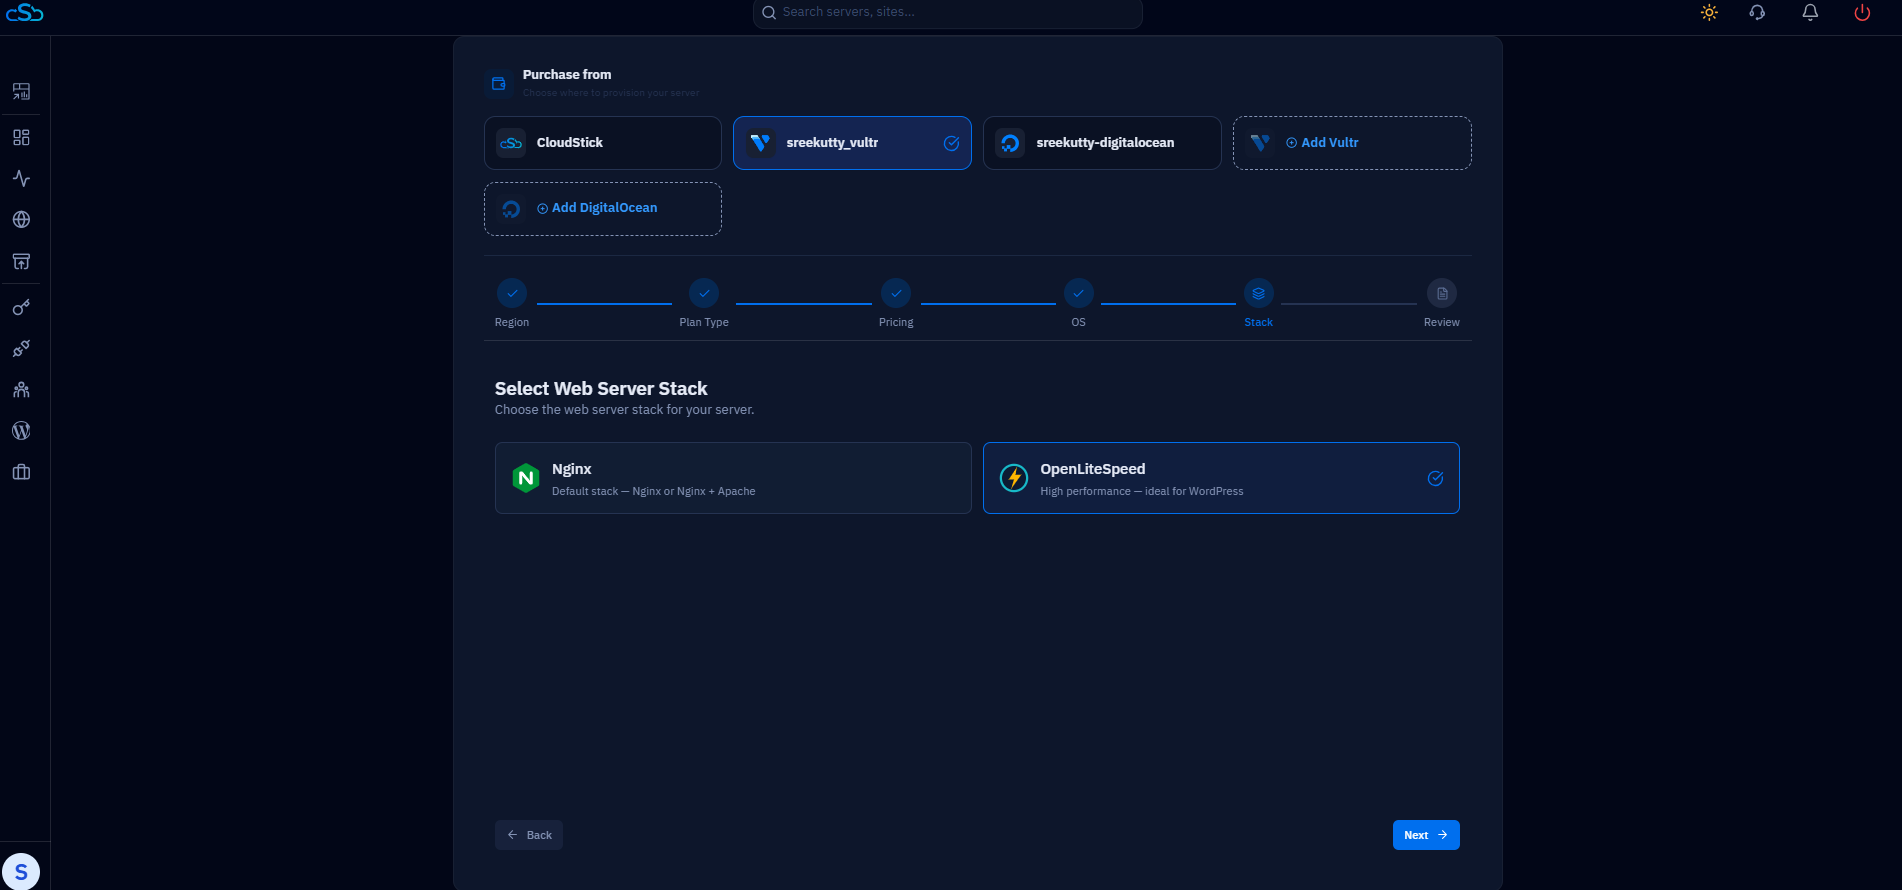
Fig. 06 — Select Web Server Stack step with OpenLiteSpeed selected, highlighted in blue with a checkmark.
Step 7: Name Your Server and Review the Configuration
The final step before launch is the Review & Launch page. Here you give your server a unique name to identify it in the CloudStick dashboard, and review a full configuration summary — region, plan, OS, web server stack, and monthly cost — before committing.
1. Enter a server name: Type a descriptive name in the Server Name field (e.g. cs-openspeed, my-wordpress-server). This name appears on your CloudStick dashboard and helps you identify the server at a glance.
2. Review the Configuration Summary: Confirm all details are correct: Country/Region, Plan Type, Server Plan, Storage, Bandwidth, Operating System, Web Server Stack, and Monthly Price.
3. Click Launch Server: Once satisfied with the configuration, click the Launch Server button in the bottom-right corner to begin provisioning.
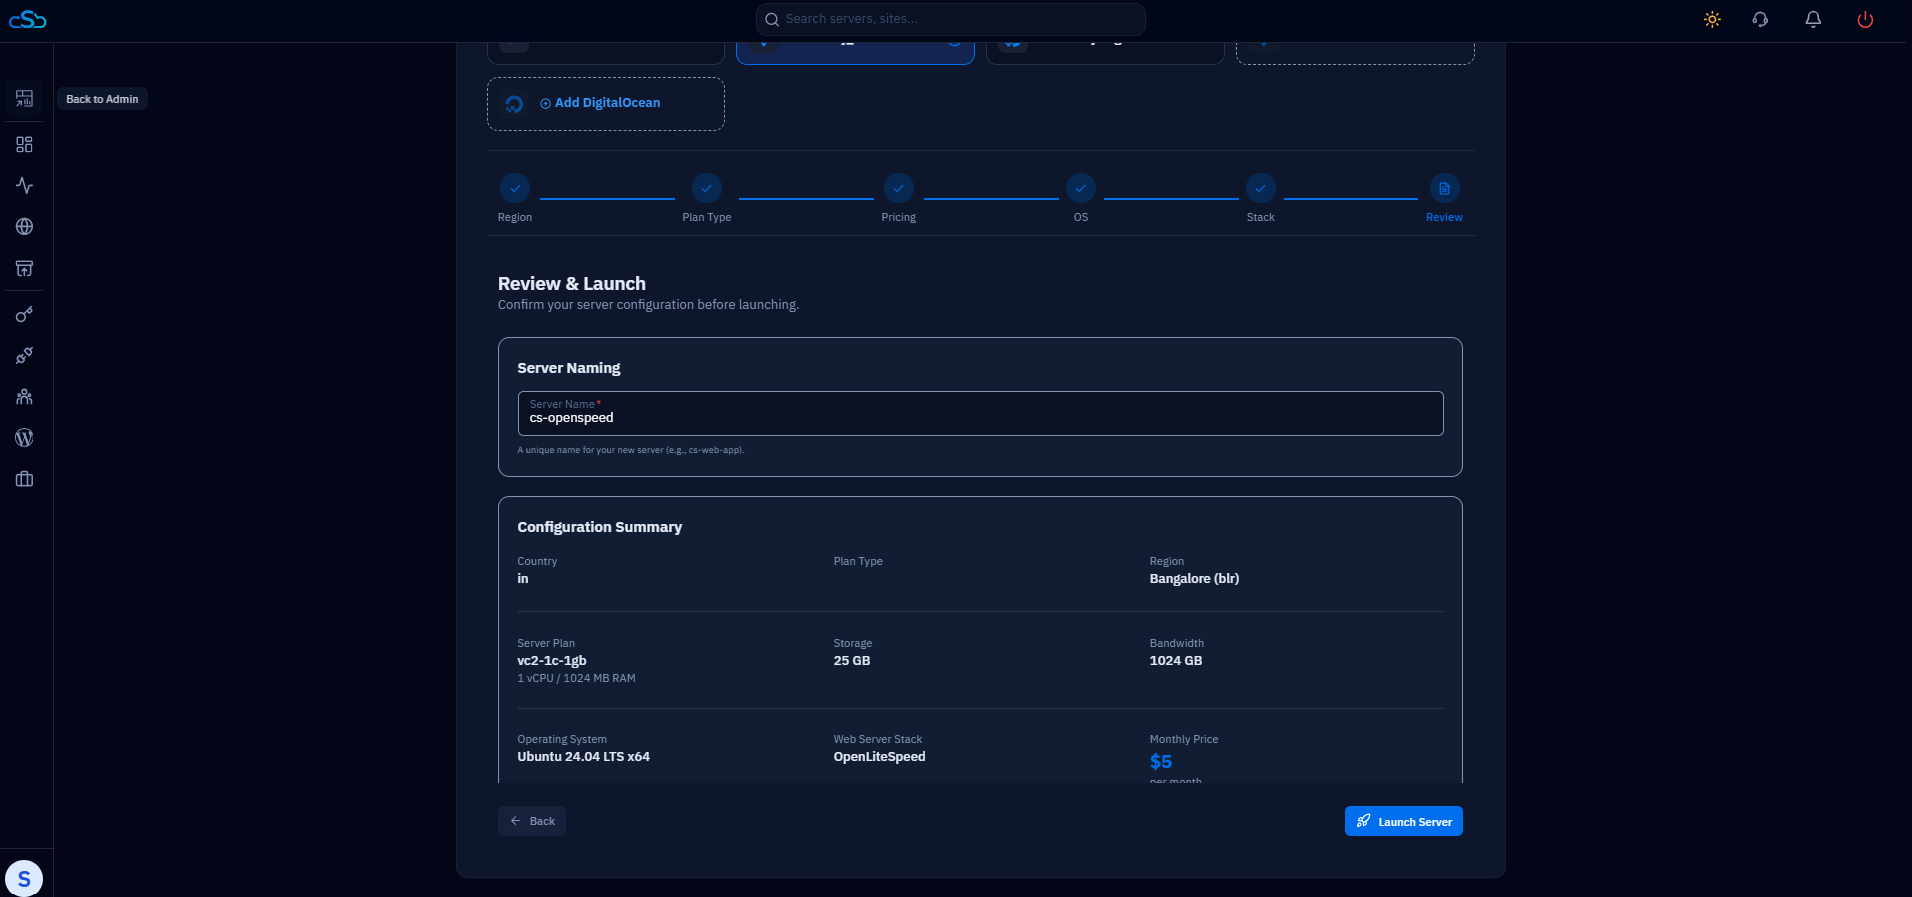
Fig. 07 — Review & Launch page showing the server name input field and full configuration summary before launch.
Step 8: Launch and Monitor the Installation
After clicking Launch Server, CloudStick immediately begins provisioning the server with your cloud provider and installing the OpenLiteSpeed stack. A new server card appears on your dashboard showing the provisioning status, and you can open the real-time Installation Logs to watch each step as it completes.
1. Watch the dashboard: Your new server card appears on the dashboard with a 'Creating' or 'Provisioning' status indicator. CloudStick is requesting the server from your cloud provider.
2. Click View Installation Logs: Click View Installation Logs on the server card to open the live log viewer. This shows every installation step in real time — package installation, OpenLiteSpeed configuration, CSF Firewall setup, and the CloudStick agent installation.
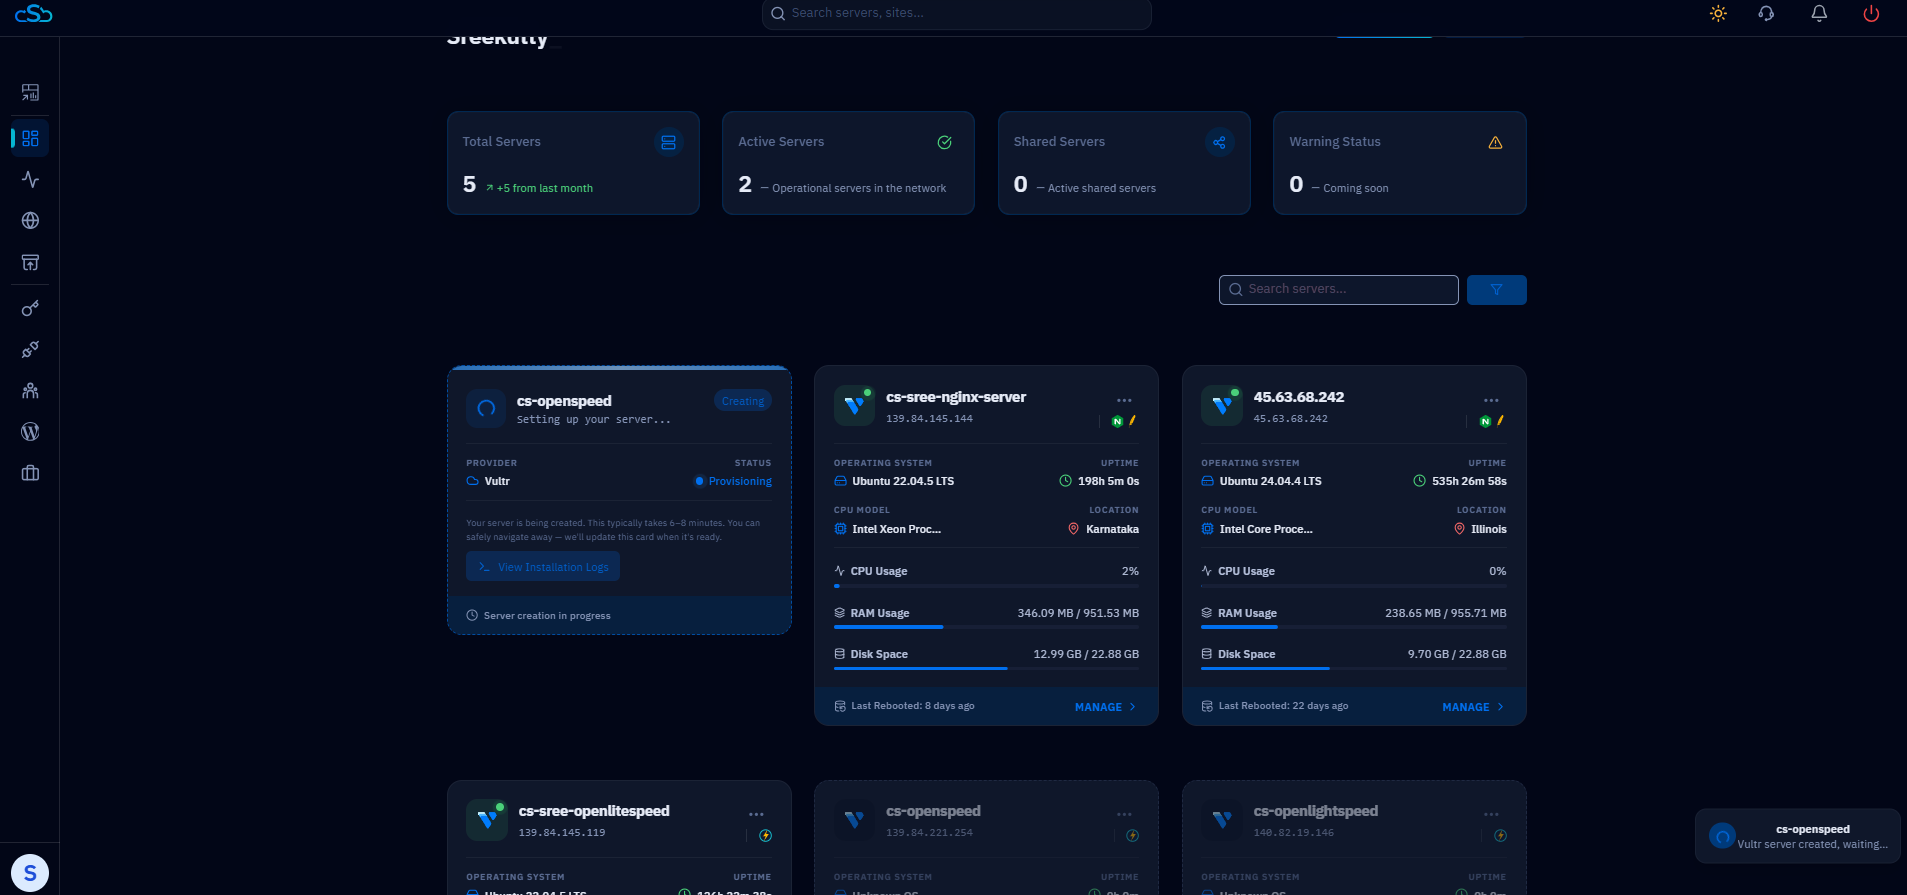
Fig. 08 — CloudStick dashboard showing a new server being provisioned with the Installation Logs panel open.
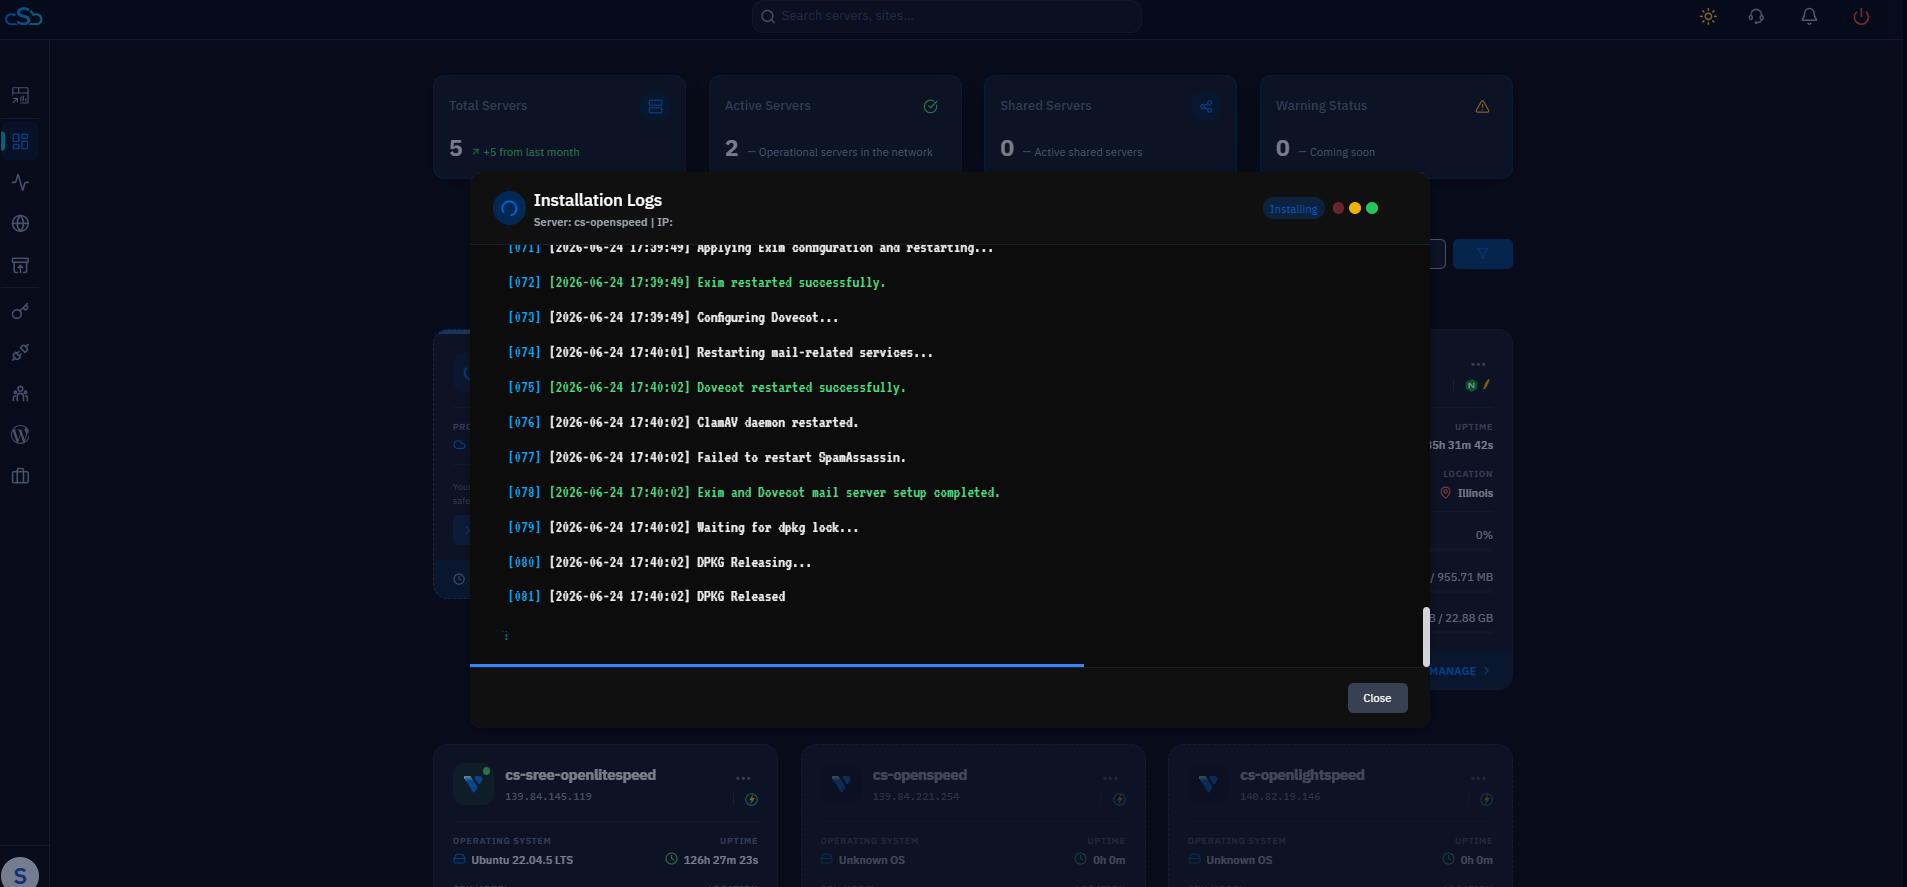
Fig. 09 — Real-time installation log viewer showing OpenLiteSpeed stack packages being configured step by step.
Step 9: Complete Setup and Verify Your Server
When all installation steps finish, the log viewer displays an Installation Complete badge and the final log line reads INSTALL_DONE. Click Complete to dismiss the installer and return to the dashboard, where your new server appears as an active, fully managed server ready for use.
1. Click Complete: When the log shows 'CloudStick installation is completed... Happy Computing..!' and the Installation Complete badge appears, click the Complete button to finalise the setup.
2. Verify on the dashboard: Your server now appears as an active server card on the CloudStick dashboard showing OpenLiteSpeed as the web stack, the correct OS, uptime counter, and live resource stats.
3. Start deploying: Click MANAGE on the server card to open the server panel. You can now create websites, install WordPress, configure DNS, set up SSL, and manage everything from the CloudStick dashboard.
Your OpenLiteSpeed server is pre-configured with CSF Firewall, the CloudStick agent, and all necessary services. No manual post-installation configuration is required — you can deploy your first WordPress site immediately.
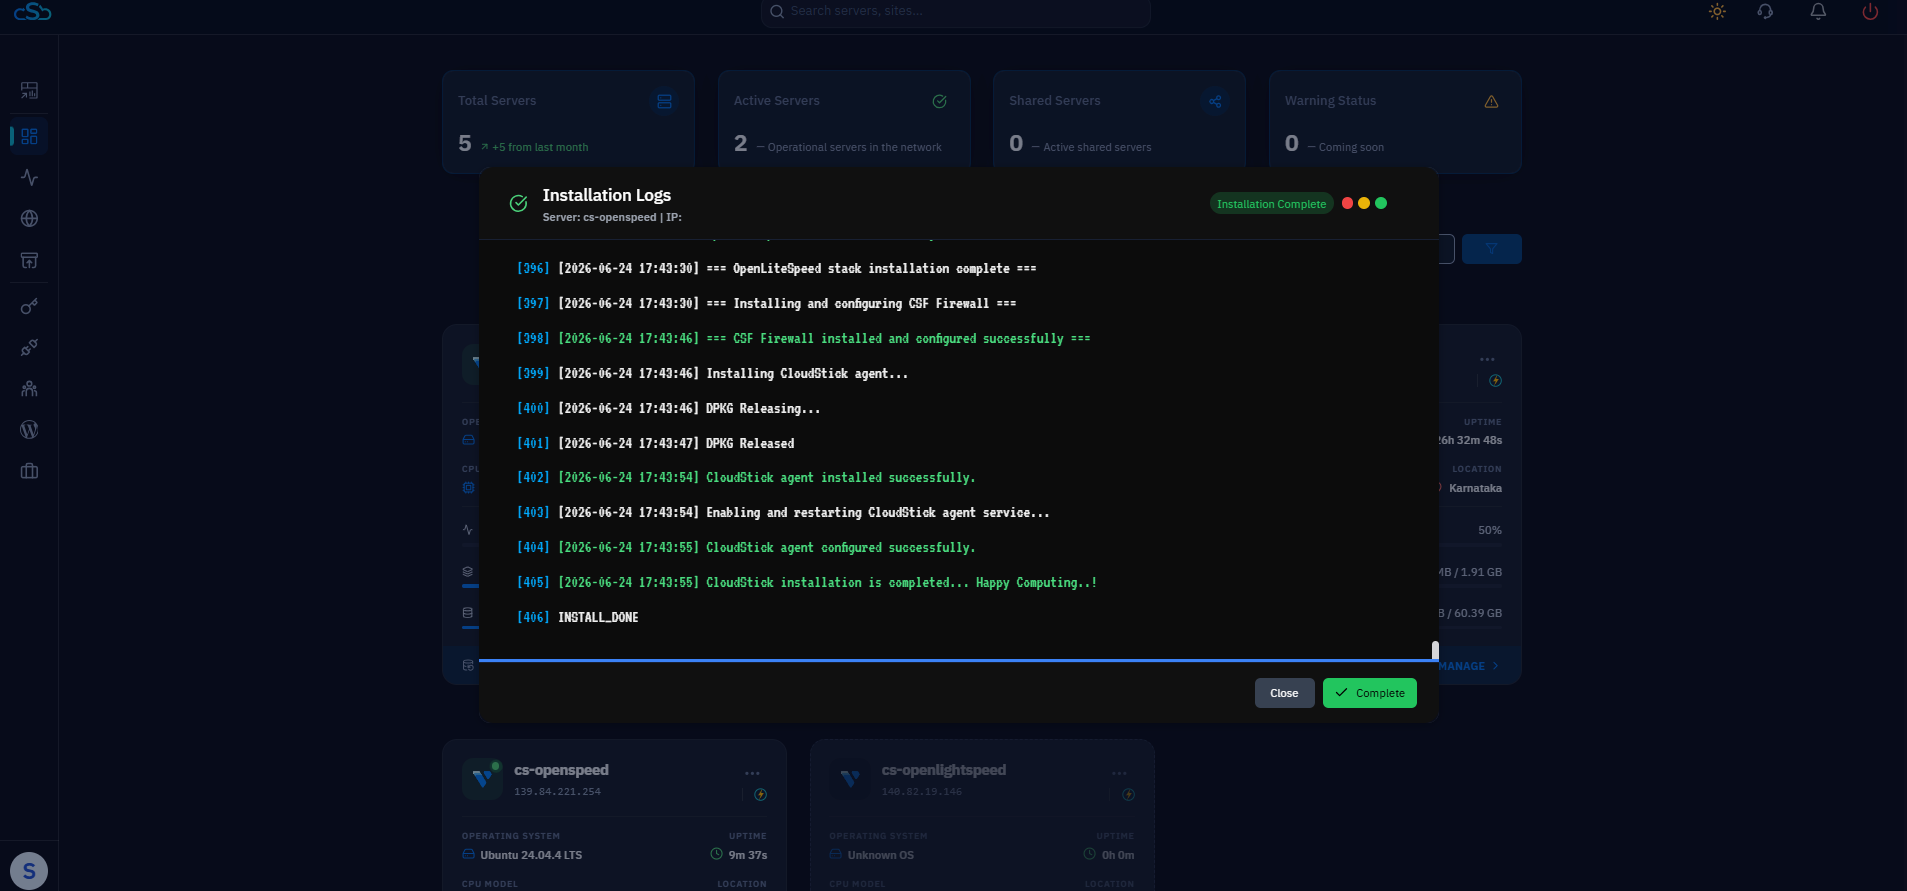
Fig. 10 — Installation log showing 'Installation Complete' status with the Complete button ready to click.
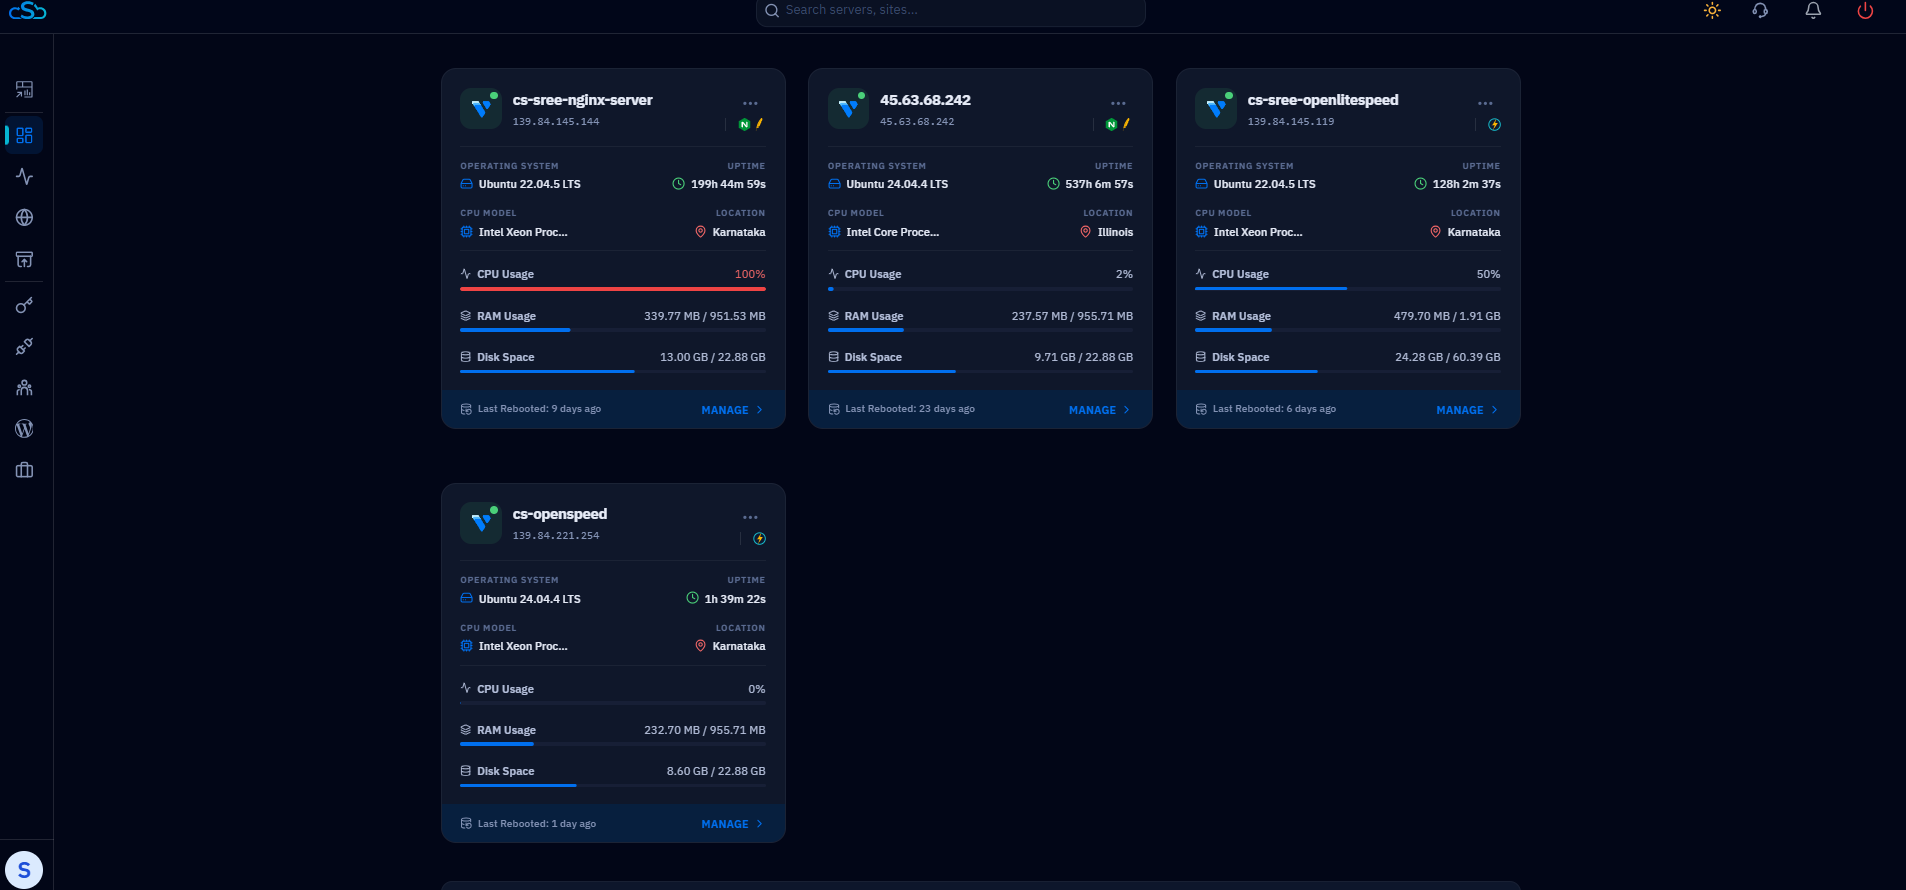
Fig. 11 — CloudStick dashboard with the new OpenLiteSpeed server now active alongside other managed servers.