How to Integrate a Cloudflare Account into CloudStick
Overview
CloudStick's Cloudflare integration lets you manage your DNS records, benefit from Cloudflare's global CDN, and protect your sites from DDoS attacks — all without leaving the CloudStick dashboard. Once connected, CloudStick automatically fetches all domains linked to your Cloudflare account and gives you a unified view of your DNS zones.
This guide walks you through retrieving your Cloudflare Global API Key and adding the integration to CloudStick. You will also learn how to update the integration and use the built-in DNS Manager to manage your domain records directly.
Prerequisites: You need a valid Cloudflare account and access to its API Tokens page. Make sure you have access to the email address registered with Cloudflare, as Cloudflare will send a verification code before revealing the API key.
Step 1: Get the Cloudflare Secret Key
Before connecting Cloudflare to CloudStick, you need your Cloudflare Global API Key — the credential CloudStick uses to authenticate API requests on your behalf.
1. Log in to Cloudflare
Visit cloudflare.com and sign in to your account.
Once logged in, you will land on the Cloudflare dashboard or support portal.
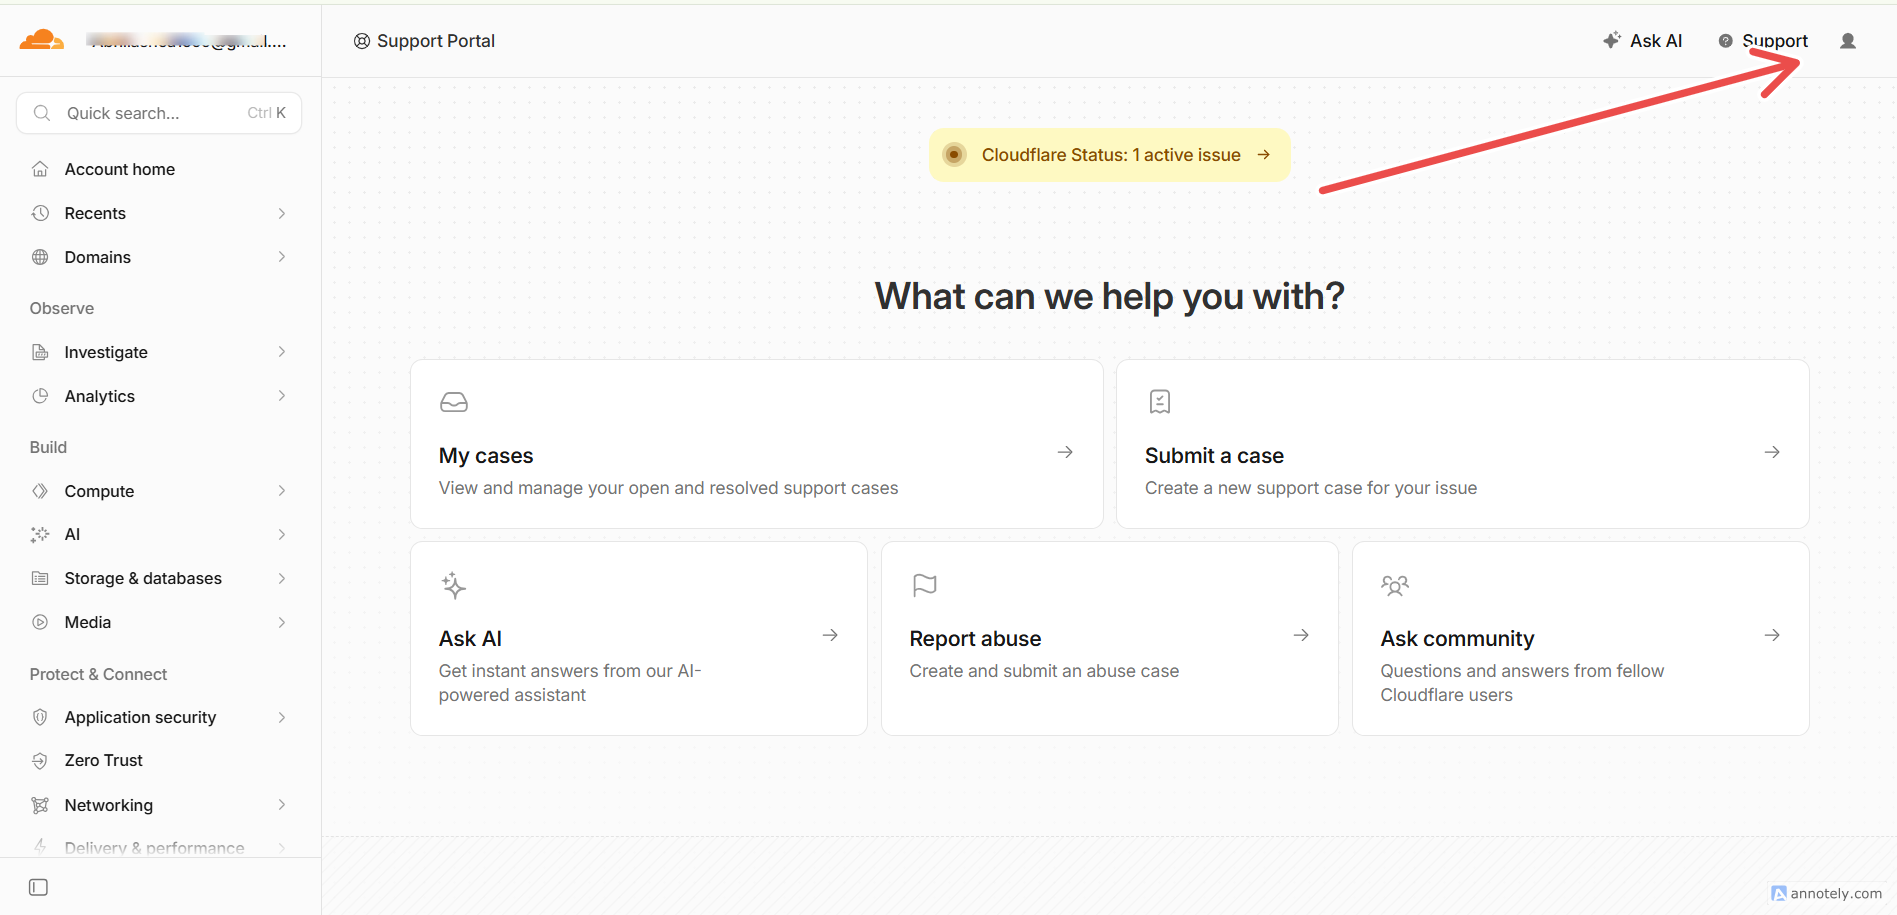
Fig. 01 — Cloudflare portal after a successful login.
2. Open My Profile
Click on your profile icon in the top-right corner of the Cloudflare dashboard.
Select My Profile from the dropdown menu.
3. Navigate to API Tokens
In the left-hand navigation of your profile, click API Tokens.
Scroll down past the API Tokens section to find the API Keys section.
Locate the Global API Key row and click the View button on the right.
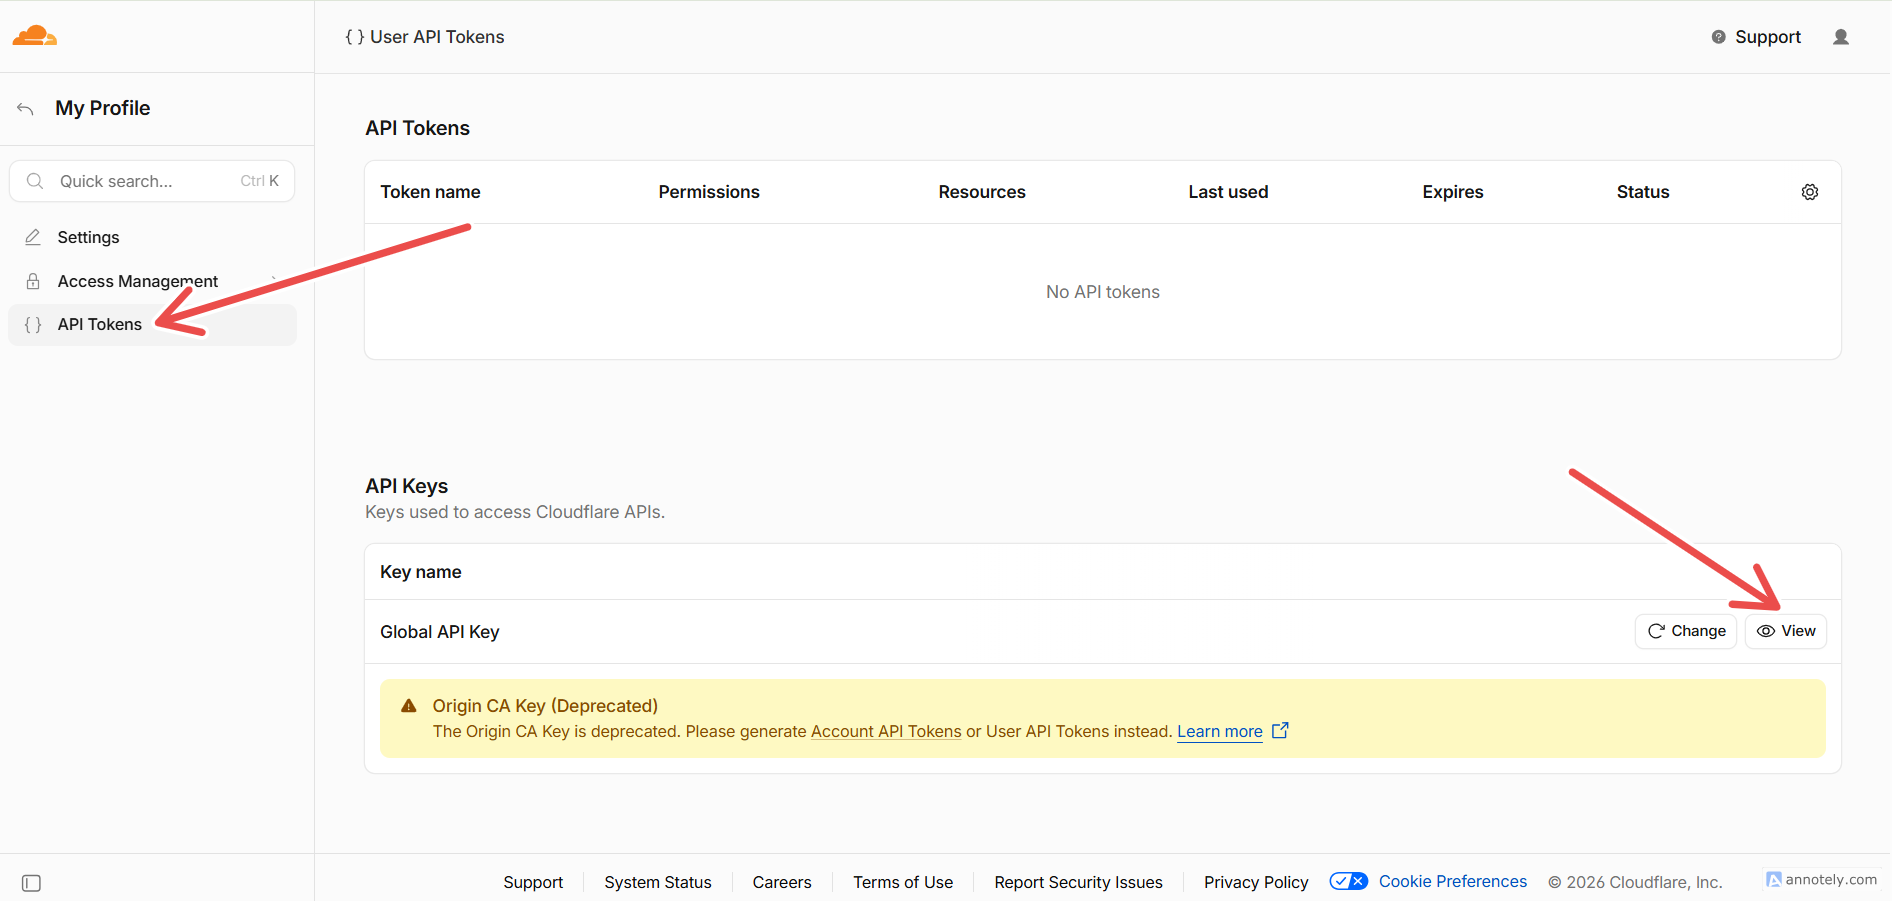
Fig. 02 — API Tokens page showing the Global API Key row with the View button.
4. Verify Your Identity
Cloudflare protects your API key behind an email-based identity check. A modal will appear asking you to confirm it is really you before the key is revealed.
In the Verify Your Identity modal, click Send Verification Code.
Cloudflare will send a one-time code to the email address registered on your account.
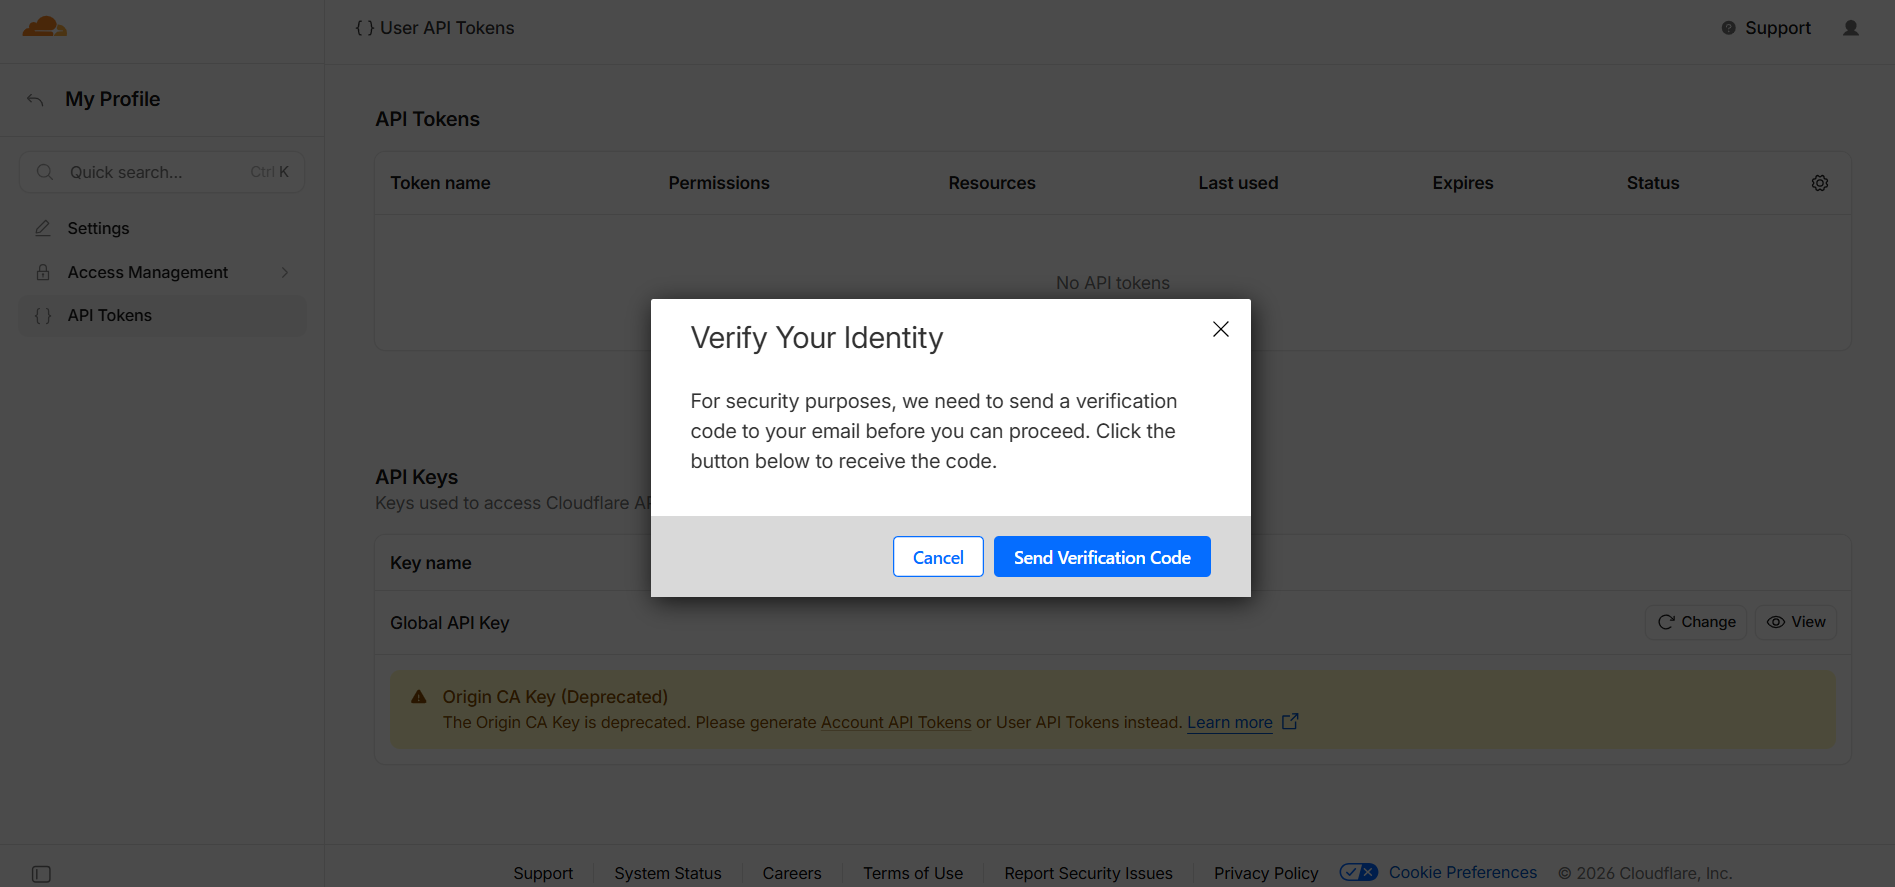
Fig. 03 — Verify Your Identity modal prompting you to send a verification code.
Open your inbox and find the email from Cloudflare with the subject "Your Cloudflare login token". Check your spam folder if it does not appear within a minute.
Note the 7-digit verification code inside the email.
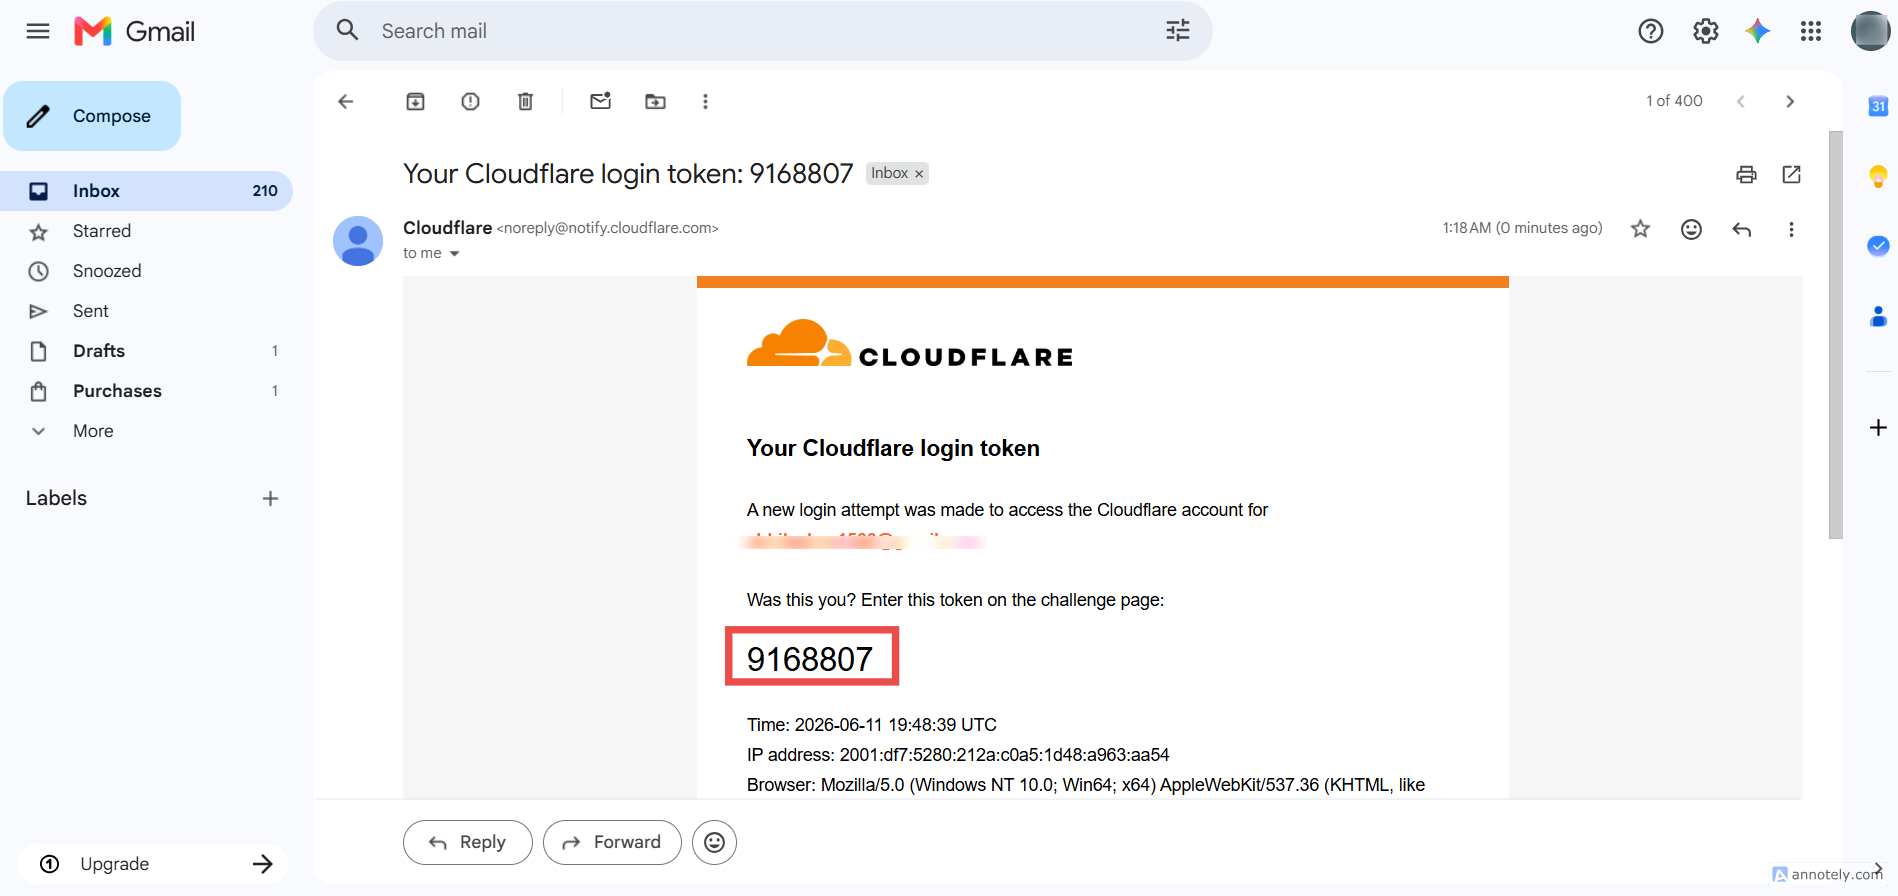
Fig. 04 — Verification email from Cloudflare containing the 7-digit login token.
5. Enter the Verification Code
Return to the Cloudflare API Tokens page and type the 7-digit code into the Verify code field.
Click Verify. A green Success! message will confirm the code was accepted.
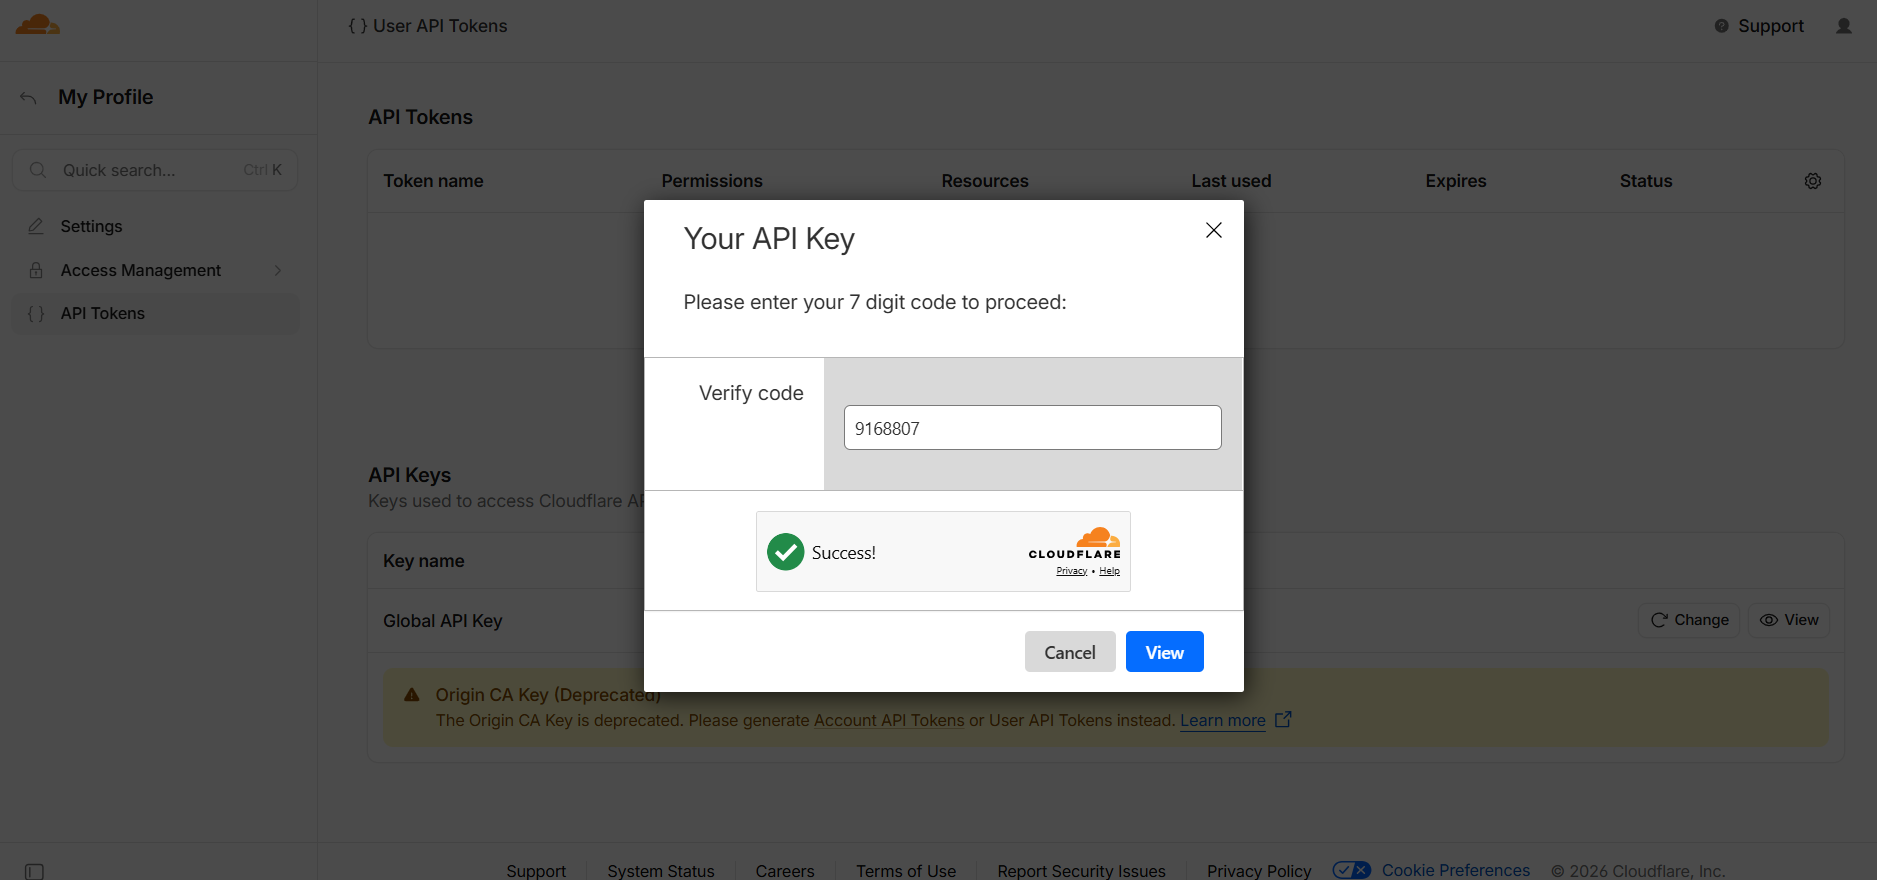
Fig. 05 — Verification code entered with a Success confirmation in the modal.
6. Copy the Global API Key
After successful verification, the modal updates to show your Global API Key.
Click Click to copy to copy the key to your clipboard. Keep it safe — treat it like a password.
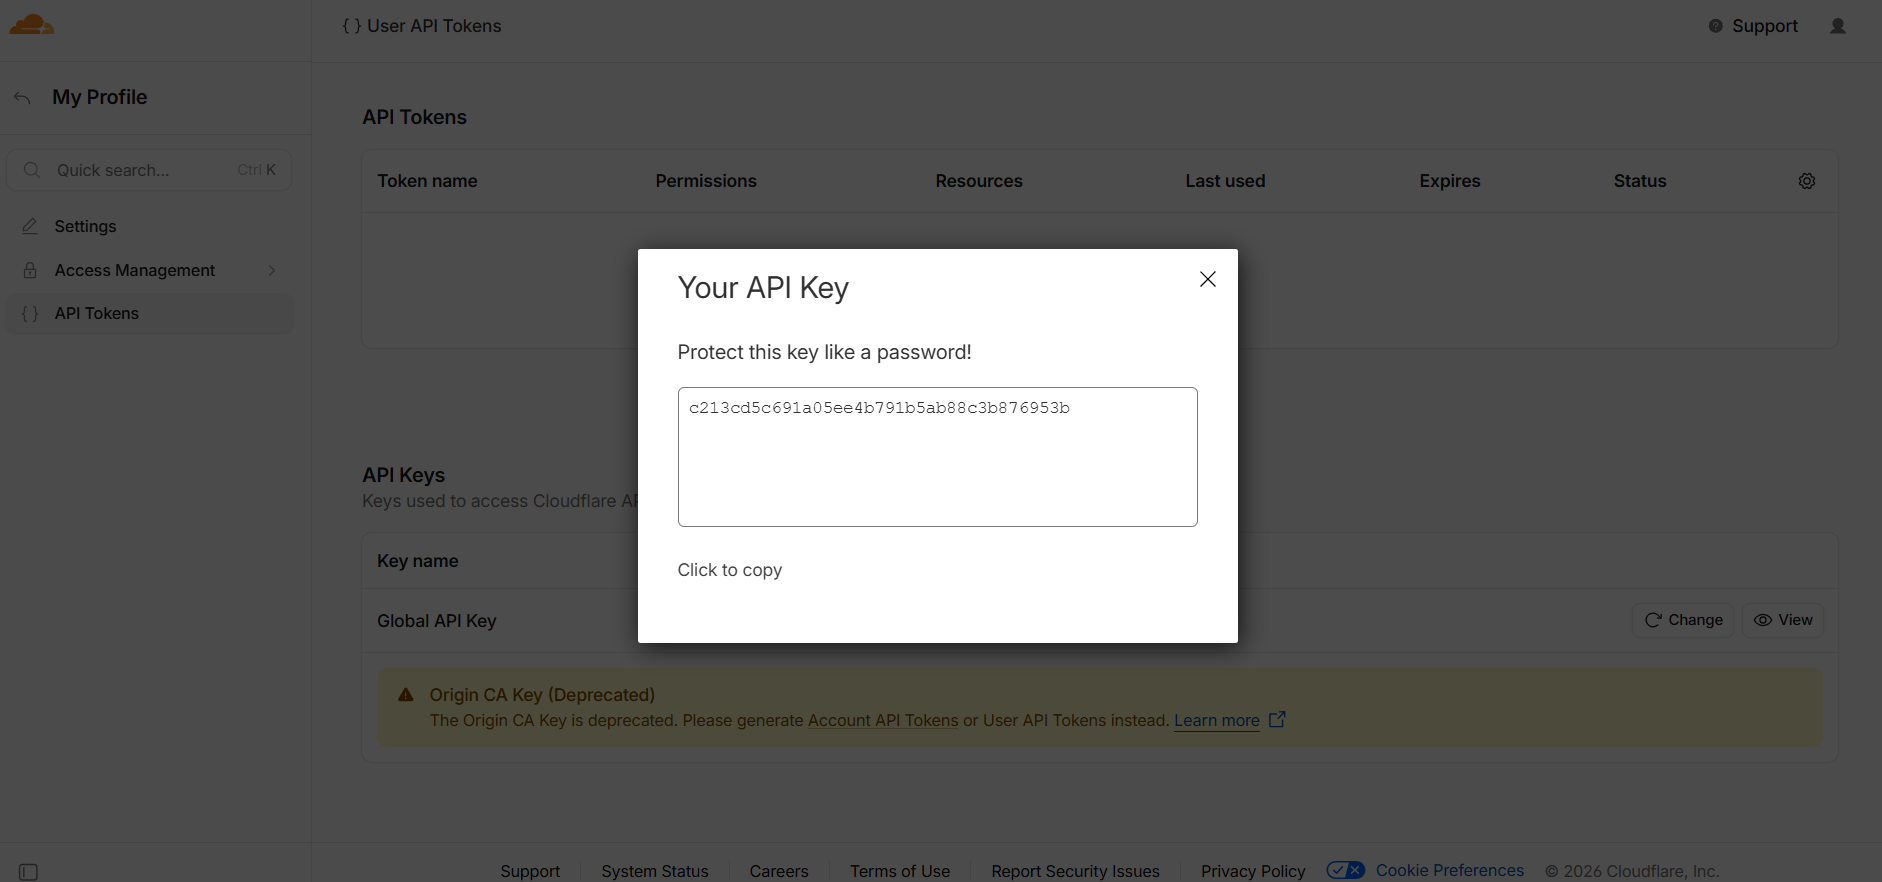
Fig. 06 — Global API Key revealed with the Click to copy option.
Keep your Global API Key private. Anyone with this key can make changes to your Cloudflare account. Never share it publicly or commit it to version control.
Step 2: Open Third-Party Integrations in CloudStick
With your Cloudflare API key in hand, log in to your CloudStick dashboard and navigate to the integrations section where external services are managed.
Log in to your CloudStick dashboard at app.cloudstick.io.
In the left-hand navigation, click the 3rd Party Integrations icon (the rocket/integrations icon highlighted in the screenshot below).
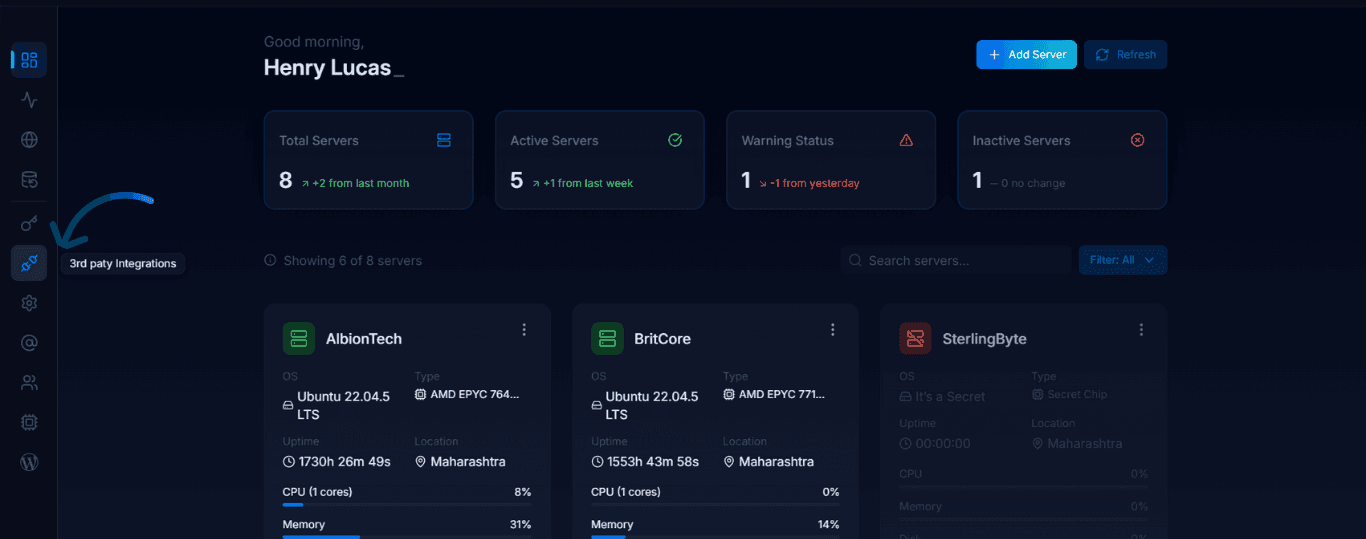
Fig. 07 — CloudStick dashboard with the 3rd Party Integrations navigation item highlighted.
Step 3: Select and Configure Cloudflare
From the 3rd Party Integration page, add a new Cloudflare integration by selecting the provider and filling in your credentials.
1. Click Add New
On the 3rd Party Integration page, click the + Add New button in the top-right corner.
This opens the provider selection screen.
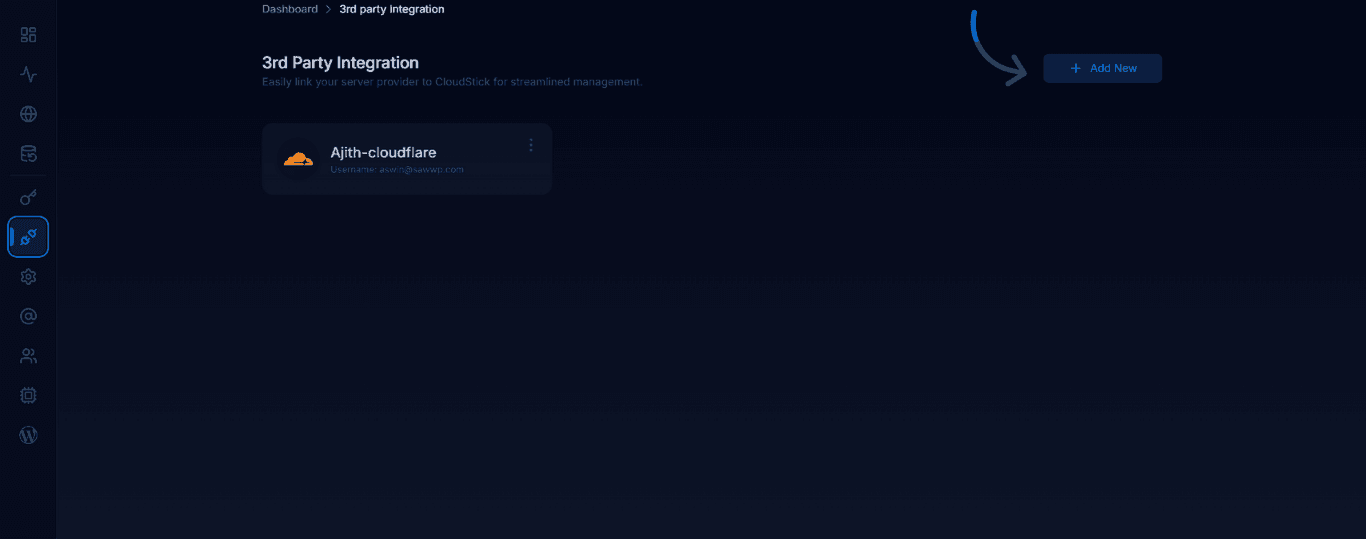
Fig. 08 — 3rd Party Integration page with the + Add New button in the top-right corner.
2. Select Cloudflare
On the Select Provider screen, locate the Cloudflare card (shown with the Cloudflare logo).
Click the Cloudflare card to select it as your integration provider.
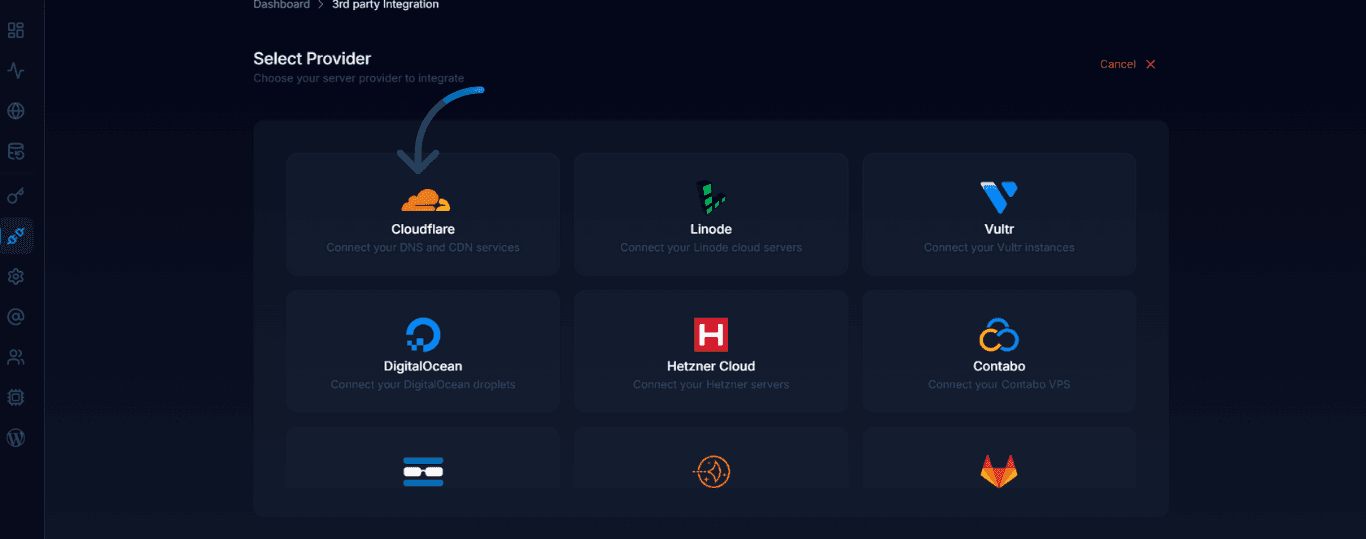
Fig. 09 — Provider selection screen with the Cloudflare card highlighted.
3. Enter Integration Details
You will be taken to the Integration Details form. Fill in all three required fields:
Integration Label: A friendly name to identify this integration (e.g., "My Cloudflare" or your company name). You can change this later.
Username / Email ID / Key ID: Enter the email address associated with your Cloudflare account.
Secret Key: Paste the Global API Key you copied from Cloudflare in the previous step.
Your integration credentials are encrypted and securely stored by CloudStick, as indicated by the "Secure Credentials" notice at the bottom of the form.
Once all fields are filled, click the Connect Integration button in the bottom-right corner.
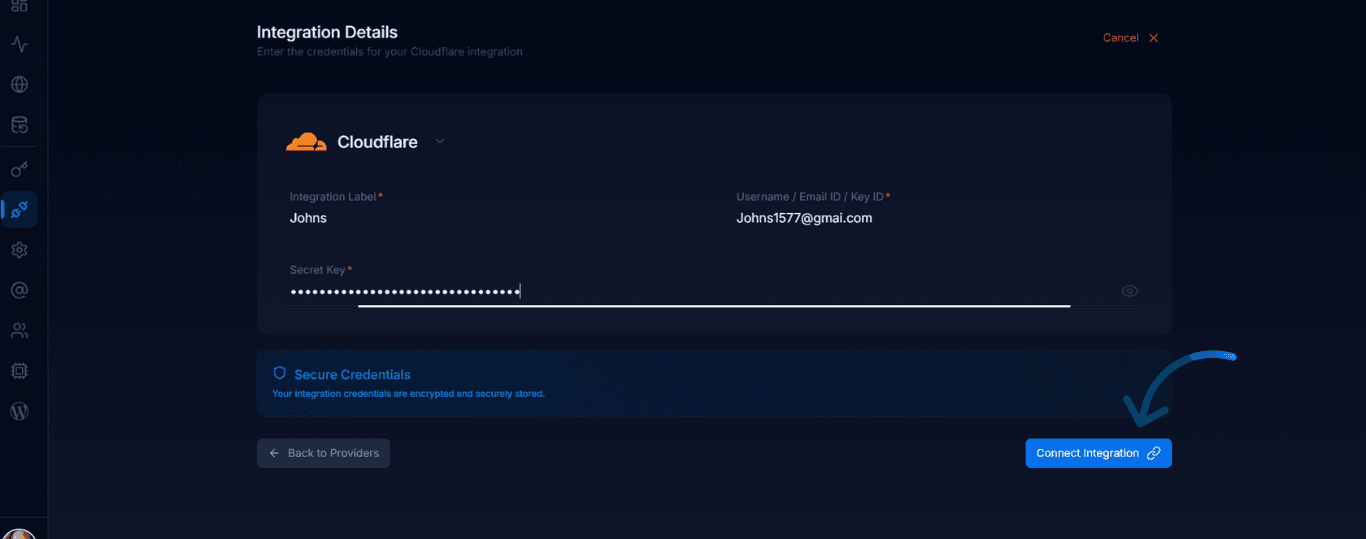
Fig. 10 — Integration Details form filled in with label, email, and Secret Key before clicking Connect Integration.
Step 4: Complete the Integration
After clicking Connect Integration, CloudStick validates your credentials with Cloudflare and saves the integration. A success notification will confirm the connection.
If the credentials are correct, a green toast notification reading "Integration Added Successfully — Your integration has been added successfully." will appear at the bottom of the screen.
Your Cloudflare integration card will now appear on the 3rd Party Integration page, showing the label you set and the associated Cloudflare email address.
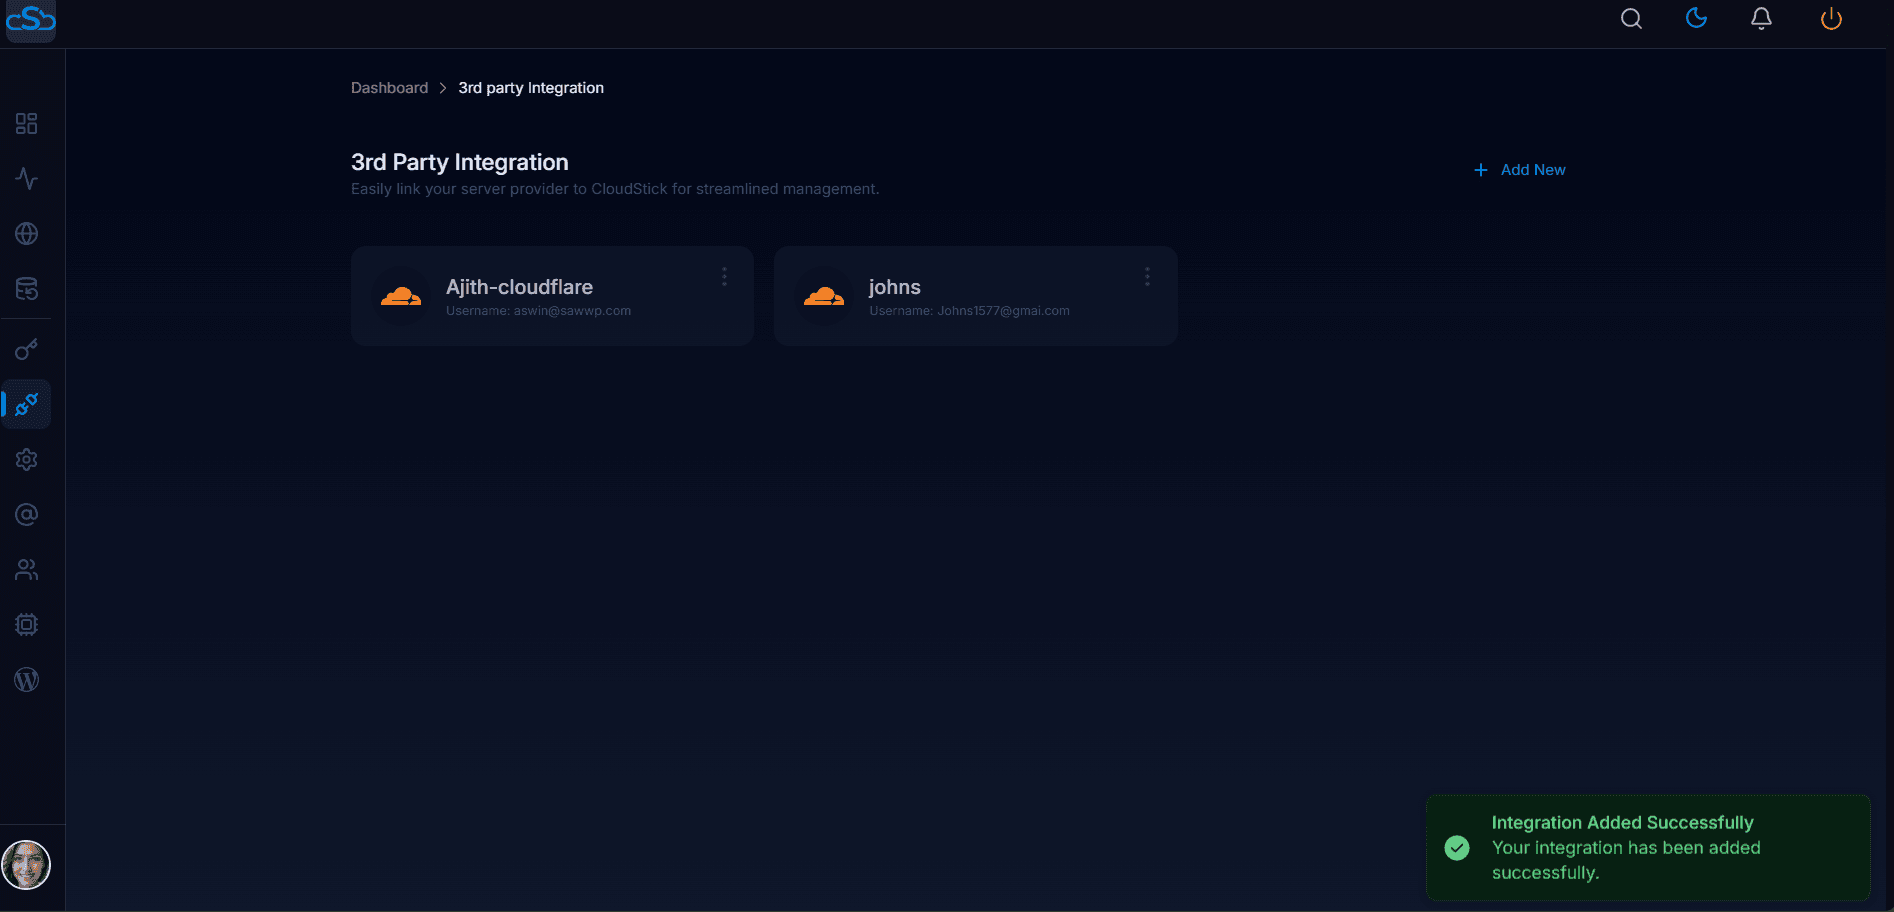
Fig. 11 — 3rd Party Integration page showing the newly added Cloudflare integration with the success toast.
Step 5: Manage Your Integration
After the integration is created, you can edit its label or update credentials at any time. Each integration card on the 3rd Party Integration page has action controls.
1. Access the Edit Controls
On the 3rd Party Integration page, hover over your Cloudflare integration card.
Click the three-dot menu (⋮) on the card to reveal the Edit (pencil) and Delete (trash) icons.
Click the Edit icon to open the update form.

Fig. 12 — Integration card with the Edit and Delete icons visible via the three-dot menu.
2. Update the Integration
The Integration Details form will open pre-filled with the existing values.
Make your changes — for example, update the Integration Label to a new name.
Click Update Integration to save the changes.
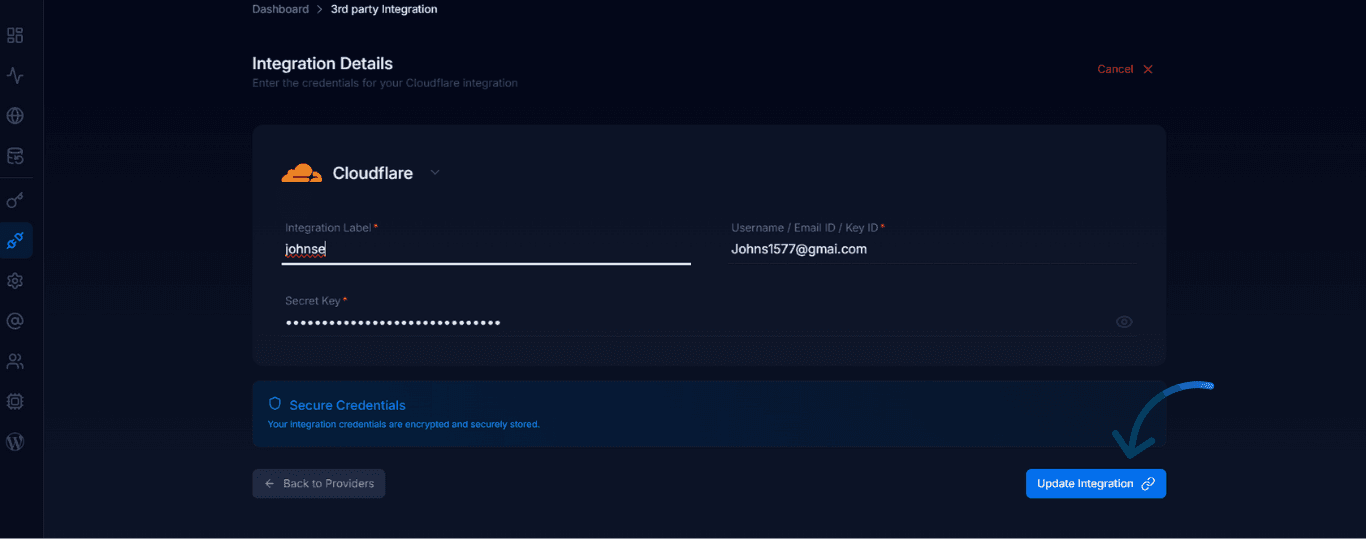
Fig. 13 — Integration Details form showing the Update Integration button for editing the label or credentials.
A green toast reading "Integration Updated Successfully" will confirm that the changes were saved.
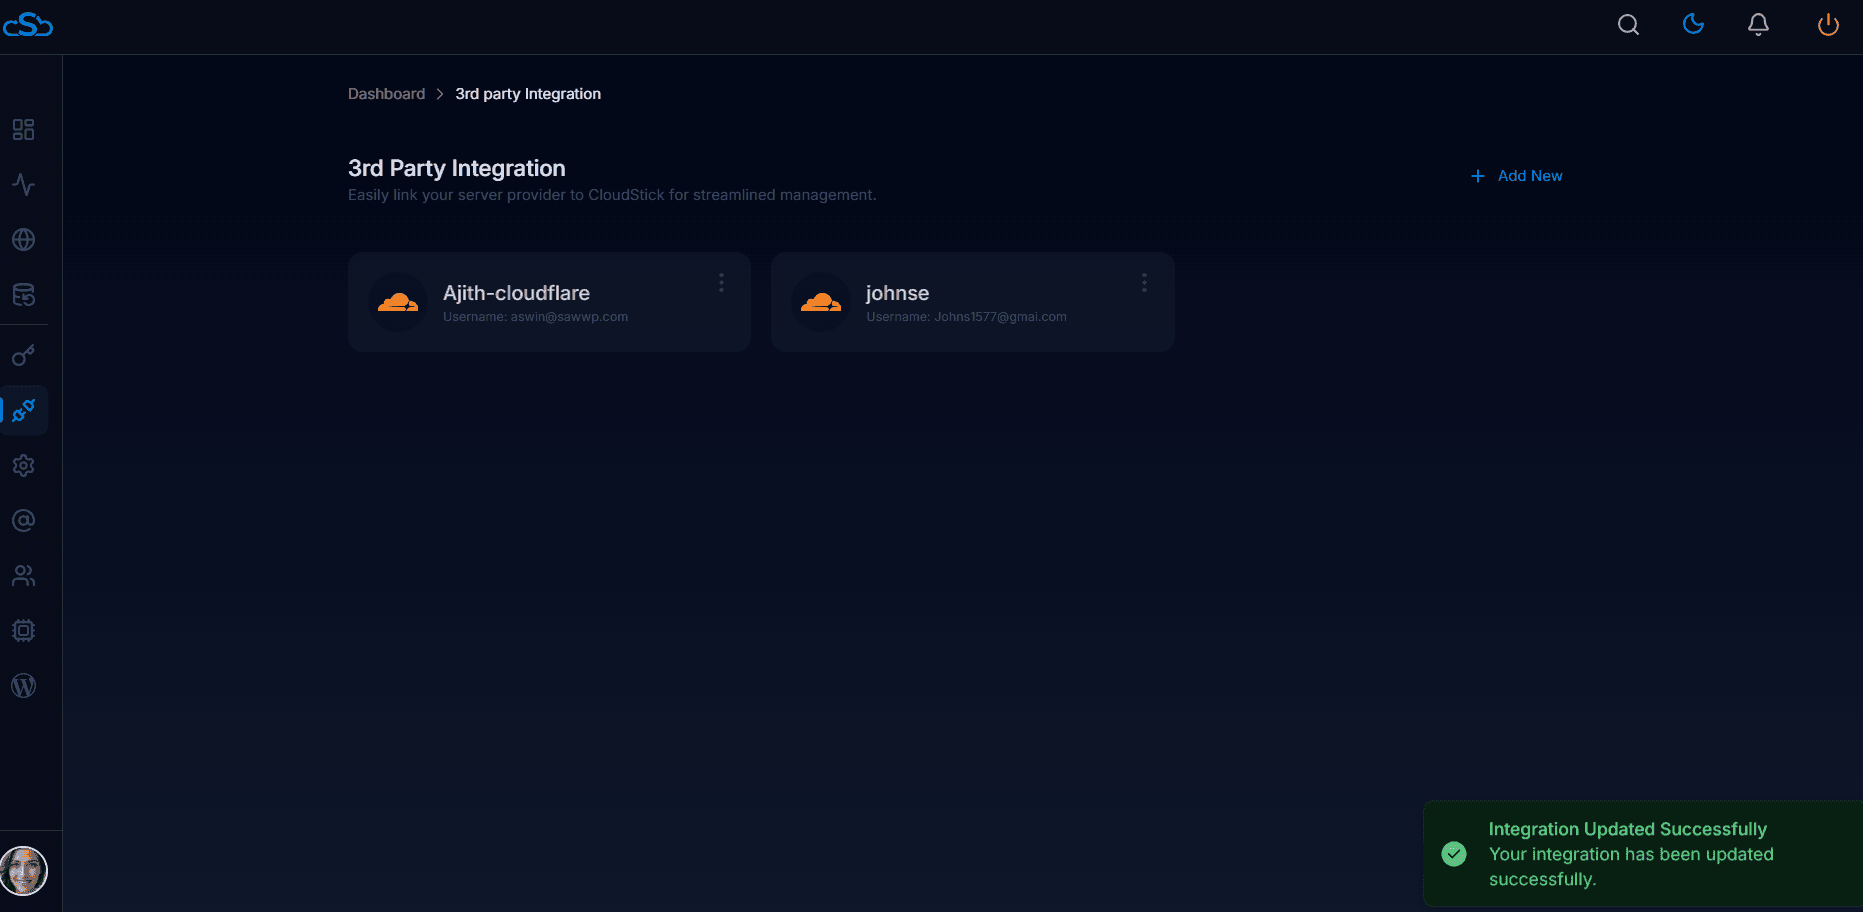
Fig. 14 — 3rd Party Integration page with the Integration Updated Successfully toast notification.
Step 6: Manage DNS via CloudStick
Once the Cloudflare integration is active, CloudStick can fetch all domains associated with your Cloudflare account and let you manage their DNS records directly — no need to log into Cloudflare separately.
In the CloudStick left-hand navigation, click the DNS Manager icon (globe icon).
Select your Cloudflare Integration Label from the dropdown at the top of the DNS Manager page.
CloudStick will automatically fetch and display all domains linked to that Cloudflare account.
Click on any domain card to view and manage its DNS records — add, edit, or delete A, CNAME, MX, TXT, and other record types directly from the dashboard.

Fig. 15 — DNS Manager showing all domains automatically fetched from the connected Cloudflare account.
If your domains do not appear after selecting the integration label, verify that the Cloudflare email and API key entered during setup match your active Cloudflare account credentials.