How to Manage DNS Records
Overview
The CloudStick DNS Manager gives you a unified interface to view, search, edit, and delete DNS records for all domains connected through your Cloudflare integration — without ever logging into Cloudflare directly. Whether you need to update an A record, add a new MX entry, or quickly filter down to a specific record type, everything is accessible from a single page in the CloudStick dashboard.
This guide covers the full DNS record management workflow: opening the DNS Manager, browsing and filtering records, editing or deleting entries, purging the CDN cache, and configuring Cloudflare SSL encryption modes for your domain.
Prerequisites: You need a Cloudflare account integrated with CloudStick and at least one DNS zone connected. If you have not set this up yet, follow the How to integrate a Cloudflare account into CloudStick guide first.
Step 1: Log In to Your CloudStick Account
Start by signing in to your CloudStick dashboard. All connected servers and Cloudflare integrations are accessible from this central view.
Go to the CloudStick dashboard: Visit dash.cloudstick.io and sign in with your credentials.
Confirm you are on the main Dashboard: You should see your connected servers listed with their CPU, RAM, and disk usage stats.
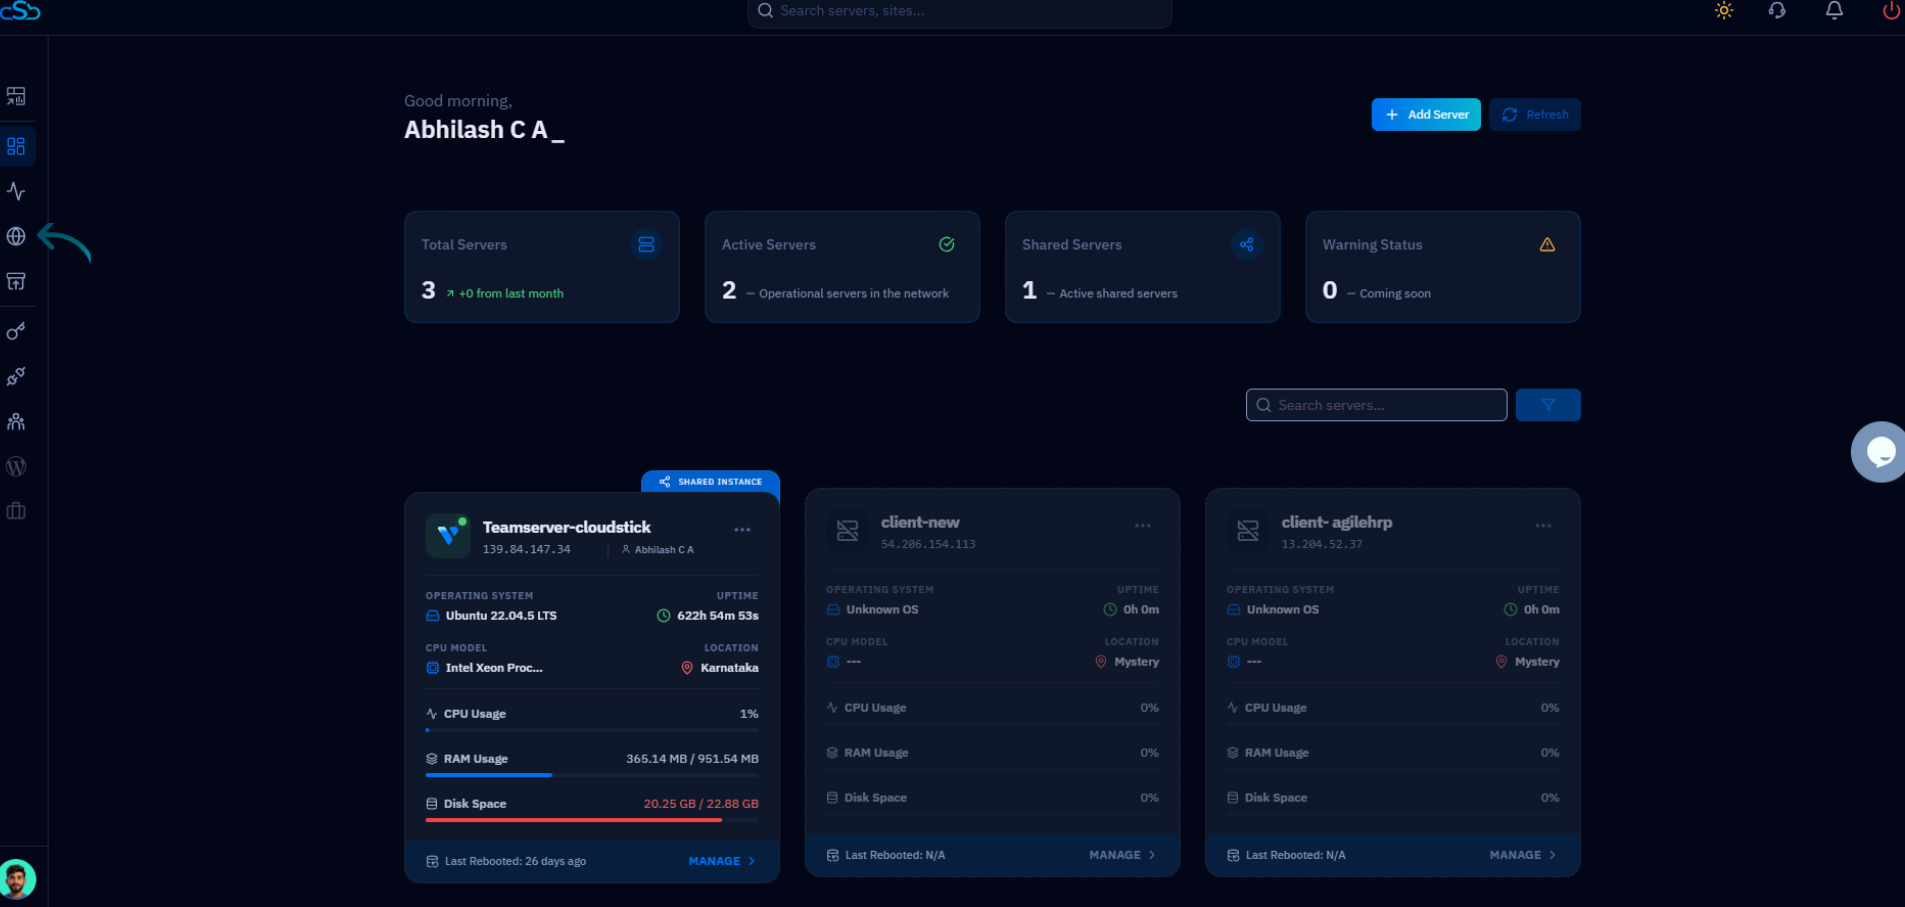
Fig. 01 — CloudStick main dashboard showing connected servers after login.
Step 2: Open the DNS Manager and Select Your Domain
The DNS Manager is a dedicated section in the left-hand navigation that lists all domains associated with your connected Cloudflare account. Selecting a domain opens its full record list.
Click DNS in the left-hand navigation: Look for the globe icon in the sidebar to open the DNS Manager.
Select your Cloudflare integration: Use the dropdown at the top of the DNS Manager to choose the connected Cloudflare account.
Click on a domain card: Your domains appear as clickable cards. Click the domain whose records you want to manage.
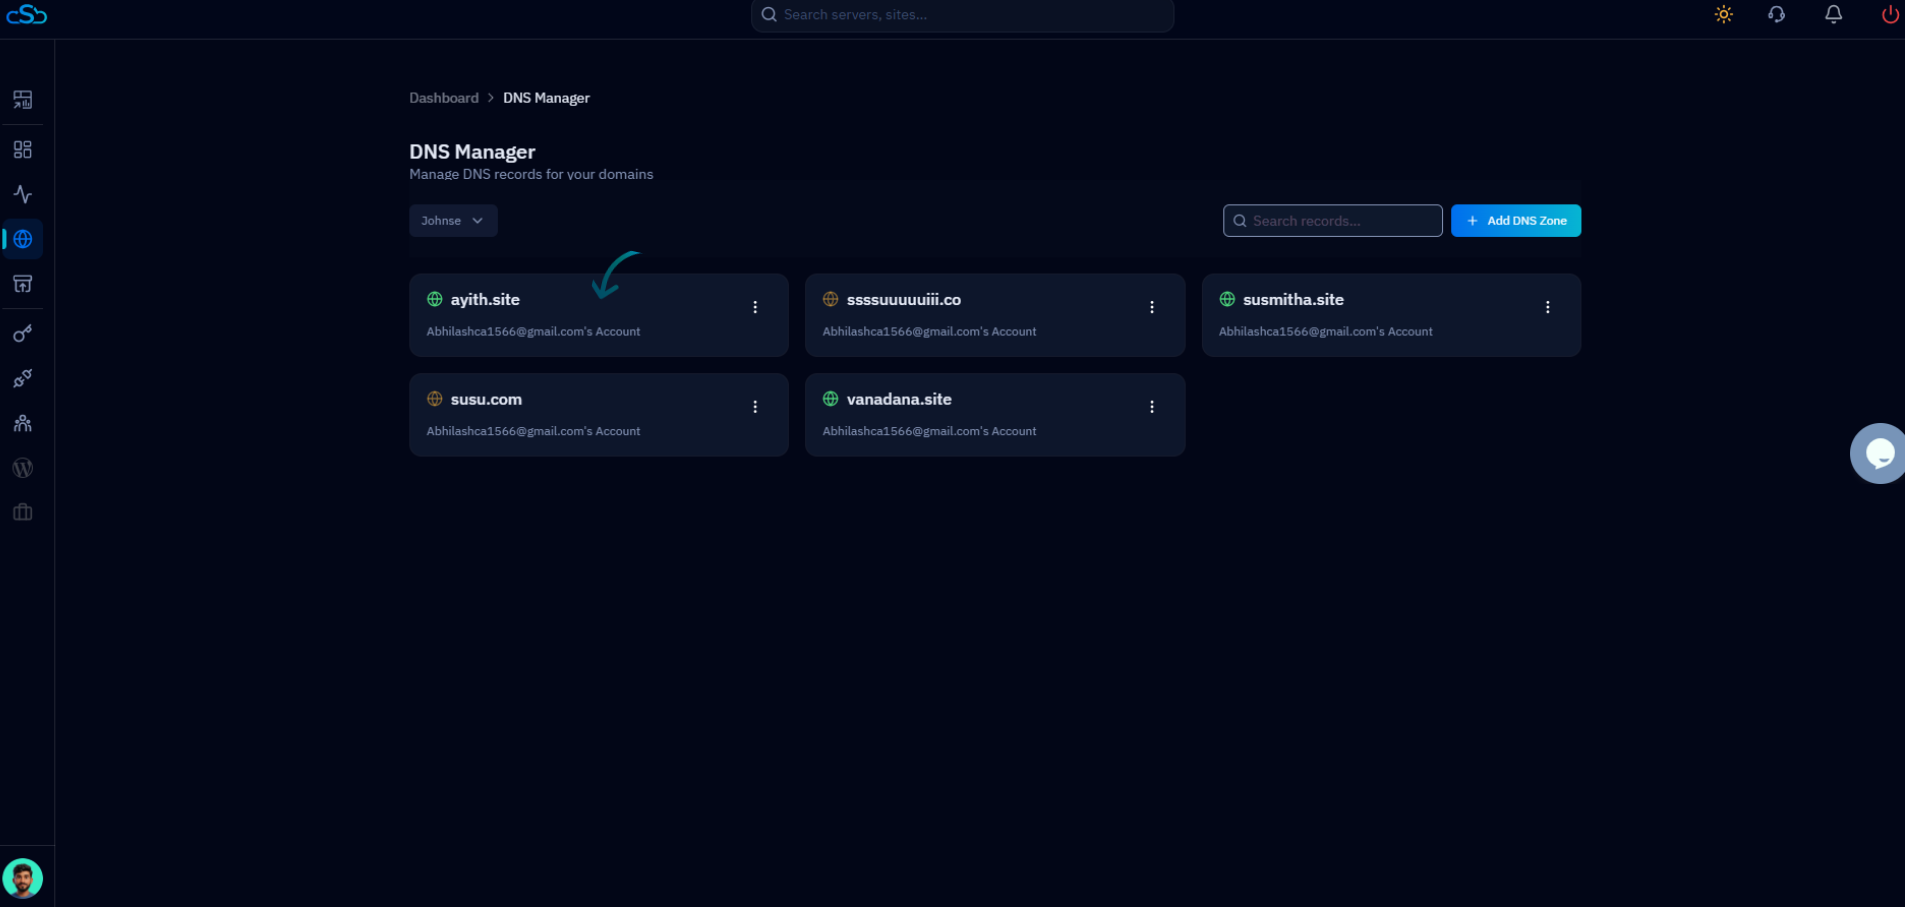
Fig. 02 — DNS Manager showing all domains fetched from the connected Cloudflare account.
Step 3: View DNS Records
After selecting a domain, you land on the DNS Records page for that domain. All existing records are displayed in a table with their full details, giving you a complete picture of the domain's DNS configuration.
TYPE: The record type — A, AAAA, CNAME, MX, TXT, and others.
NAME: The hostname or subdomain this record applies to (e.g., www.yourdomain.com).
CONTENT: The record value — an IP address for A records, a target hostname for CNAME, and so on.
TTL: Time to Live — how long DNS resolvers cache this record before checking for updates.
PROXY: Indicates whether traffic is routed through Cloudflare's CDN (Proxied) or resolved directly (DNS Only).
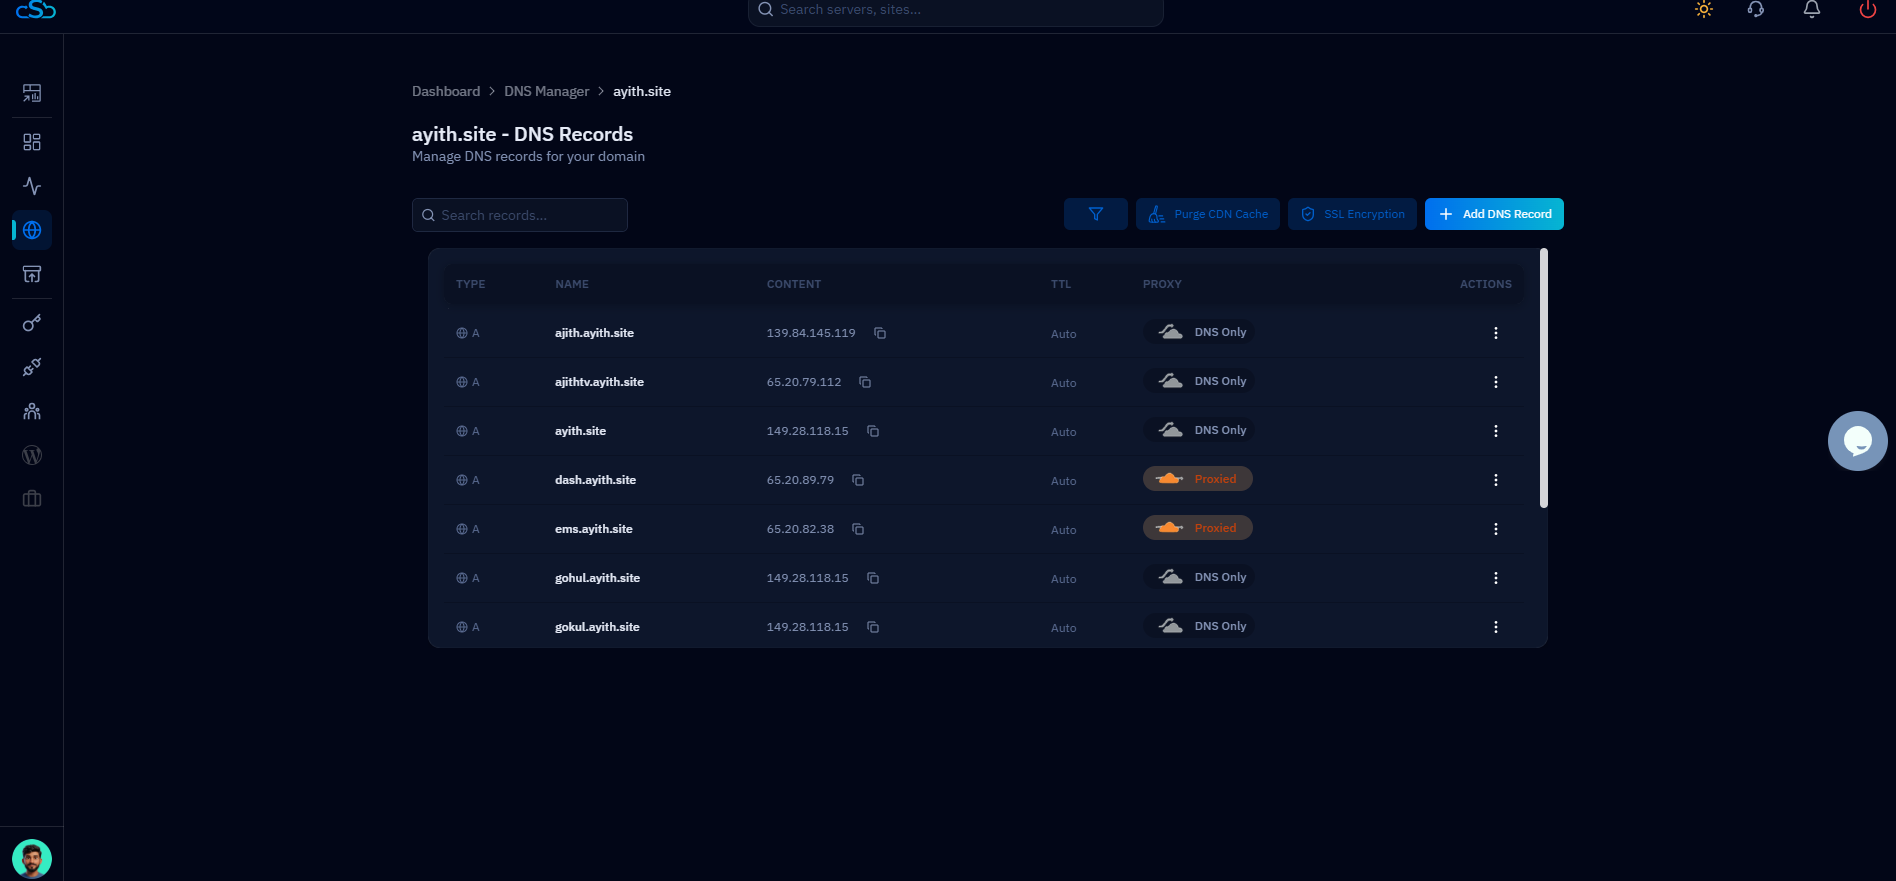
Fig. 03 — DNS Records page for a domain, showing all records with Type, Name, Content, TTL, and Proxy status.
Step 4: Search and Filter Records
When a domain has many DNS records, the search bar and filter dropdown make it easy to narrow down to exactly what you need without scrolling through the entire list.
Use the Search bar: Type a hostname, IP address, or any part of a record value into the Search records... field to instantly filter matching rows.
Use the Filter button: Click the filter icon (funnel) next to the search bar to open the record type dropdown.
Select a record type: Choose from All, A, AAAA, CAA, CERT, CNAME, MX, TXT, and others to show only records of that type.
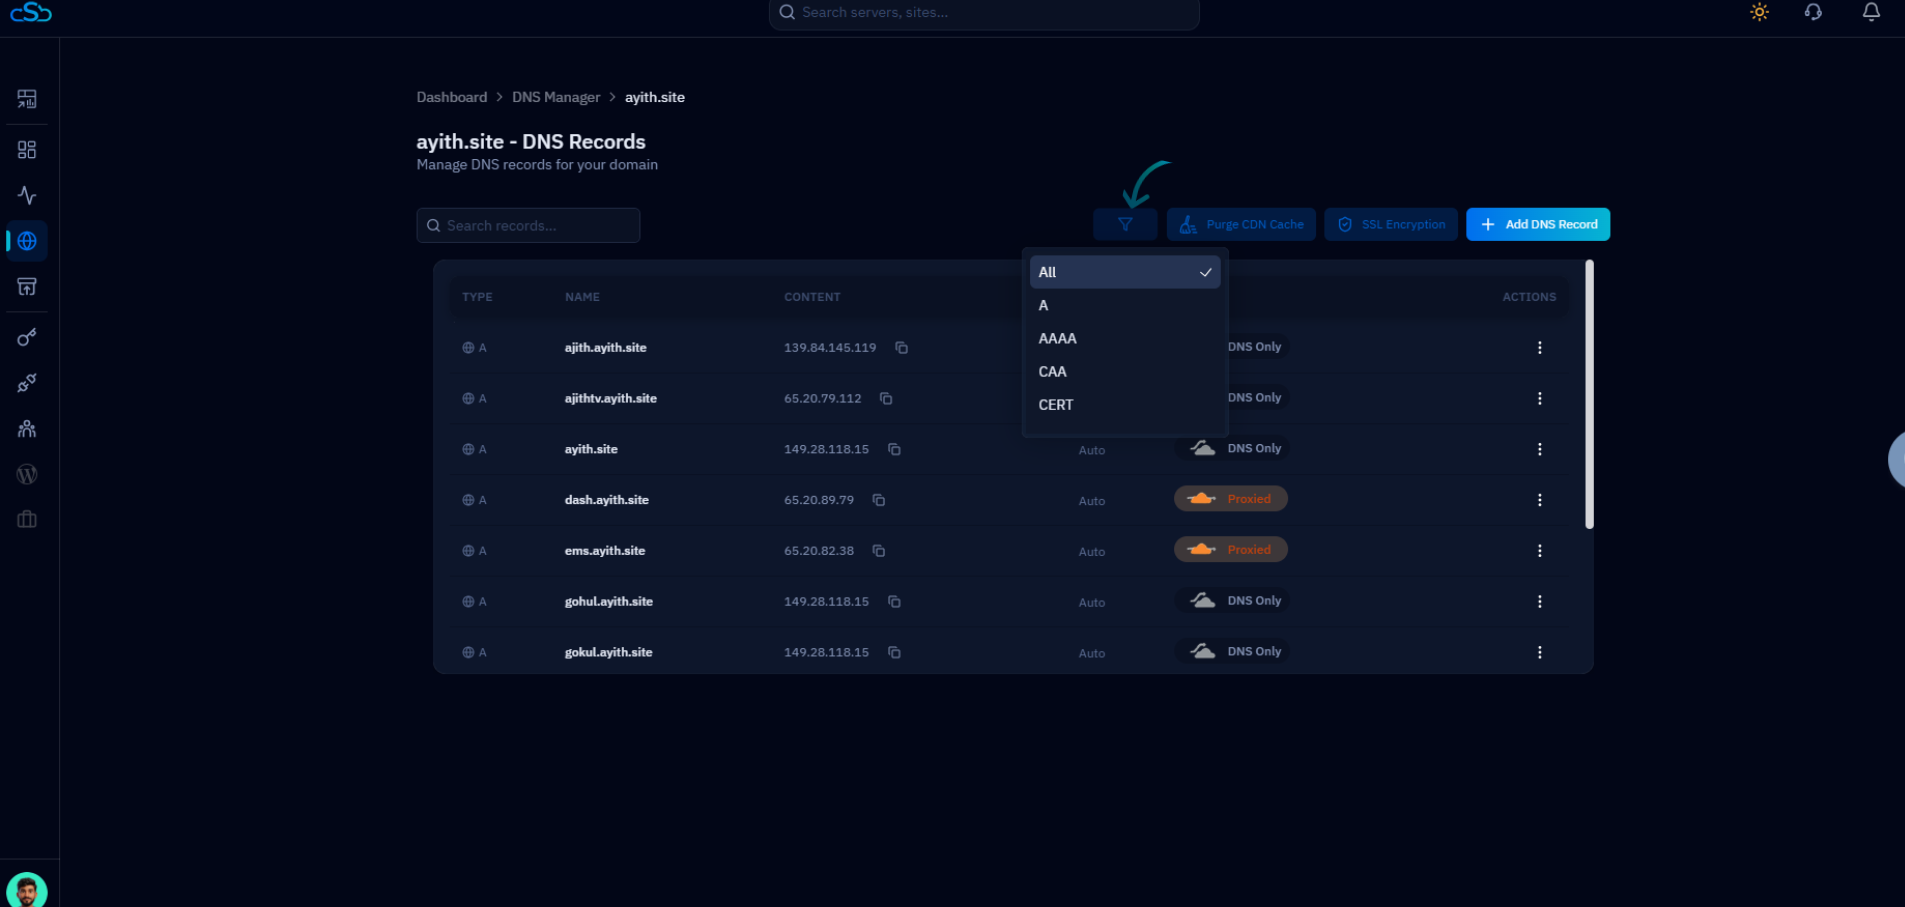
Fig. 04 — Filter dropdown open on the DNS Records page, showing available record type options.
Step 5: Edit or Delete Records
Each DNS record can be updated or removed at any time using the Actions menu on the right side of the records table. This is how you correct a misconfigured record or remove one that is no longer needed.
Open the Actions menu: Click the three-dot menu (⋮) in the Actions column of the record you want to modify.
Edit Record: Click Edit Record to open the record form pre-filled with the current values. Update any field and save.
Delete Record: Click Delete Record to permanently remove the entry. Confirm the deletion when prompted.
Deleting a DNS record is immediate and irreversible. Make sure you no longer need the record before removing it, as doing so can break services that rely on it (e.g., email delivery for MX records).
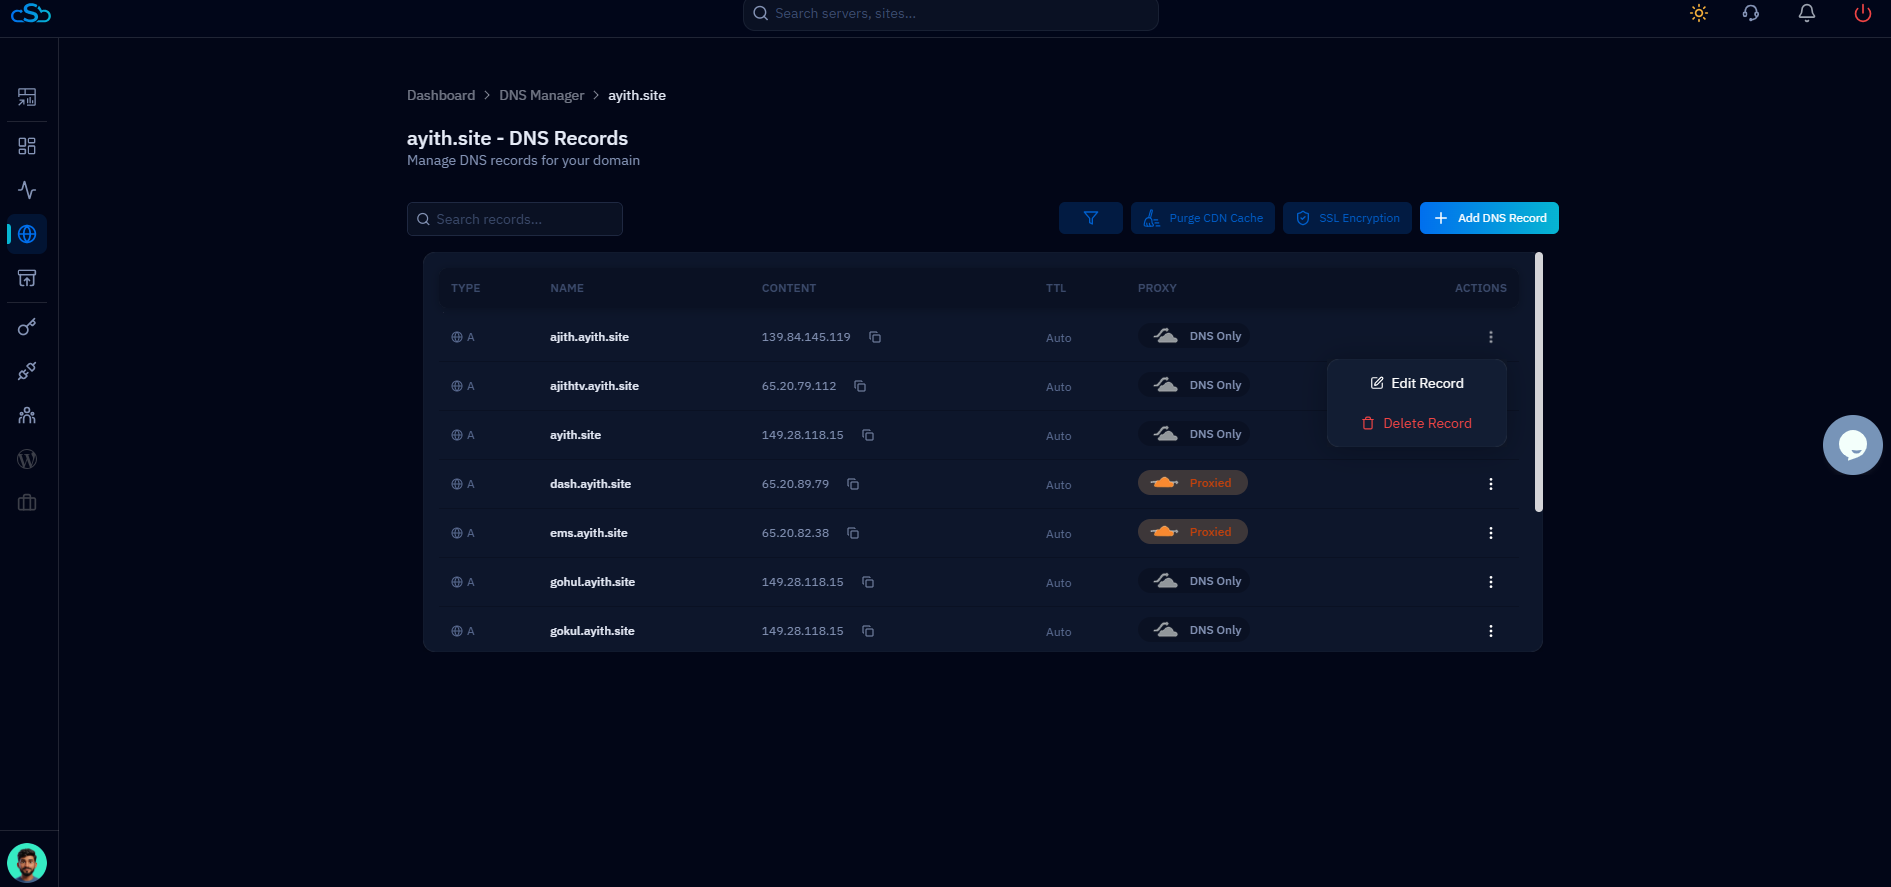
Fig. 05 — Actions menu open on a DNS record row, showing the Edit Record and Delete Record options.
Step 6: Purge DNS Cache
When you update DNS records, Cloudflare's edge network may still serve cached versions of old values to visitors until the cache expires. The Purge CDN Cache button forces an immediate refresh, so your changes propagate faster.
Click Purge CDN Cache: This button is located in the top-right area of the DNS Records page, next to the filter and SSL Encryption buttons.
Confirm the purge: CloudStick will send the purge request to Cloudflare. A confirmation message will appear once the cache has been cleared.
Purging the CDN cache clears Cloudflare's cached assets for the domain. Use this after making DNS or content changes that need to be reflected immediately, rather than waiting for the TTL to expire.
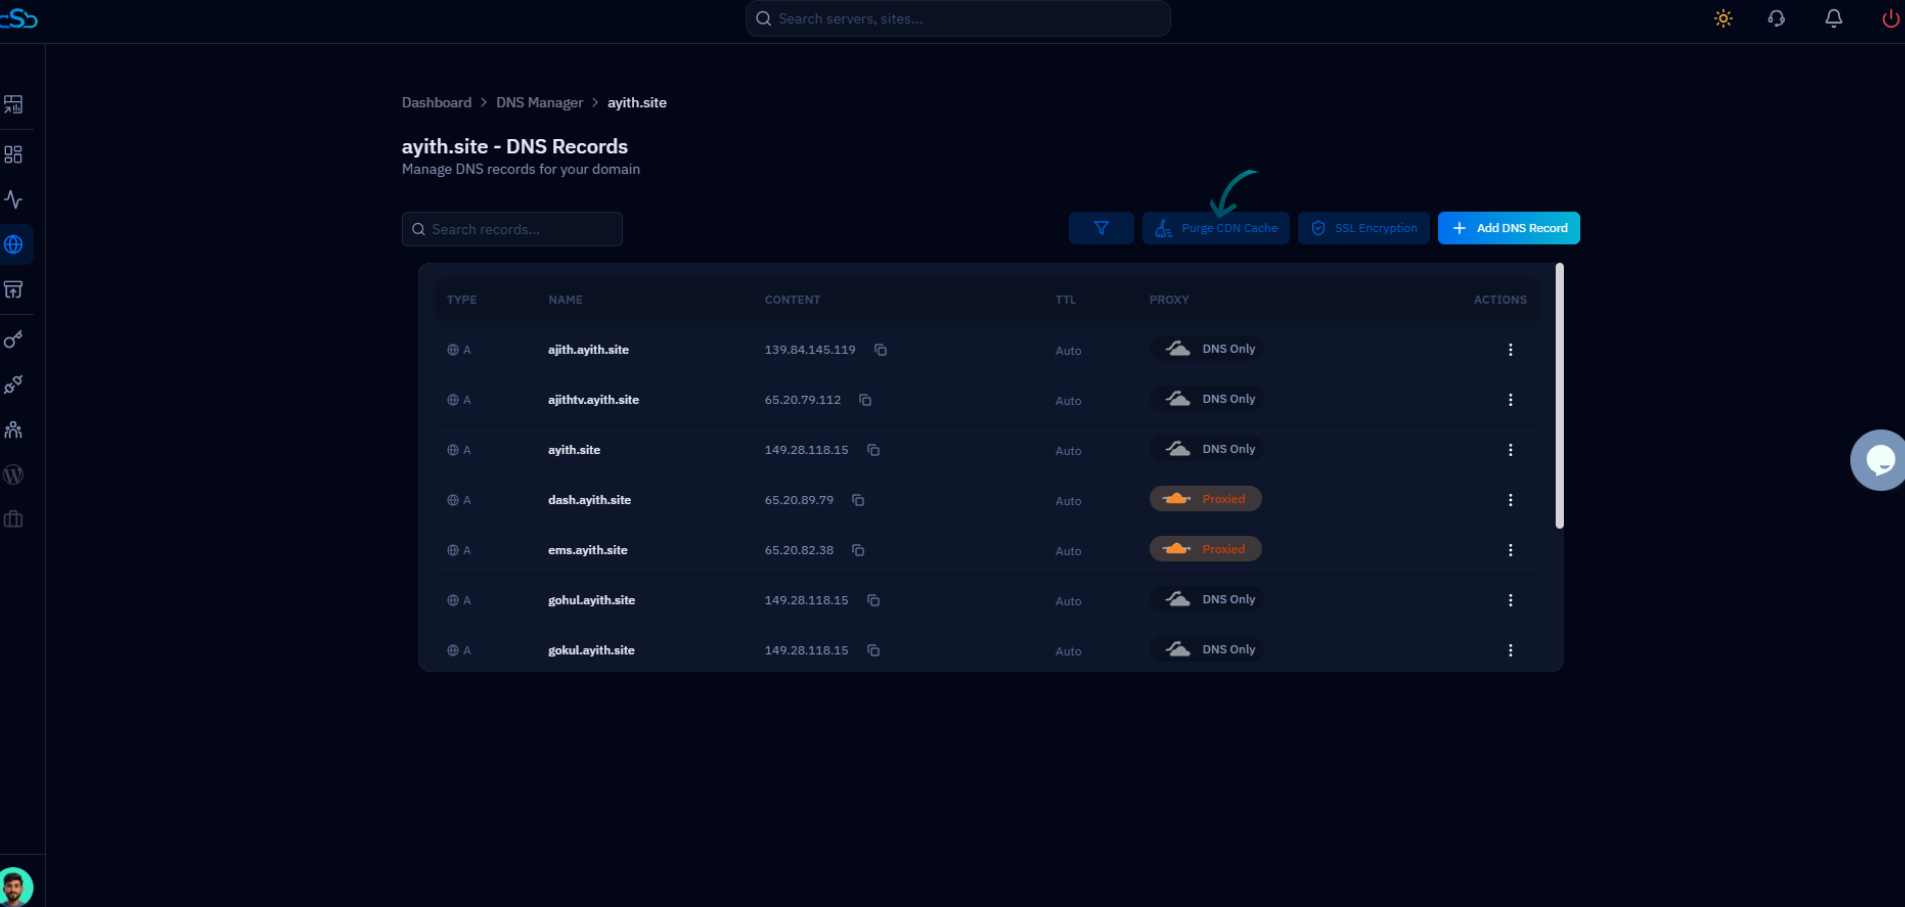
Fig. 06 — DNS Records page with the Purge CDN Cache button highlighted in the top-right toolbar.
Step 7: Open SSL Encryption Settings
CloudStick exposes Cloudflare's SSL/TLS encryption mode directly from the DNS Records page, so you can configure how Cloudflare encrypts traffic between browsers, Cloudflare's edge, and your origin server — all without leaving the dashboard.
Click SSL Encryption: This button is located in the top-right toolbar of the DNS Records page, between the filter icon and the + Add DNS Record button.
The SSL Encryption modal opens: It shows the available SSL/TLS encryption modes for the selected domain.
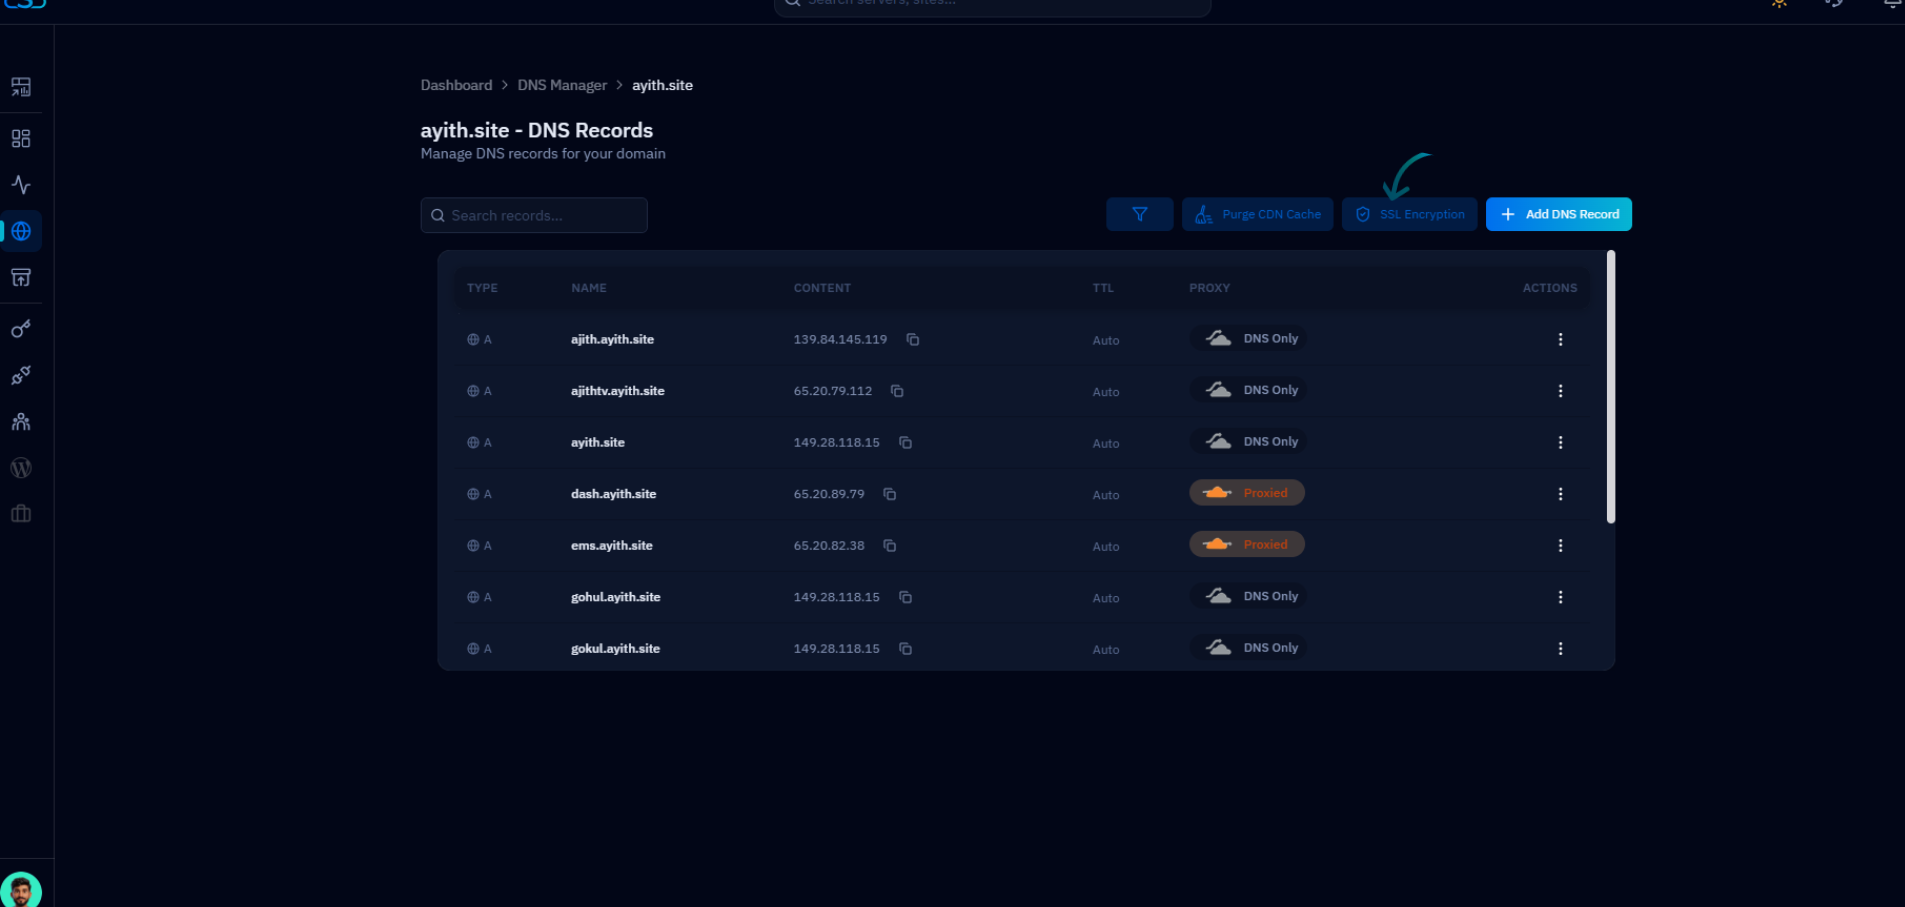
Fig. 07 — DNS Records page with the SSL Encryption button highlighted, ready to open the SSL settings modal.
Step 8: Configure and Save SSL Mode
The Cloudflare SSL Encryption modal lets you select the encryption mode that matches your server's certificate configuration. Choosing the wrong mode can result in redirect loops or insecure connections, so select the option that reflects your actual setup.
Off: No encryption is applied. Traffic between Cloudflare and your origin is unencrypted. Not recommended for production sites.
Flexible: Encrypts traffic between the visitor's browser and Cloudflare, but the connection from Cloudflare to your origin server remains unencrypted.
Full: Encrypts end to end using any certificate on your server — including self-signed certificates. Cloudflare does not verify the certificate's authenticity.
Full (Strict): The most secure option. Encrypts end to end and requires a trusted CA or Cloudflare Origin CA certificate on the server. Cloudflare verifies the certificate.
Select the mode that matches your server's SSL setup, then click Save SSL Settings to apply the change.
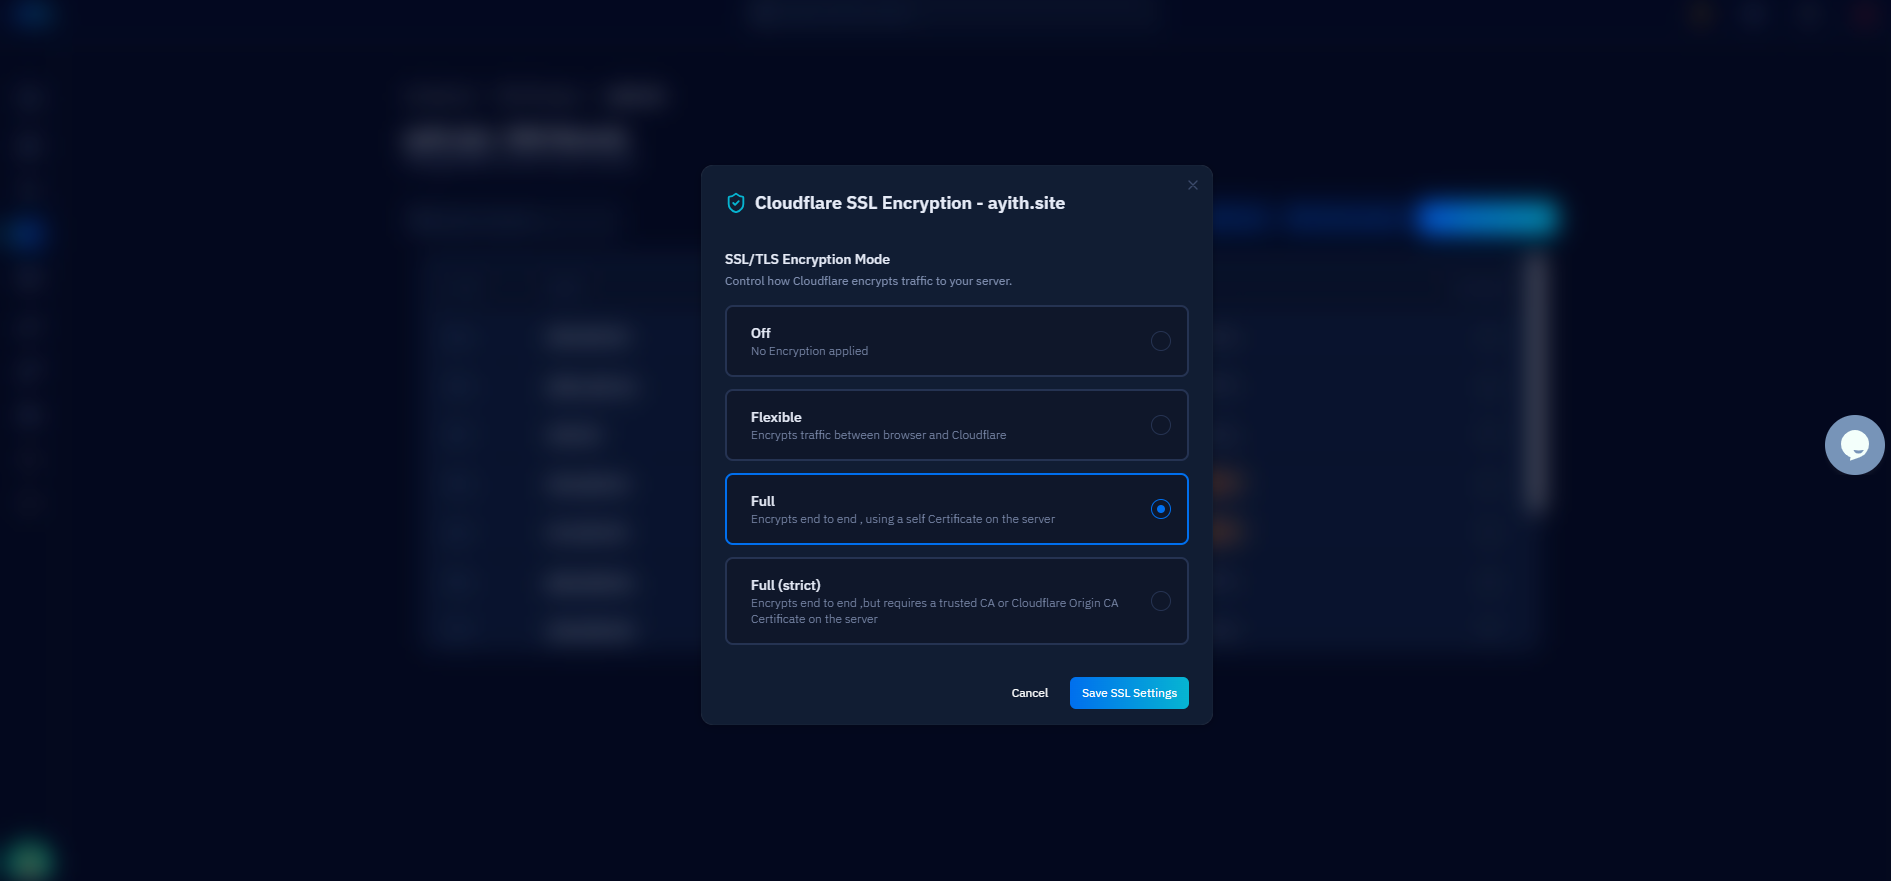
Fig. 08 — Cloudflare SSL Encryption modal showing Off, Flexible, Full, and Full (Strict) encryption modes.
If you have a valid SSL certificate installed on your origin server (e.g., via Let's Encrypt), use Full (Strict) for the strongest security. If you are unsure, Full is a safe starting point. DNS and SSL changes may take some time to propagate globally.