How to Migrate a WordPress Website Using Migrate Guru
Overview
Moving a WordPress site to a new server can feel daunting — database exports, file transfers, DNS changes, and broken links all lurk as potential issues. Migrate Guru eliminates that complexity. It is a free WordPress plugin that copies your entire site directly from the source to the destination server without touching your local machine, making it one of the safest and fastest ways to migrate a live WordPress website.
This guide walks you through migrating your existing WordPress website to a CloudStick-managed server using Migrate Guru. You will install the plugin on your source site, point it at your CloudStick server using SFTP credentials, and let the migration run automatically — no manual file downloads or database dumps required.
Before starting, make sure your destination WordPress website has already been created on your CloudStick server. You will need the server IP address and SFTP credentials from your CloudStick account. If you have not yet installed WordPress on CloudStick, refer to the "How to Install WordPress in CloudStick" guide first.
Step 1: Install and Activate Migrate Guru
Start by installing Migrate Guru on your source WordPress website — the site you want to move to CloudStick.
1. Log in to your source WordPress dashboard: Navigate to your existing WordPress admin panel (e.g., yourdomain.com/wp-admin).
2. Go to Plugins → Add New: Search for Migrate Guru in the plugin directory.
3. Install and Activate: Click Install Now and then Activate. Once activated, a Migrate Guru item will appear in your WordPress dashboard navigation menu.
Migrate Guru is completely free and performs server-to-server transfers, meaning it copies your site directly from the old host to CloudStick without downloading anything to your computer.
Step 2: Start the Migration
With Migrate Guru activated, launch the migration wizard from your WordPress dashboard.
1. Navigate to Migrate Guru: Click on Migrate Guru in the left-hand WordPress dashboard menu. The plugin welcome screen will open.
2. Enter your email address: Type your email in the provided field. Migrate Guru will send you status updates and a completion notification when the transfer finishes.
3. Accept the Terms & Conditions: Check the agreement checkbox.
4. Click Migrate: This submits your email and launches the migration setup flow.
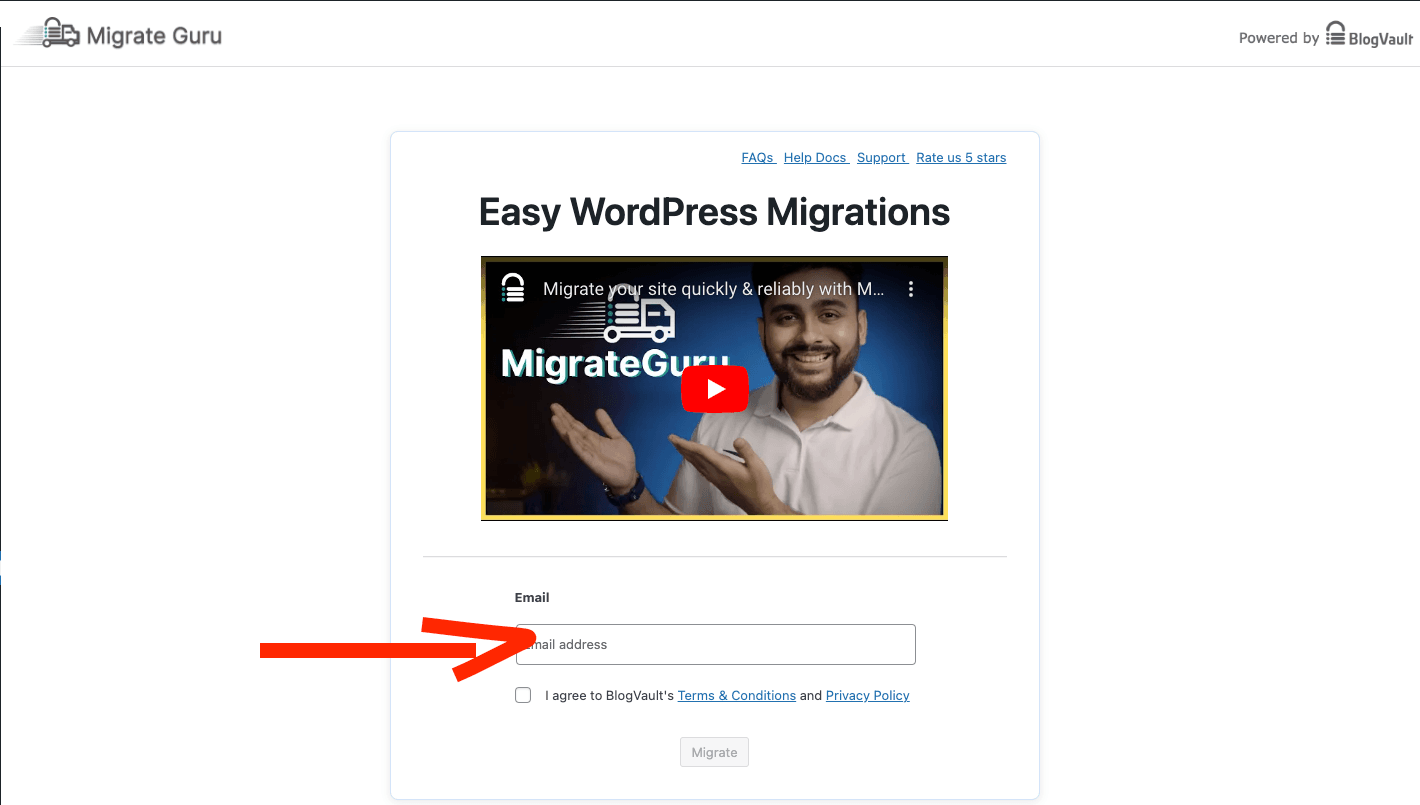
Fig. 01 — Migrate Guru welcome screen with the email address field and Migrate button.
Step 3: Select Your Destination Host
Migrate Guru will display a grid of popular hosting providers. Since CloudStick is not listed as a named provider, you will select the generic option.
1. Review the host selection screen: You will see cards for Bluehost, HostGator, WP Engine, cPanel, and many others.
2. Click Other Hosts: This is the last card on the grid (highlighted with a red outline in the screenshot). Selecting this option allows you to manually enter your destination server details rather than using a preset configuration.
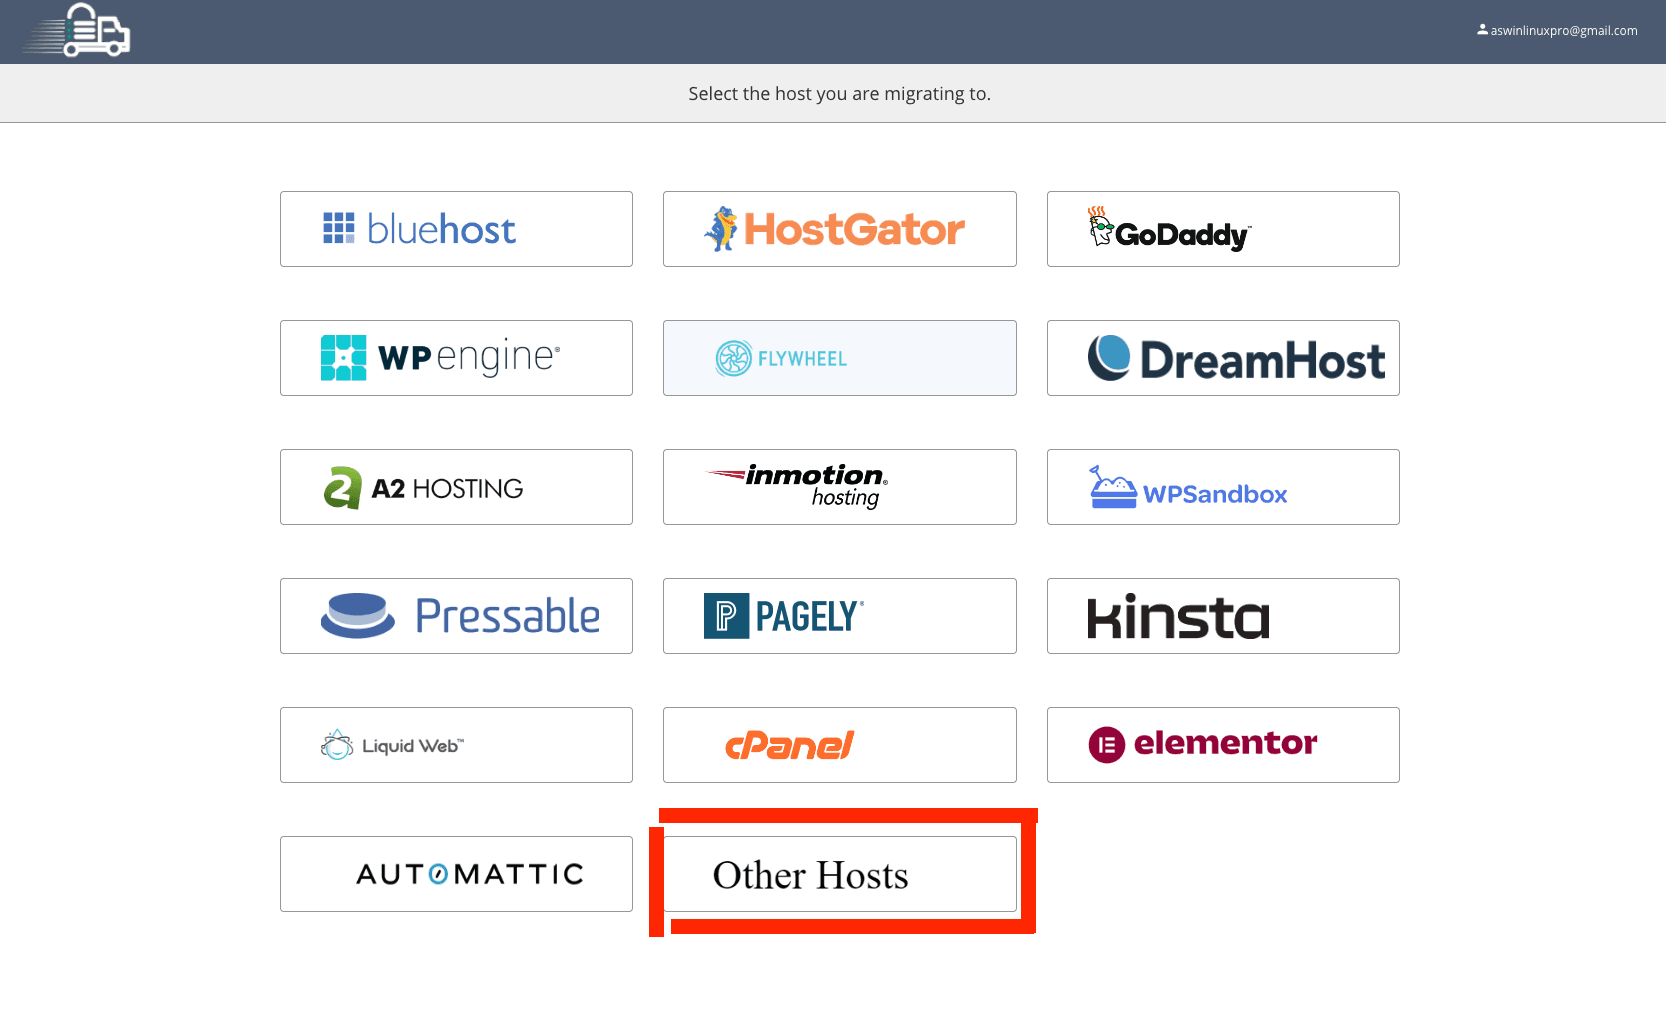
Fig. 02 — Host selection screen with the Other Hosts option highlighted.
Step 4: Enter Hosting Details
After selecting Other Hosts, Migrate Guru presents two connection methods. Choose the manual SFTP input method for use with CloudStick.
1. Select Manually Input Host Details: Click this tab at the top of the connection screen. This switches the form to accept SFTP credentials directly, rather than requiring a Migrate Guru API key.
2. Review the available fields: You will see fields for MigrateGuru Migration Key, Source Website Password Protected, Destination Website Password Protected, Advanced Options, and folder/table filters.
3. Proceed to fill in your CloudStick SFTP details: These are entered in the next step.
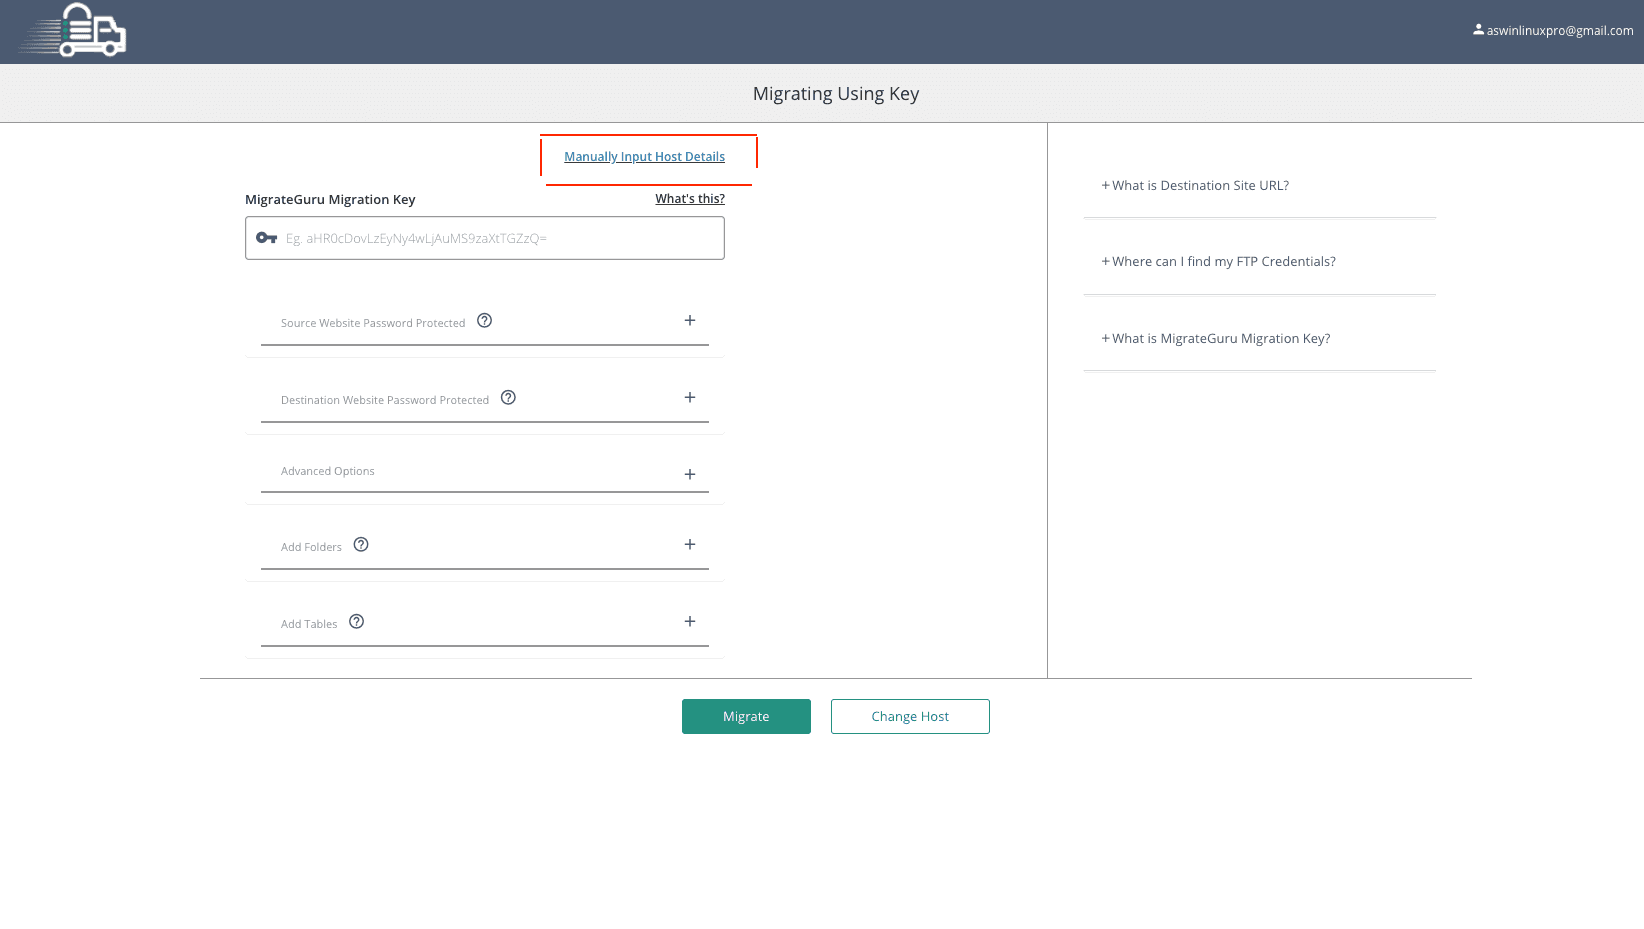
Fig. 03 — Migrate Guru connection screen with the Manually Input Host Details tab selected.
Step 5: Configure CloudStick Connection Details
Now fill in the SFTP credentials from your CloudStick account so Migrate Guru can connect to your destination server.
Website URL: Enter the full URL of the destination website on your CloudStick server. Example: https://yourdomain.com
Connection Type: Select SFTP. CloudStick uses SFTP for secure file transfer — avoid selecting plain FTP.
Server IP: Enter your CloudStick server IP address. You can find this on your server panel inside the CloudStick dashboard.
SFTP Username: Use the system user associated with your website on CloudStick. This is available in your Account Summary or the Welcome Email sent when your server was set up.
SFTP Password: Use the password provided in your Welcome Email. If you need to reset it, you can do so from your CloudStick account settings.
Root Path: Enter the absolute path to your website root directory on the CloudStick server. Example: /home/shoprcenter/apps/app-shop
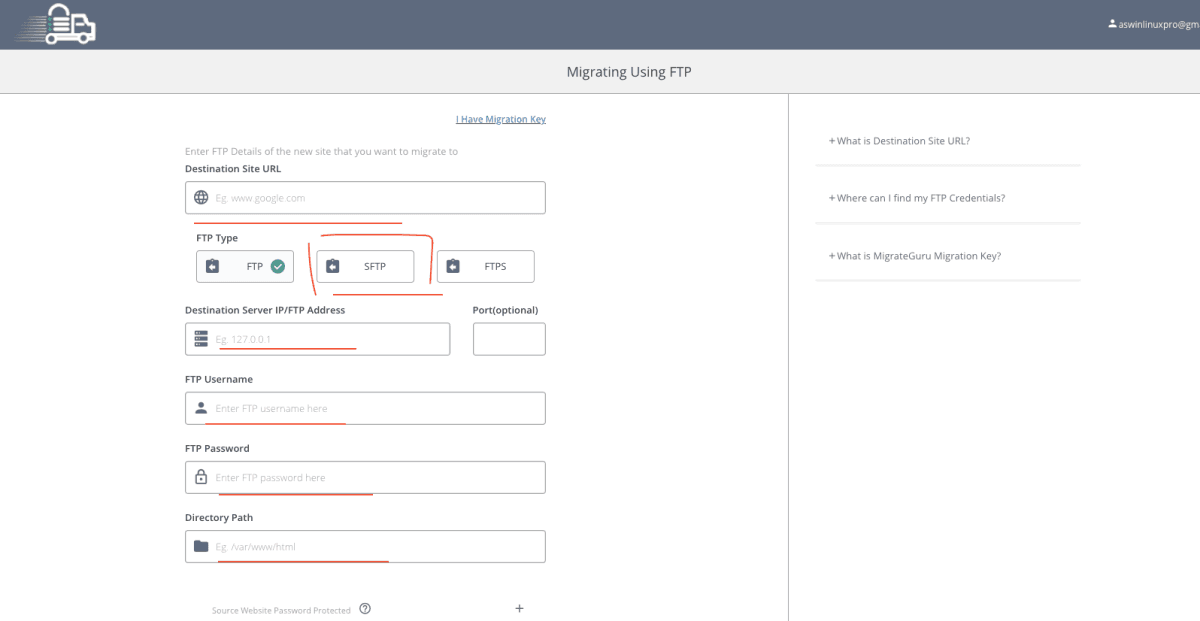
Fig. 04 — Migrate Guru FTP/SFTP form with Destination Site URL, connection type, server IP, username, password, and directory path fields.
Double-check the Root Path carefully. An incorrect path is the most common reason a migration appears to succeed but the website does not load on the new server. The path should point to the folder containing your wp-content directory.
Step 6: Start the Migration
With all connection details filled in, you are ready to kick off the transfer.
1. Review all entered details carefully: Scroll through the form to confirm the Website URL, SFTP credentials, and Root Path are correct before proceeding.
2. Click Migrate: This initiates the server-to-server transfer. Migrate Guru will automatically copy your WordPress files and database from the source host to your CloudStick server.
3. Wait for completion: The migration runs entirely in the background. Do not close your browser or modify the source site during the transfer. You will receive an email notification when the process is complete.
Migration time depends on your website size. A small site may complete in a few minutes, while a large site with many media files can take 30–60 minutes or longer. The source site remains fully live throughout the process.
Step 7: Verify Your Website
Once Migrate Guru sends the completion email, it is time to confirm everything transferred correctly on your CloudStick server.
1. Access your website on CloudStick: Navigate to your domain or server IP in a browser to load the migrated site.
2. Check pages and content: Browse through key pages — homepage, blog posts, shop pages — to confirm content, images, and formatting all appear correctly.
3. Verify plugins and themes: Log in to the WordPress admin on the new server and confirm all plugins are active and the correct theme is applied.
4. Test forms and functionality: Submit a test contact form, add a product to cart (if WooCommerce), or trigger any other key user flow to validate the site works end-to-end.
5. Deploy SSL: If the migrated site requires HTTPS, navigate to the SSL Management section in your CloudStick server panel and issue a free Let's Encrypt certificate for the domain.
Once you have verified the site is fully functional on CloudStick, update your DNS records to point the domain to the new server IP. Allow up to 24–48 hours for DNS propagation to complete globally.