How to View Current Backup Storage and Upgrade in CloudStick
Overview
As your server grows — more websites, databases, and email accounts — your backup storage consumption grows with it. CloudStick gives you a real-time breakdown of exactly how much of your backup quota has been used, how much is available, and how that space is distributed across websites, databases, archived snapshots, and email. When you need more room, upgrading to a larger plan takes just a few clicks directly from the same dashboard.
This guide walks you through opening the Backup Management page, reading your storage stats, clicking Purchase Plan to browse available storage tiers, selecting the plan that fits your needs, reviewing the order summary, and completing payment securely via Stripe or PayPal.
Backup storage upgrades are account-wide additions on top of your CloudStick plan's included free quota. Make sure you are on a paid plan (Basic, Pro, or Business) before purchasing additional storage — the Free plan does not include backup quota.
Step 1: Log In to CloudStick
Start from the main CloudStick dashboard, which lists all servers connected to your account.
Sign in to your account: Open CloudStick and log in with your credentials. The main dashboard shows your total servers, active servers, and any warning statuses at a glance.

Fig. 01 — The CloudStick main dashboard after signing in, showing all connected servers.
Step 2: Navigate to Backup Management
Backup storage details and upgrade options live inside the dedicated Backups section, accessible from the left-hand navigation of your server panel.
Click Backups: From the left-hand navigation menu on any server, click Backups. You will be taken to the Backup Management page, which shows your Current Backup Plan, Backup Status toggle, Storage Used meter, and a Backup Assets Summary card for Websites, Databases, Archived Backups, and Emails.
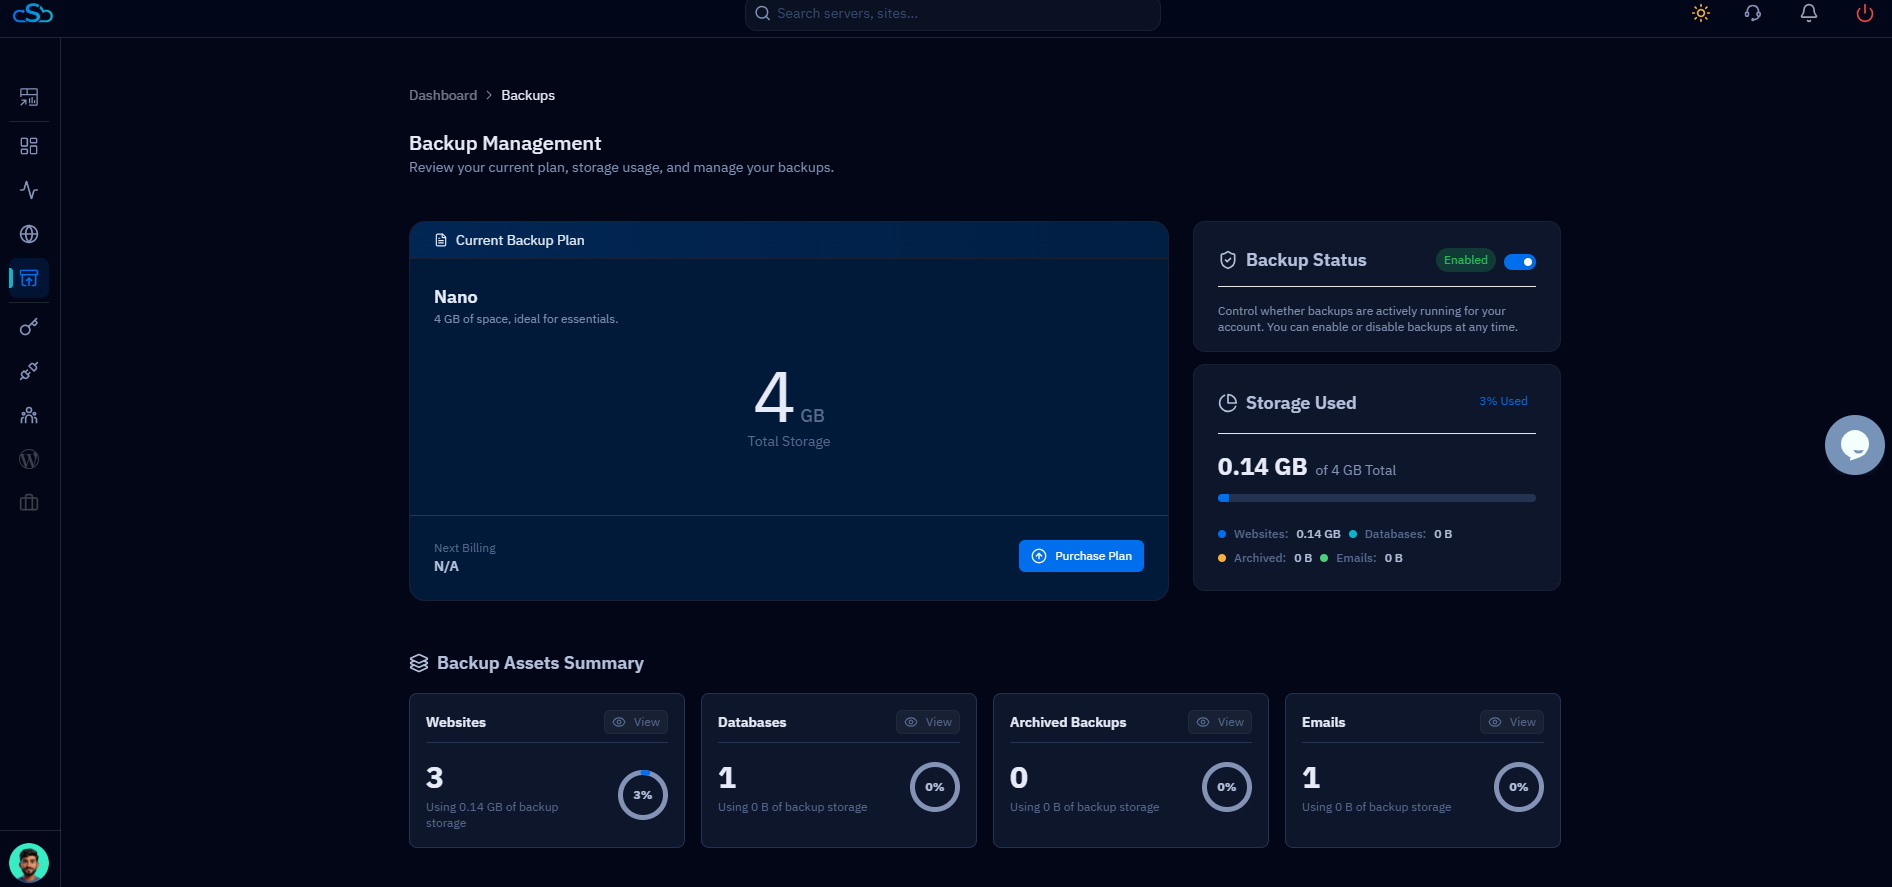
Fig. 02 — The Backup Management page showing the current plan, storage usage meter, and Backup Assets Summary.
The Backup Status toggle lets you pause all running backups at any time. Make sure it is set to Enabled before checking storage usage so the figures reflect active backup activity.
Step 3: View Your Current Storage Usage
The Backup Management page gives you a clear breakdown of how your storage quota is being used across all backup types.
Total Backup Storage: The total quota allocated to your account under the current plan.
Used Storage: How much of your quota has been consumed by existing backups.
Available Storage: The remaining free space before you run out of quota.
Storage Usage Percentage: A visual progress bar showing what percentage of your total quota is in use.
Total Backups Stored: The count of all backup files currently retained across websites, databases, emails, and archives.
Fig. 03 — Storage Used panel showing GB consumed, percentage used, and a per-type breakdown.
If your storage usage is approaching 80% or higher, upgrade before it fills completely — backups will stop running when your quota is exhausted.
Step 4: Initiate the Upgrade
When you need more space, a single button on the Current Backup Plan card launches the plan selection flow.
Click Purchase Plan: In the Current Backup Plan section of the Backup Management page, click the Purchase Plan button. This opens the Scale Your Backup plan selection screen where you can browse all available storage tiers.
Choose a billing cycle: Toggle between Monthly and Annually at the top of the plan selection screen. Annual billing offers a significant saving compared to paying month-to-month.
Step 5: Select a Backup Plan
CloudStick offers six storage tiers to match any scale — from a small personal project to enterprise-level infrastructure.
Light — 100 GB: $2/month or $24/year. Perfect for small projects with minimal backup needs.
Core — 500 GB: $8/month or $96/year. Suited for growing applications with multiple websites and databases.
Plus — 1 TB: $12/month or $144/year. Great for large workloads requiring frequent or long-retention backups.
Ultra — 2 TB: $20/month or $240/year. Built for high-volume data environments.
Power — 3 TB: $25/month or $300/year. For heavy usage scenarios with many servers and long retention policies.
Max — 4 TB: $40/month or $480/year. Designed for enterprise-scale environments with maximum storage requirements.

Fig. 04 — Scale Your Backup plan selection showing monthly pricing tiers.
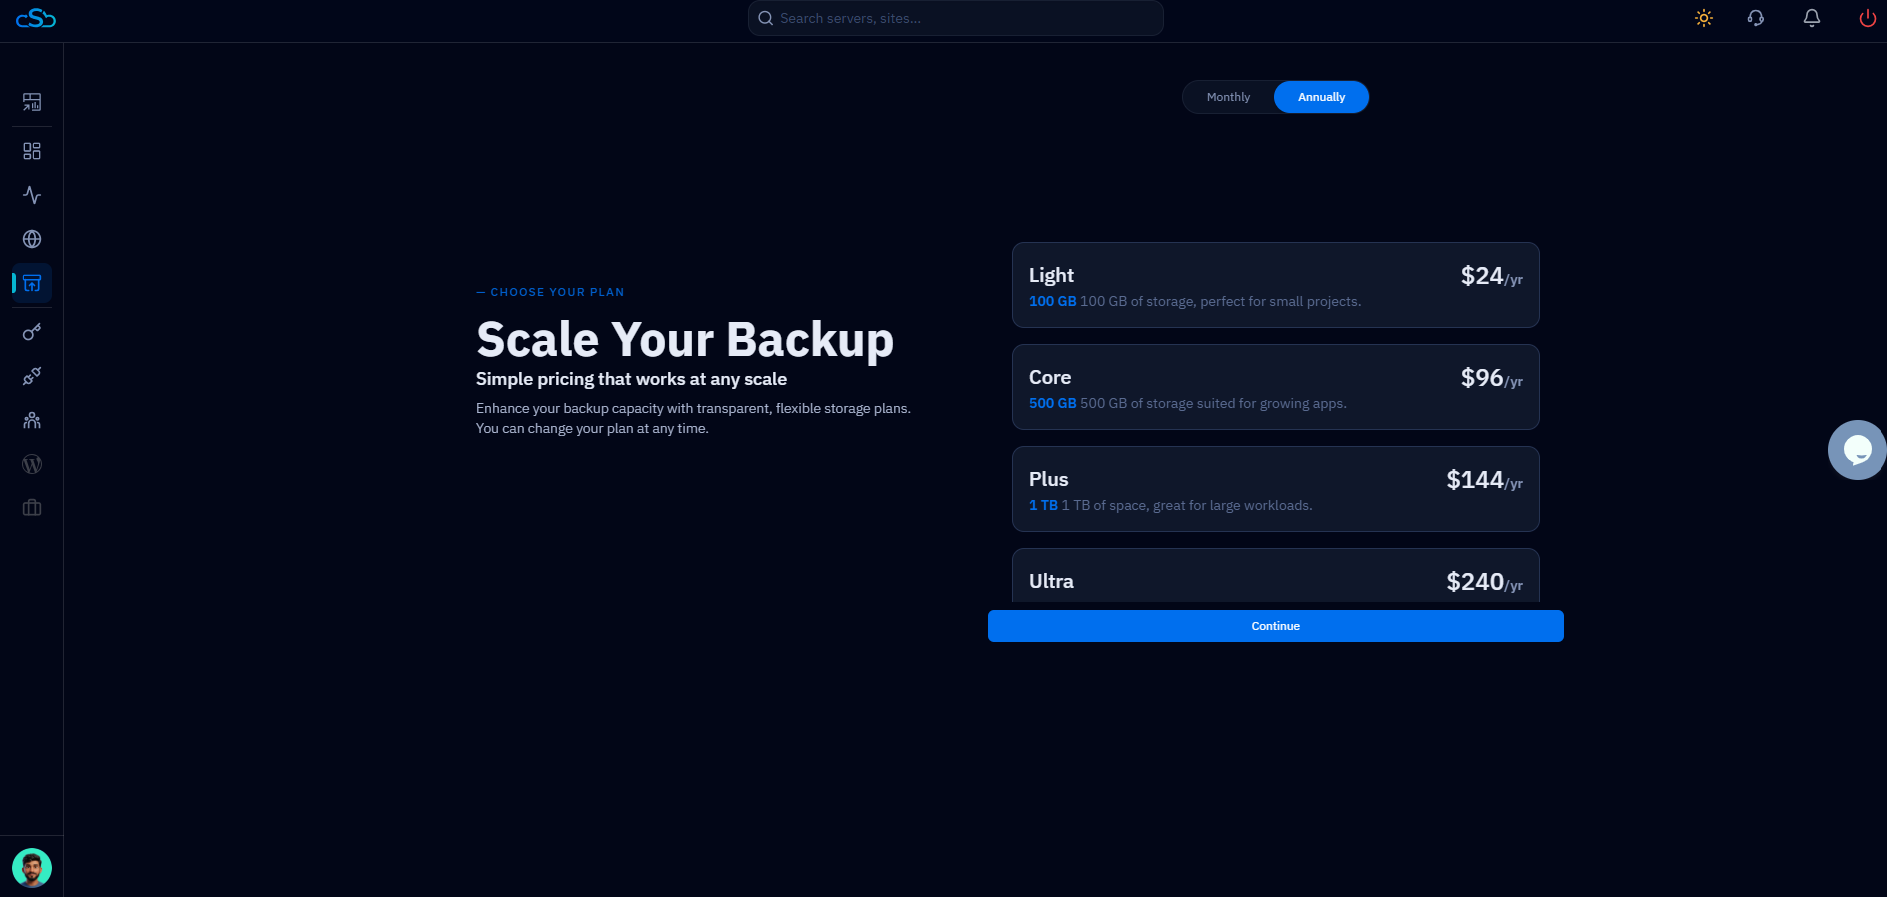
Fig. 05 — Plan selection with Annually toggle active, showing yearly pricing with savings.
Click Continue: Once you have highlighted your preferred plan, click the Continue button to proceed to the order summary.
Step 6: Review Your Order Summary
Before any payment is processed, CloudStick shows you a full order summary so you can confirm the details are correct.
Review the plan: The Order Summary modal shows the plan name, storage capacity, billing cycle (Monthly or Annual), and the total amount due.
Check the next renewal date: The summary confirms when the plan renews so you know your billing schedule in advance.
Click Proceed to Payment: Once everything looks correct, click Proceed to Payment to move to the secure payment page.
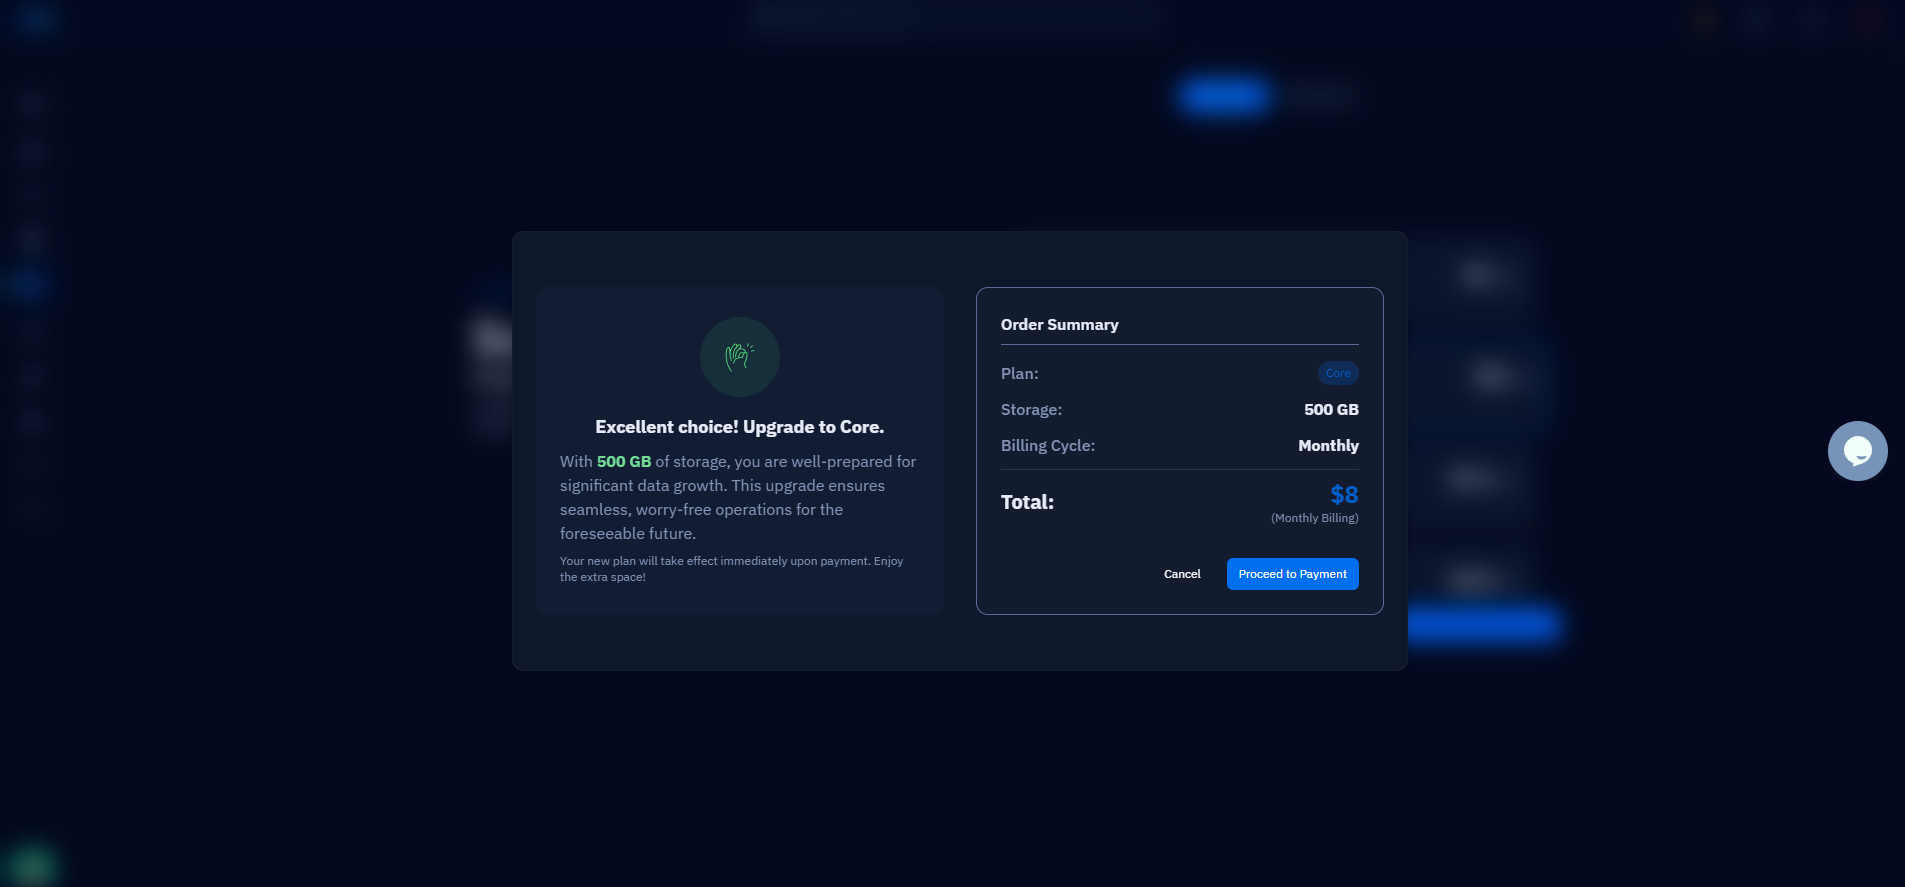
Fig. 06 — Order Summary modal confirming plan name, storage, billing cycle, and total amount before payment.
Step 7: Complete the Payment
The Backup Storage Purchase page is your final step — review the details, pick a payment method, and confirm your order.
Review the Backup Storage Purchase details: The left panel shows the selected plan name, storage size, today's date, next due date, and total amount due.
Select a payment method: Choose either Pay with Stripe (credit/debit card) or Pay with PayPal from the Payment panel on the right.
Click Pay Now: Click the Pay button and follow the on-screen instructions to complete your purchase. Once payment is confirmed, your upgraded storage allocation is applied to your account immediately.
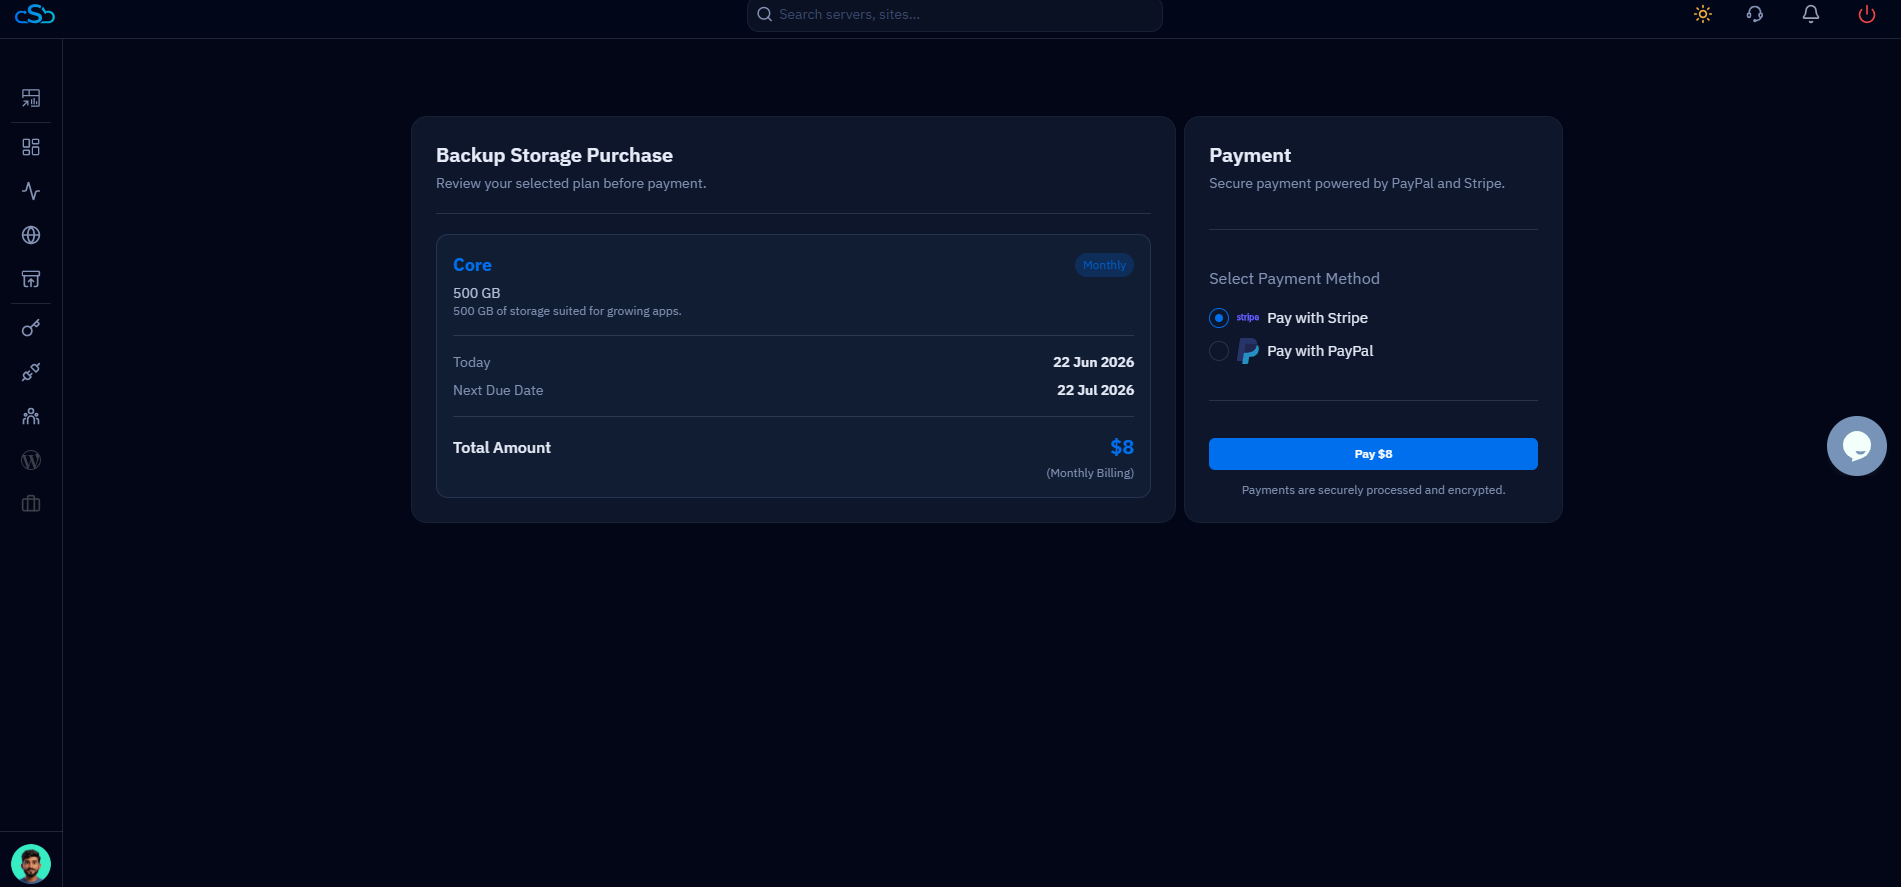
Fig. 07 — Backup Storage Purchase page showing plan details on the left and Stripe/PayPal payment options on the right.
After a successful payment, return to the Backup Management page and check the Storage Used panel — your new total storage and updated available quota will be reflected immediately. CloudStick also displays your next billing date on the Current Backup Plan card.