How to Deploy a GitHub Repository to Your Website
Overview
CloudStick's Proxy App stack lets you deploy any Node.js, Next.js, or other server-side application directly from a GitHub repository — without SSHing into your server or writing a single deployment script by hand. Once connected, CloudStick pulls your code, installs dependencies, runs your build, and starts your application under PM2, all from the dashboard.
This guide walks through the full flow: selecting your server, importing a GitHub repository, configuring the branch, install/build/run commands, and Node.js version, and finally reviewing the deployment logs. It also covers the Git management panel you get after deployment, where you can enable Auto Deploy on Push, trigger a manual Redeploy, or browse your repository files without leaving CloudStick.
You need a GitHub account with the repository you want to deploy, and the repository should contain a working package.json with the correct start script if you plan to run it with PM2.
Step 1: Log In to CloudStick
Every deployment starts from your CloudStick account, where all your connected servers and websites are visible in one place.
Sign in: Go to app.cloudstick.io and log in with your CloudStick credentials to reach the main Dashboard.
Step 2: Select Your Server
Your GitHub repository needs to be deployed onto a specific server, so the next step is choosing which connected server should host the application.
Go to the Servers section: From the Dashboard, review your connected servers — each card shows the operating system, CPU usage, RAM usage, and disk space at a glance.
Select the target server: Click on the server where you want to deploy your website to open its server panel.
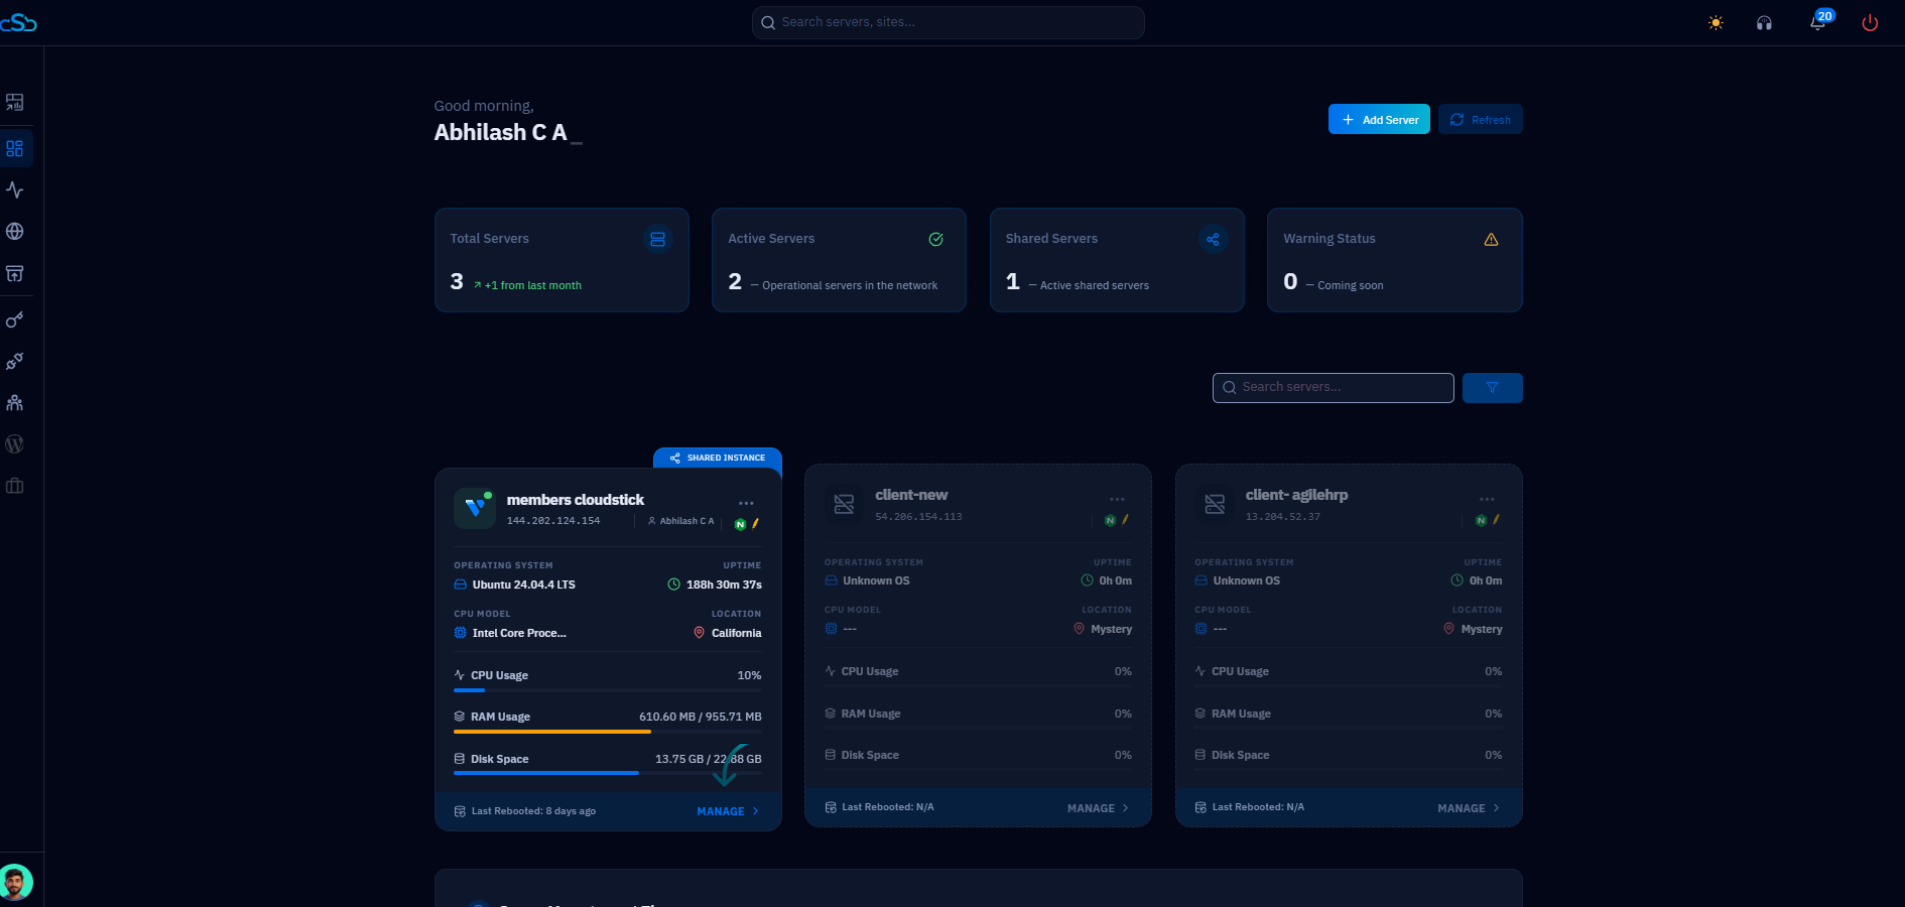
Fig. 02 — CloudStick dashboard listing connected servers; select the server you want to deploy your GitHub repository to.
Step 3: Open Website Management
Once inside the server panel, all hosted sites and new deployments are managed from the Websites section.
Click Websites: Open the Websites resource card from the server overview, or select Websites from the left-hand navigation, to see the Websites List for this server.
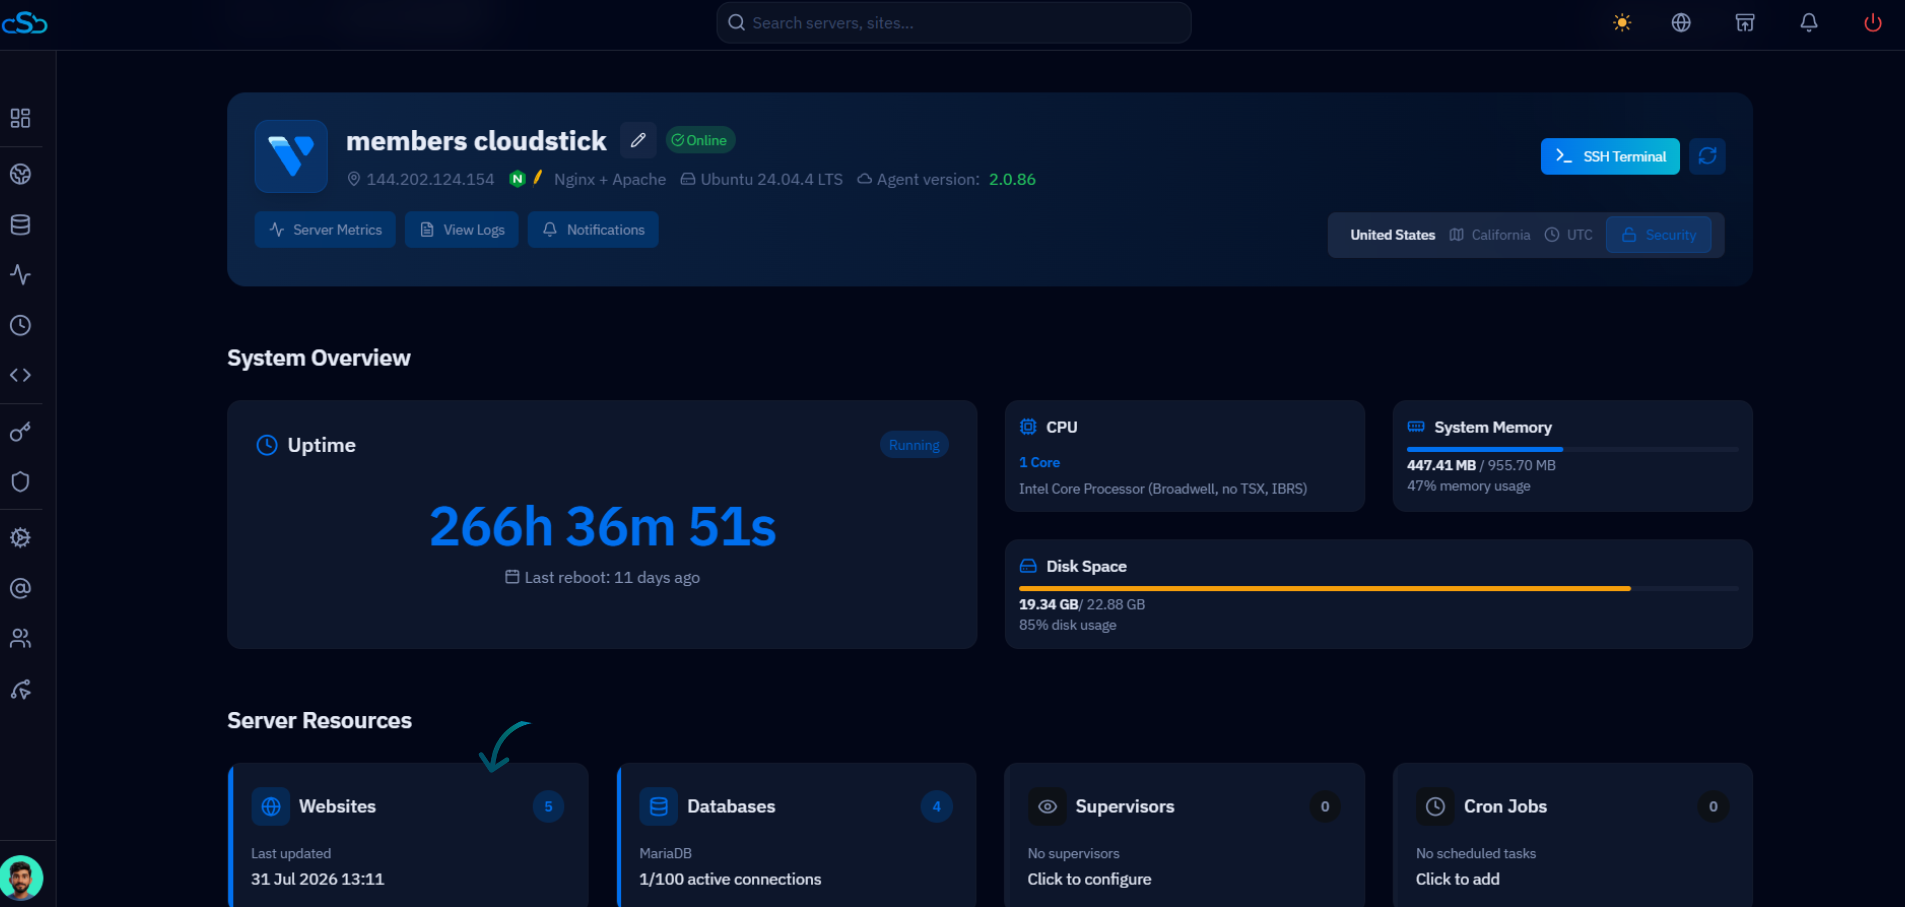
Fig. 03a — Server panel overview; click the Websites resource card to open the Websites List.
Click + Add Website: In the Websites List, click the + Add Website button in the top-right corner to start creating a new deployment.
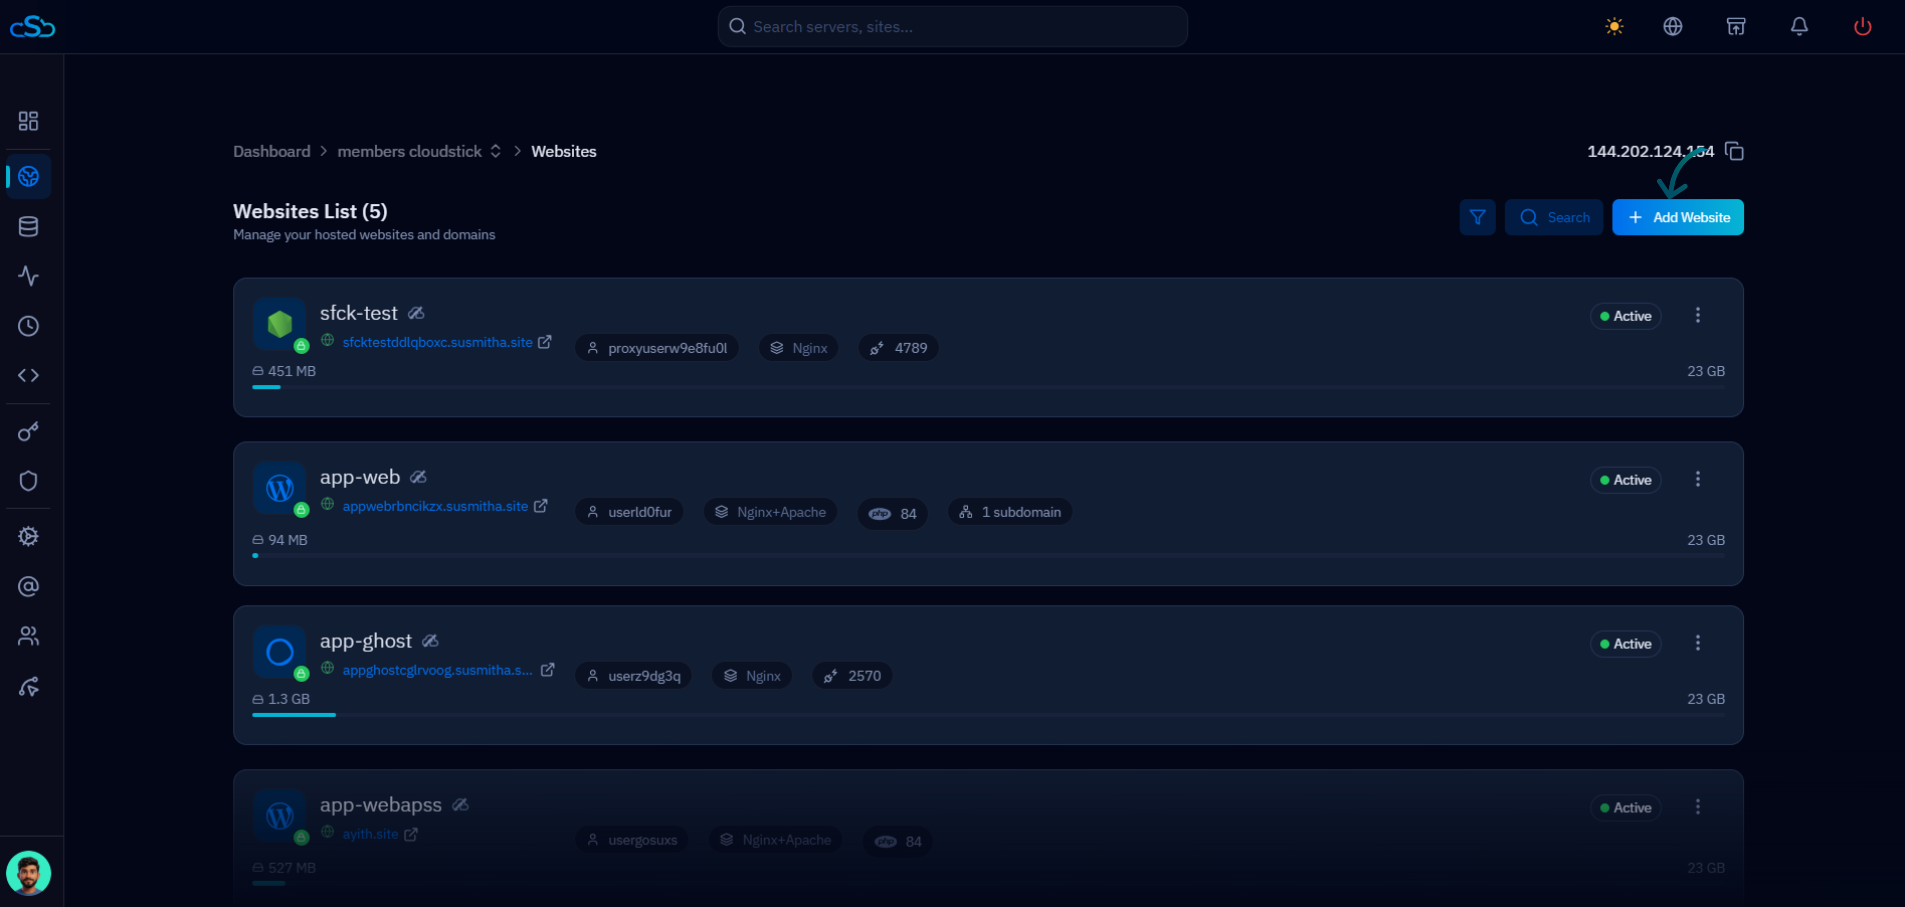
Fig. 03b — Websites List for the selected server; click + Add Website to begin a new deployment.
Step 4: Choose Proxy App
The Create New Website dialog offers several stacks — WordPress, Custom PHP, Laravel, and more. To deploy a Node.js or server-side application from GitHub, select the Proxy App stack.
Select Proxy App: Proxy App is labelled "JavaScript runtime for server-side applications" and carries a No PHP badge. Click Select on the Proxy App card.
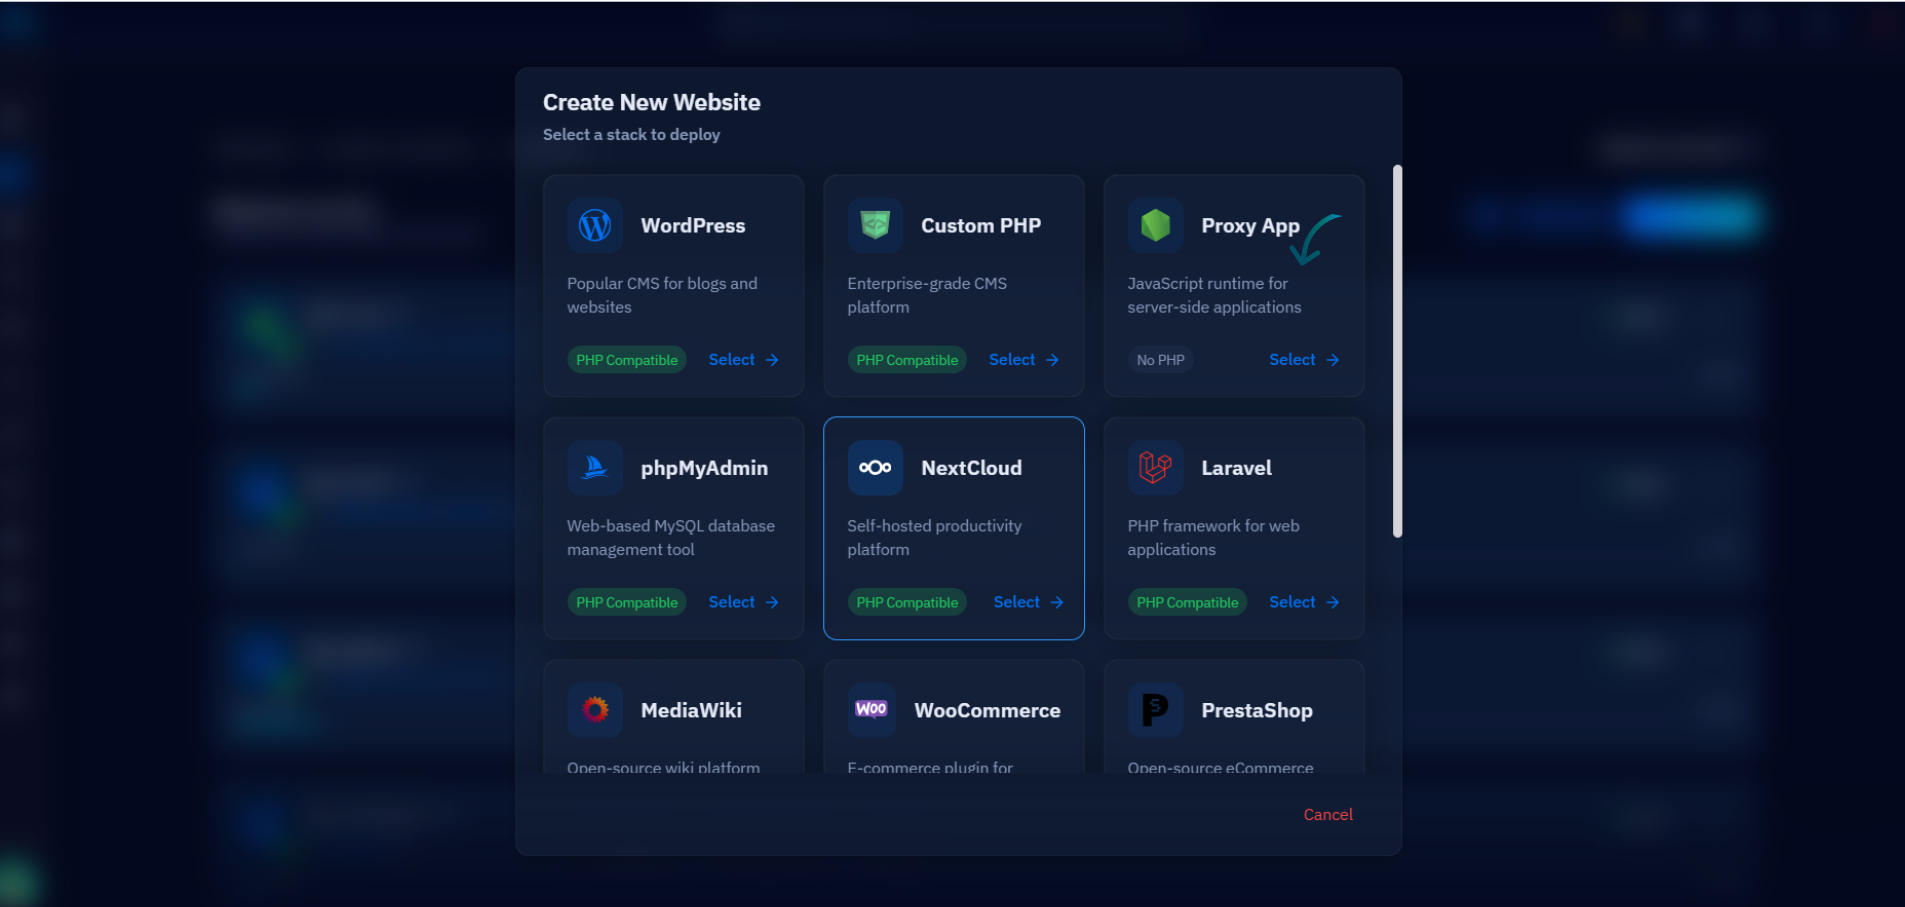
Fig. 04 — Create New Website dialog; select the Proxy App stack to deploy a GitHub-hosted application.
Step 5: Import Your GitHub Repository
Instead of filling in the Proxy App form manually, you can import a GitHub repository so CloudStick can detect your framework and pre-fill the deployment settings.
Click Import Repository: On the Proxy App form, click the Import Repository button in the top-right corner to connect a GitHub repository instead of configuring the app from scratch.
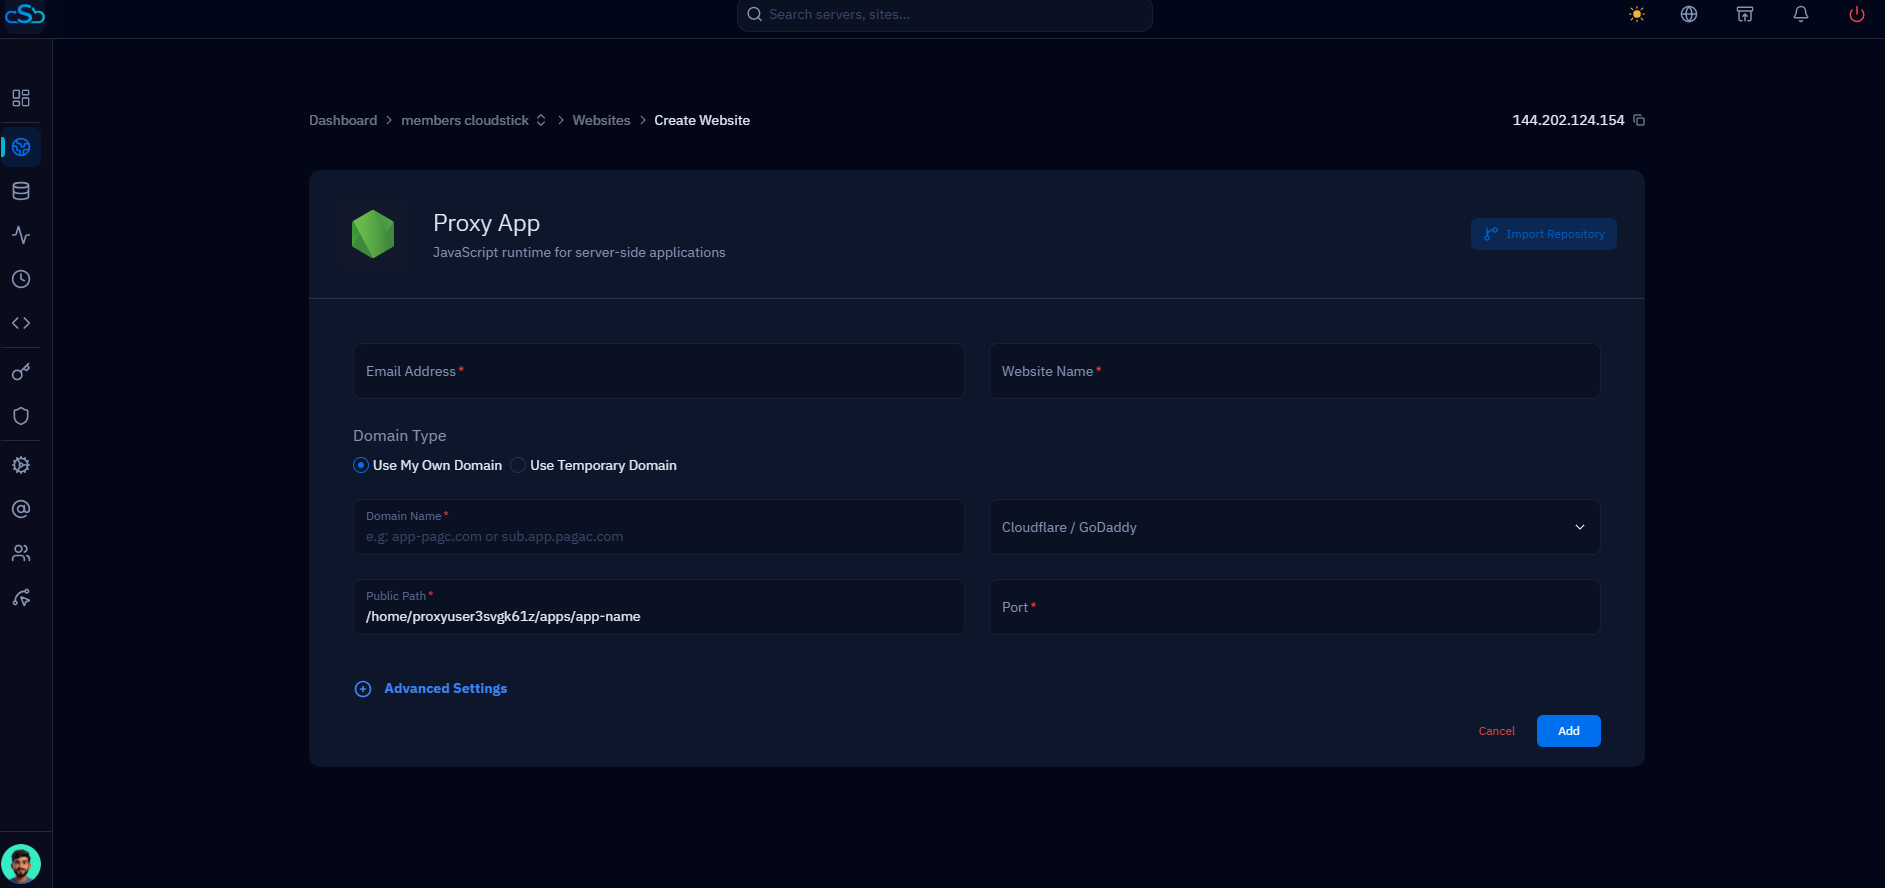
Fig. 05 — Proxy App creation form; click Import Repository to link a GitHub repository.
Step 6: Select Your GitHub Account
CloudStick supports GitHub, GitLab, and Bitbucket as Git providers. For a GitHub repository, choose whether to reuse an existing connected account or connect a new one.
Import Existing: If you have already connected your GitHub account to CloudStick, select Import Existing and click Continue with GitHub to reuse that connection.
Create New: If this is your first time connecting GitHub, select Create New and complete the GitHub authorization flow to grant CloudStick access to your repositories.
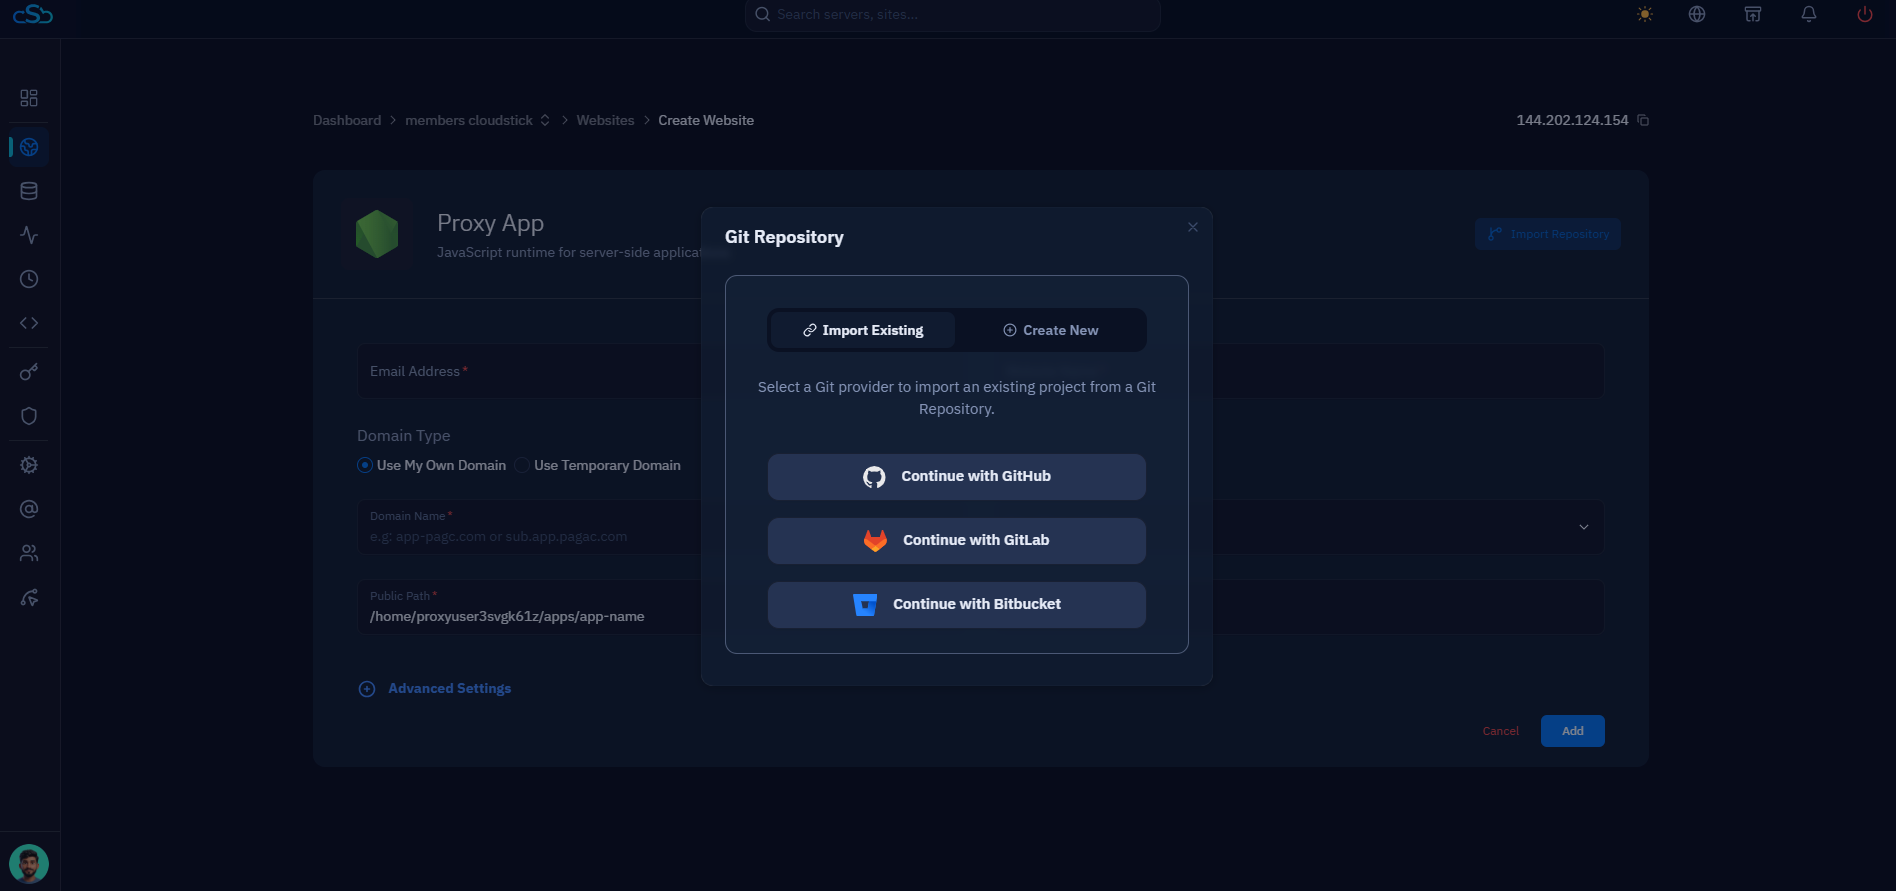
Fig. 06 — Git Repository dialog; choose Import Existing or Create New, then Continue with GitHub.
Step 7: Select the Repository
After authorizing GitHub, CloudStick lists the repositories available under your connected account so you can pick the one to deploy.
Choose your GitHub account: Use the account dropdown to confirm which connected GitHub account you are browsing repositories from.
Search and select: Use the search box to find your repository, then click Import next to the repository you want to deploy.
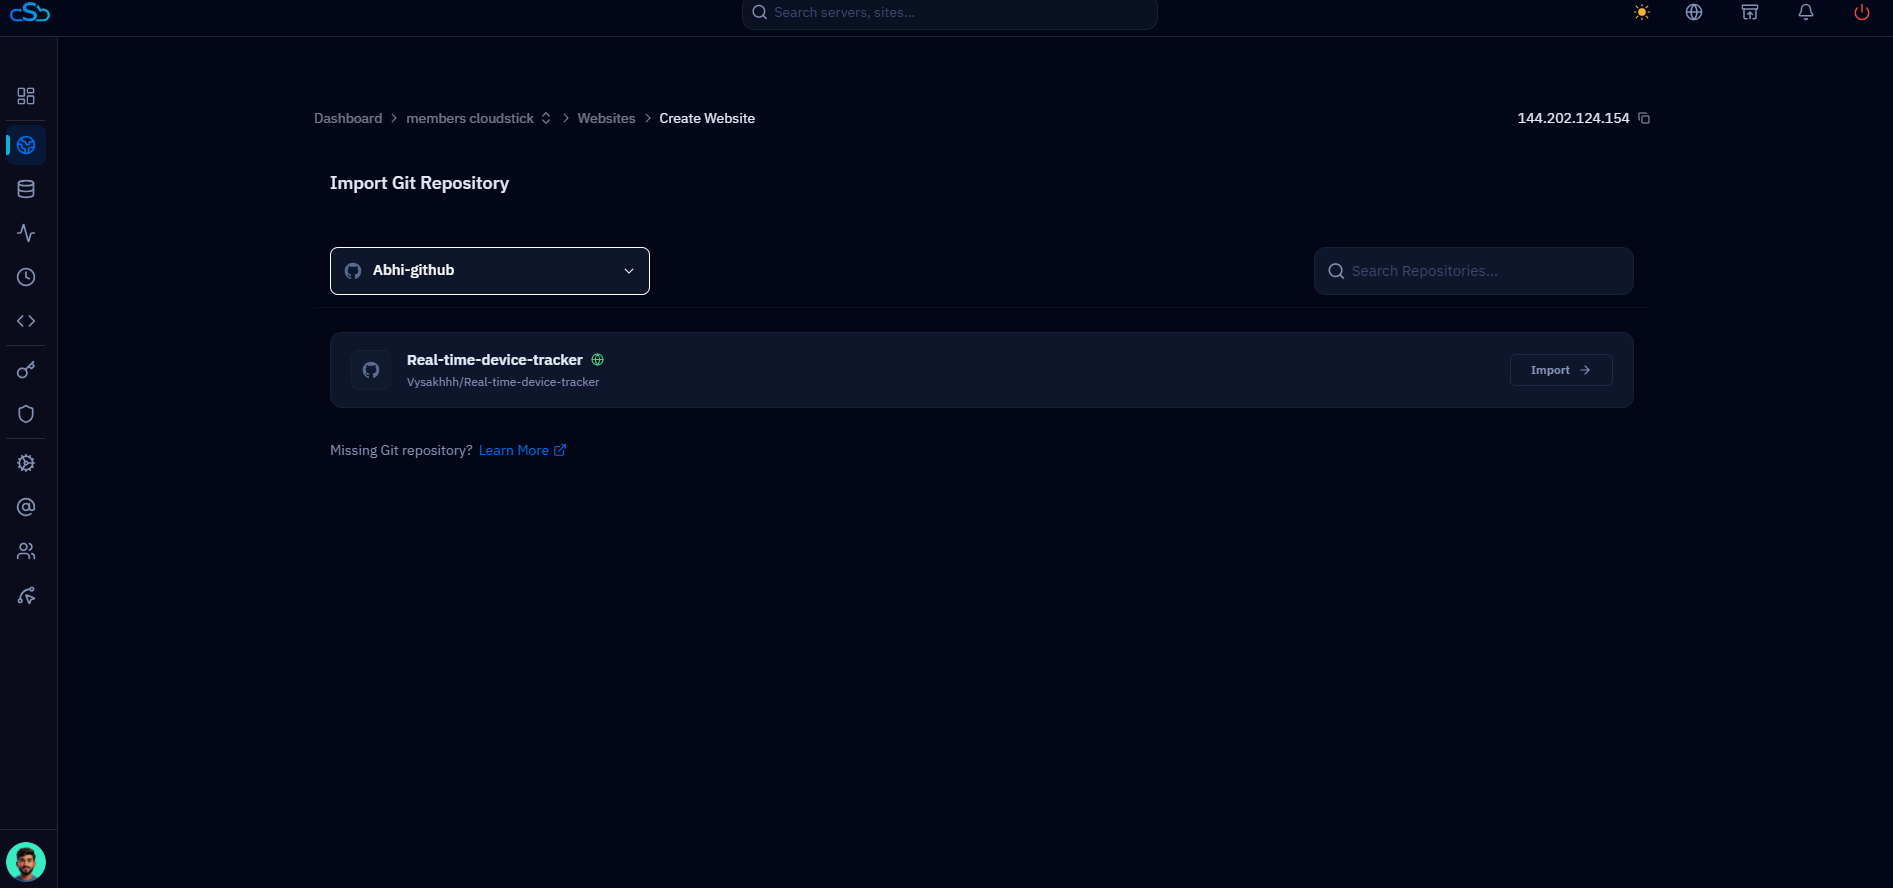
Fig. 07 — Import Git Repository screen listing repositories under the connected GitHub account; click Import to proceed.
Step 8: Configure Deployment Settings
After importing, CloudStick shows the Configure Deployment section where you define exactly how your application should be built and run. CloudStick auto-detects your framework where possible and pre-fills sensible defaults.
Branch: Select the GitHub branch you want to deploy, for example main or master.
Root Directory: Specify where your application files live — use / for the repository root, or a path like /app if your project sits in a subfolder.
Clone Method: Choose HTTP or SSH as the method CloudStick uses to clone your repository.
Install Command: Enter the command used to install dependencies, for example npm ci or npm install.
Node.js Version: Select the Node.js version your application requires, such as Node.js 18, 20, or 22.
Build Command: Enter the command needed to build your application, for example npm run build — required for frameworks like React and Next.js.
Run Command: Enter the command used to start your application, for example npm start.
Keep Running with PM2: Enable this toggle so PM2 keeps your application running in the background, restarts it automatically after a server reboot, and reduces downtime if the process crashes.
Auto Deploy on Push: Enable this toggle so CloudStick automatically pulls and redeploys your application whenever new commits are pushed to the selected branch.
Environment Variables: Add the key/value pairs your application needs at runtime, such as DATABASE_URL, API_KEY, and NODE_ENV, or use Import .env to upload them from an existing file.
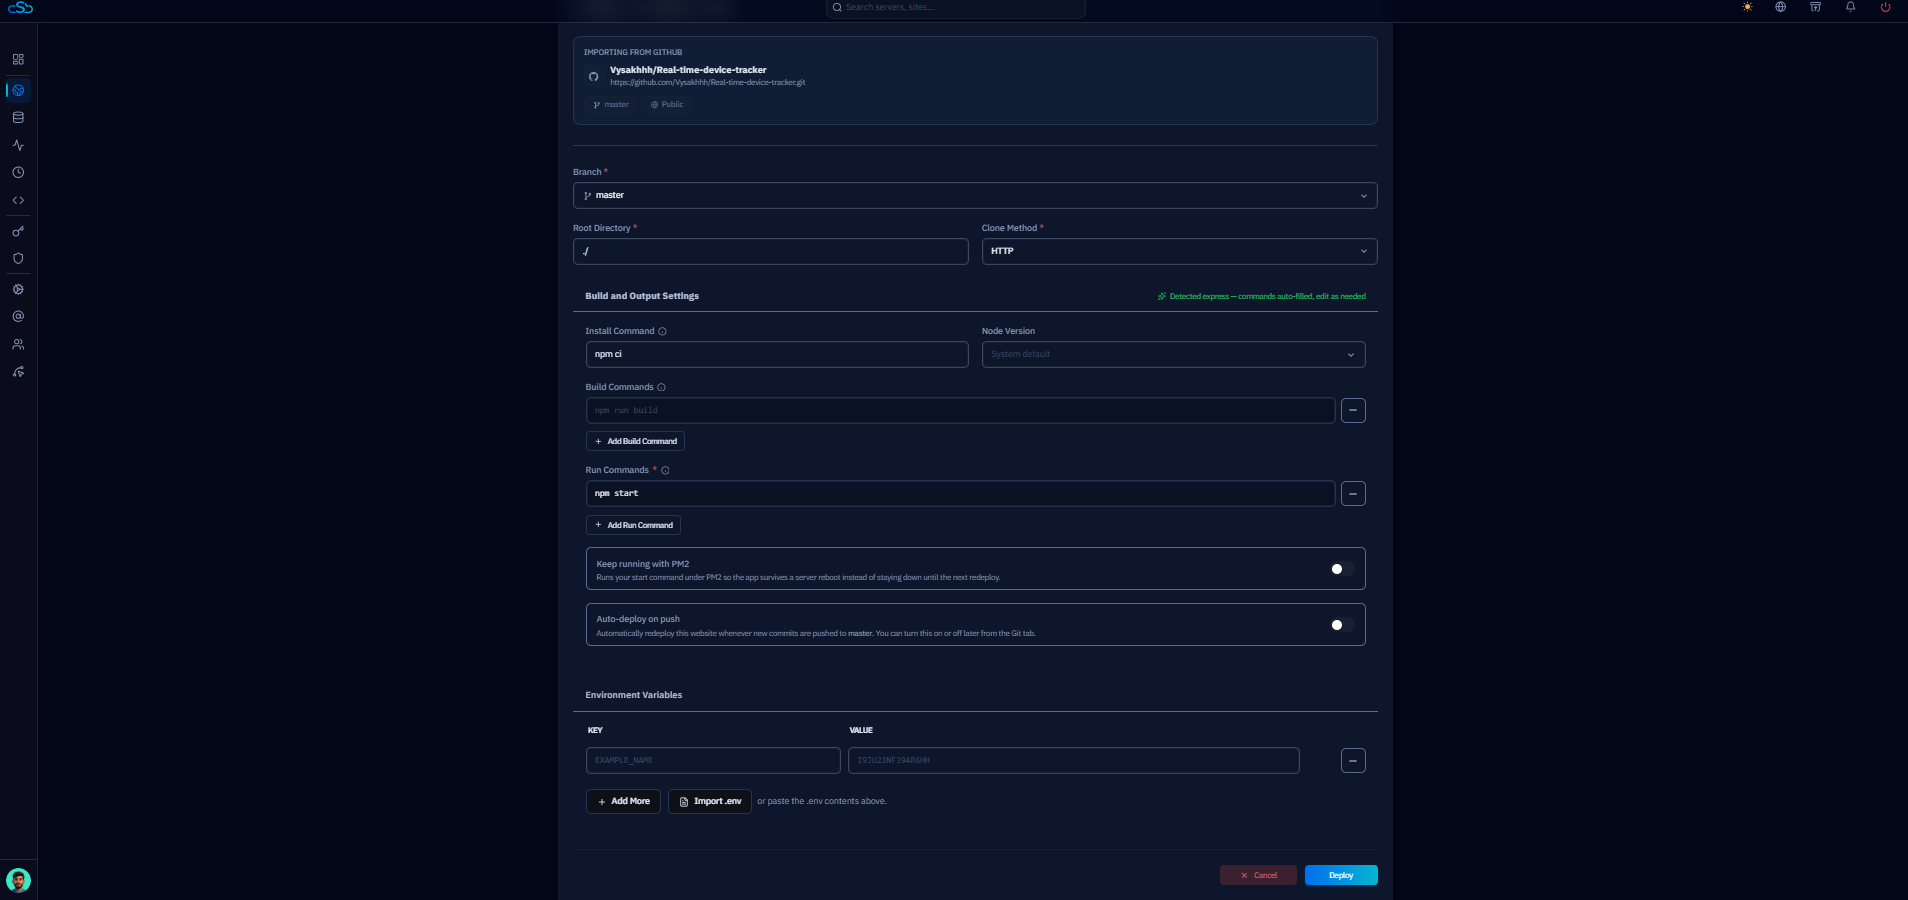
Fig. 08a — Configure Deployment form showing branch, root directory, install/build/run commands, PM2, Auto-deploy on push, and environment variables.
Click Deploy: Once all settings are configured, click Deploy. CloudStick begins installing dependencies, running your build, and starting your application.
Step 9: Create the Website
With the repository linked and deployment settings configured, the last step before going live is entering the website details.
Email Address: Enter the email address to associate with this site.
Website Name: Give the site a short identifier — this becomes part of its system user and file path on the server.
Domain Type: Choose Use Temporary Domain to test the deployment immediately, or Use My Own Domain to point a real domain or subdomain at it.
Application Port: Enter the port your application listens on, matching the port configured in your app.
Click Create Website: Click Add Website (or Create Website) to finish. CloudStick applies all your configuration and starts deploying the application — you can continue to monitor progress from the deployment logs.
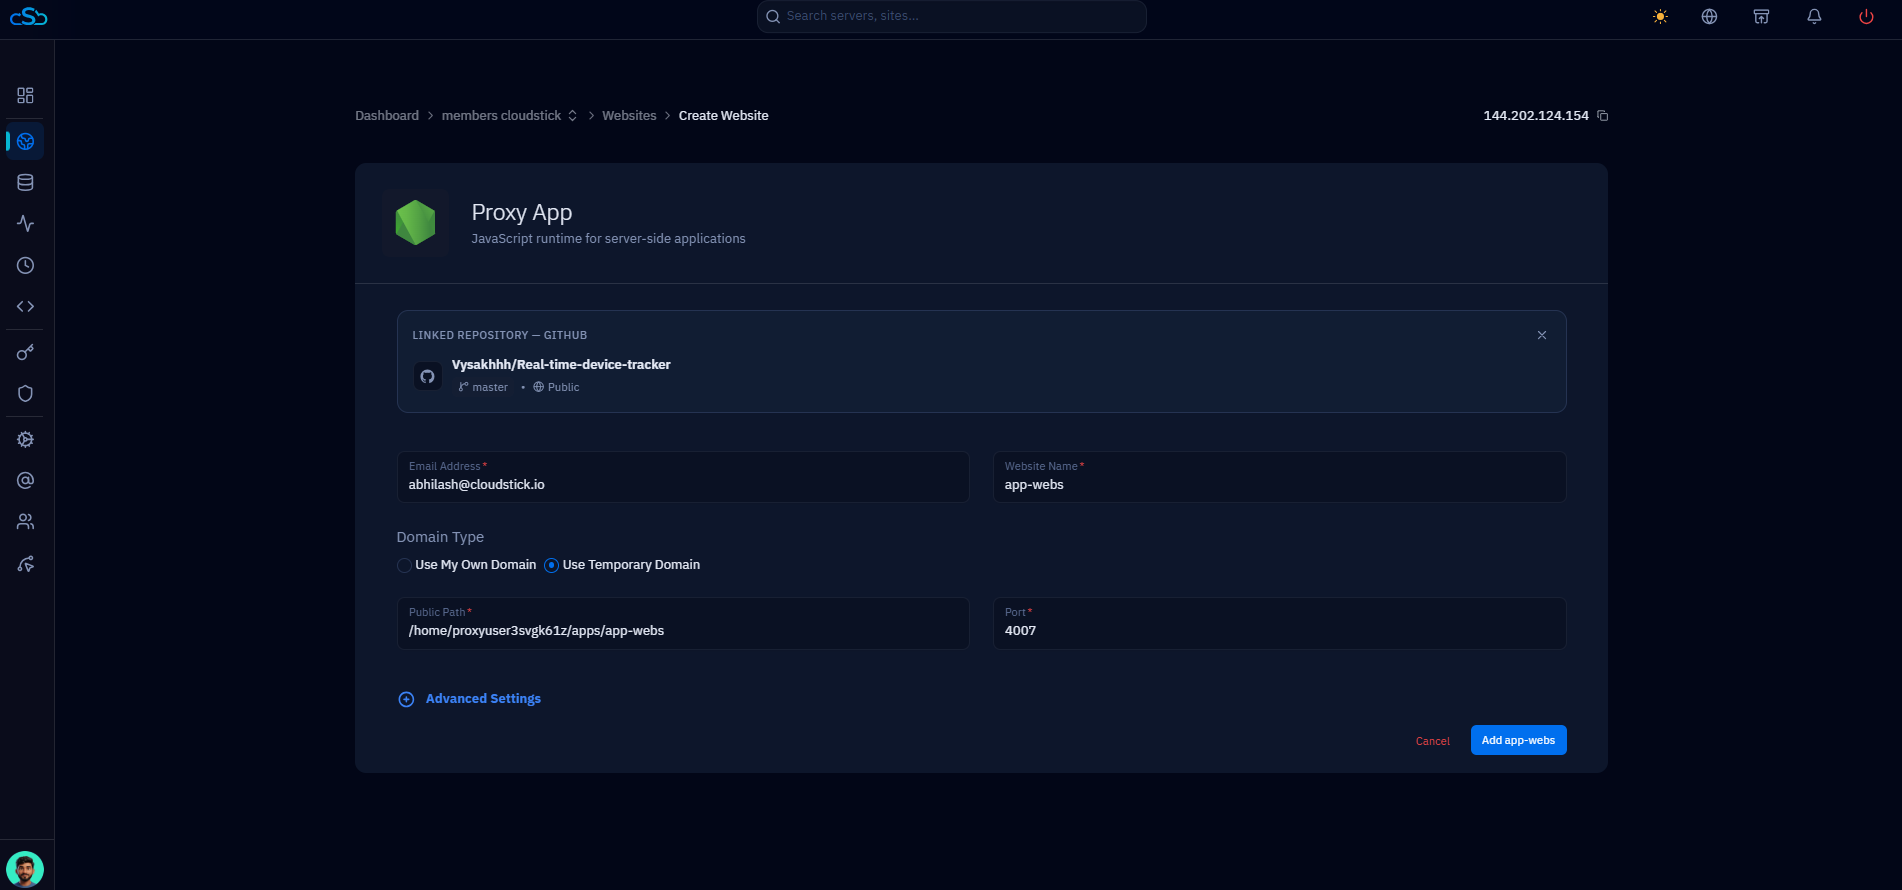
Fig. 09a — Proxy App form with the linked GitHub repository, email address, website name, domain type, and port; click Add Website to deploy.
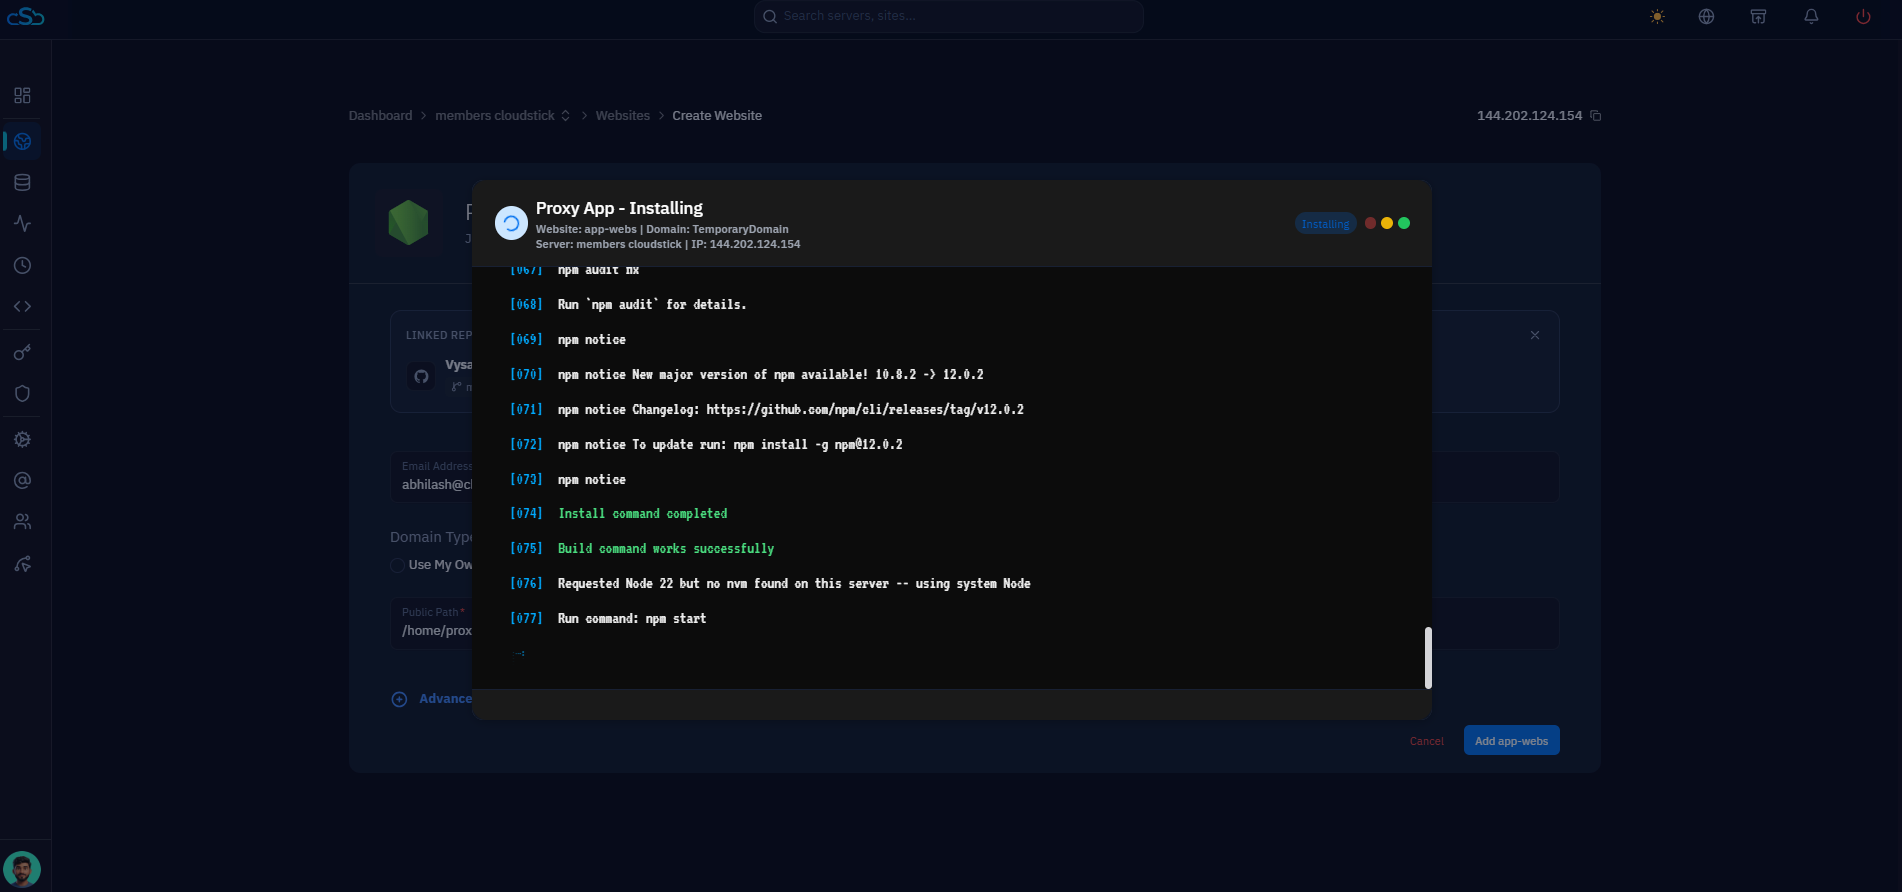
Fig. 09b — Live deployment log showing the install and build commands completing successfully before the run command starts.
You can monitor the entire process — dependency install, build, and start — through the live deployment logs shown in this dialog. If the log shows an error, fix the underlying script (for example, a missing build step) and redeploy rather than editing files directly on the server.
Step 10: Deploy an SSL Certificate
Once the deployment completes, secure the site with HTTPS before sharing the domain with visitors.
Open Manage SSL: From the website's management tabs, open Manage SSL and deploy a free Let's Encrypt certificate — or install your own custom certificate — to enable HTTPS access.
A temporary domain can also have SSL deployed, but for production use, point your own domain at the server and issue the certificate against that domain instead. See How to install a Let's Encrypt SSL certificate for the full walkthrough.
Step 11: Manage GitHub Repository Settings
After deployment, a dedicated Git tab appears on the website, giving you full control over the connected repository without needing to open GitHub.
Repository Information: View the repository URL, connection status, selected branch, latest commit status, number of branches, commit history, and when it was last updated.
Auto Deployment: Toggle Auto-Deploy on or off at any time. When enabled, CloudStick automatically deploys the website whenever new code is pushed to the selected branch.
Manual Deployment: If Auto-Deploy is disabled, click Redeploy to manually pull and deploy the latest changes from your GitHub repository.
Disconnect Repository: Click Disconnect if you want to remove the connected GitHub repository from this website.
Browse Repository Files: Use the Files tab to browse your repository's folders and files directly from CloudStick, without opening GitHub.
Files – Browse repository files and folders.
Overview – View repository details and deployment status.
Actions – Monitor deployment actions and activities.
Pull Requests – View and manage pull requests.
Branches – View available branches and switch branches.
Commits – Review commit history.
Deployments – View previous deployment records.
Pipeline – Monitor your deployment pipeline.
Settings – Configure GitHub deployment settings.
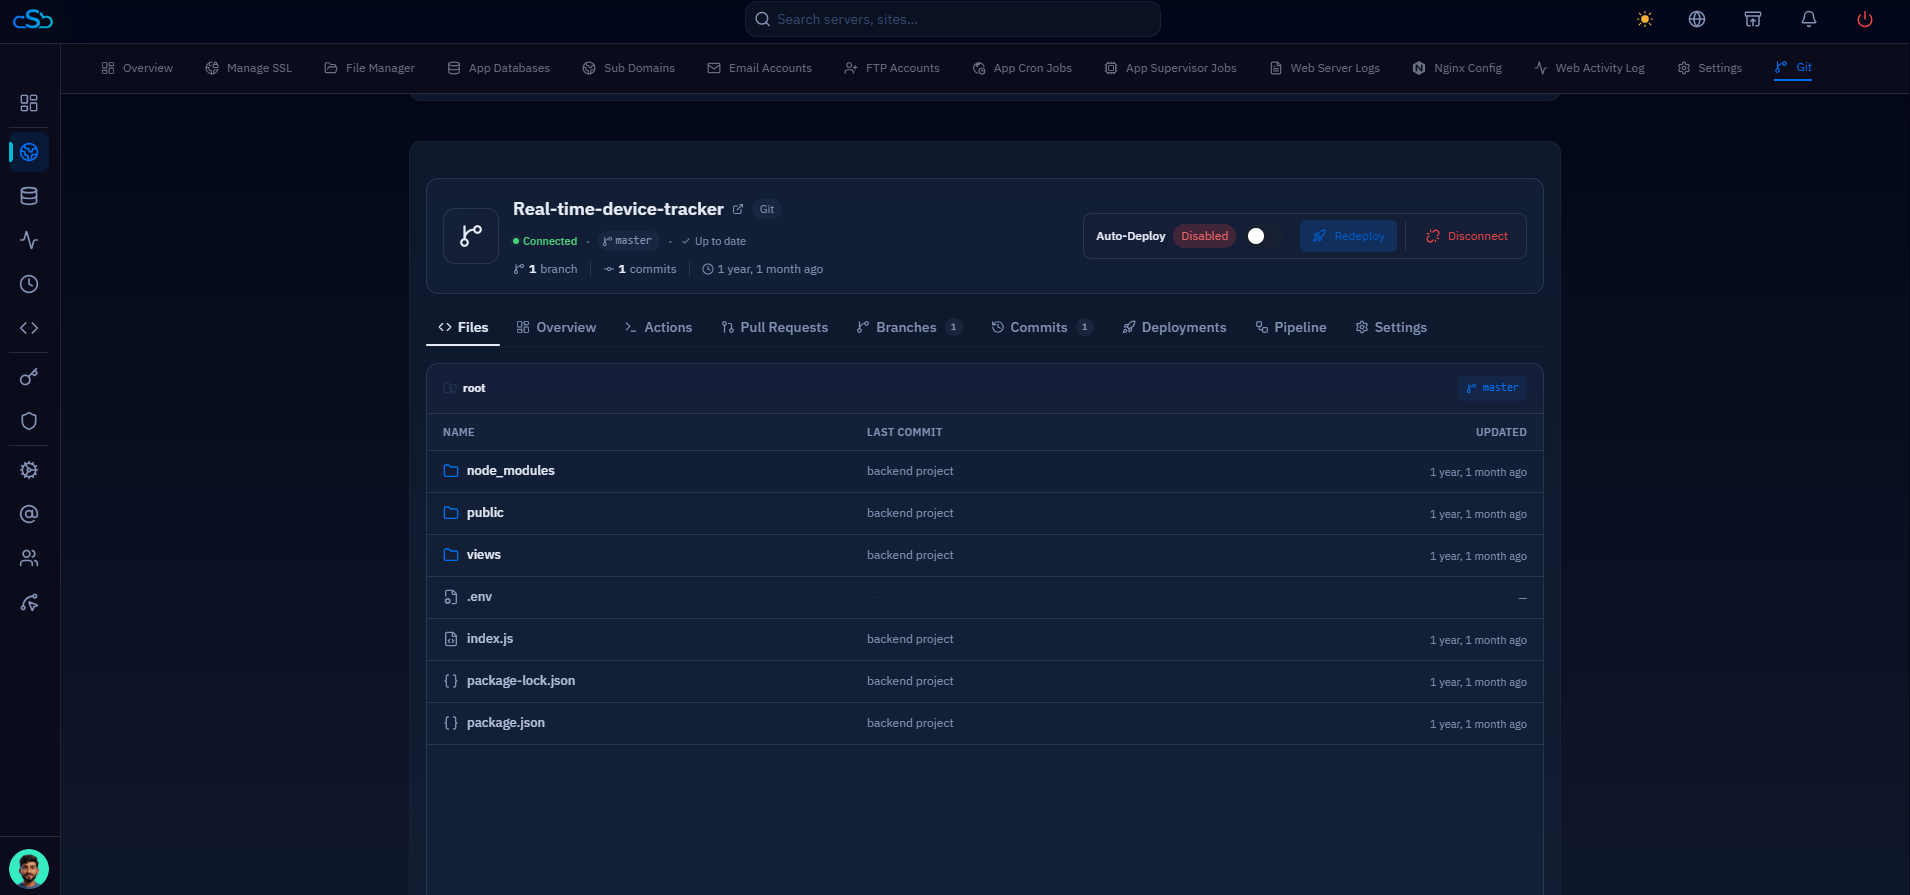
Fig. 11 — Git tab for a deployed website, showing connection status, Auto-Deploy toggle, Redeploy and Disconnect actions, and repository management tabs.
With CloudStick, you can manage your entire GitHub deployment — branches, Auto Deploy, commits, and redeployments — from a single dashboard, without logging into GitHub for regular deployment tasks.