How to Install a New PHP Version in CloudStick?
Overview
PHP is the foundation of WordPress and the vast majority of web applications running on CloudStick servers. Each PHP version brings security patches, performance improvements, and support for newer language features — and plugins or frameworks often require a minimum PHP version to function correctly. Having multiple PHP versions installed on your server means you can assign different PHP versions to different websites, testing a new version on a staging site before upgrading production.
CloudStick's EasyPHP section makes installing a new PHP version a one-click operation from the server panel — no SSH, no package management commands, and no manual configuration required. This guide walks you through selecting your server, navigating to EasyPHP, installing an additional PHP version, and confirming it is running on the Services page.
Installing a new PHP version makes it available globally on the server. To assign it to a specific website, navigate to that website's settings and use the Change PHP Version option — see the How to change PHP version for a web application guide.
Step 1: Log In and Select Your Server
Start from the CloudStick dashboard, which lists all servers connected to your account with real-time CPU, RAM, and disk statistics. Identify the server where you want to install the new PHP version and open its management panel.
1. Sign in: Go to dash.cloudstick.io and log in with your CloudStick credentials.
2. Find your server: Locate the server card on the dashboard. Each card shows the server name, IP address, operating system, and live resource usage.
3. Click MANAGE: Click the MANAGE button at the bottom-right of the server card to open the server's management panel.
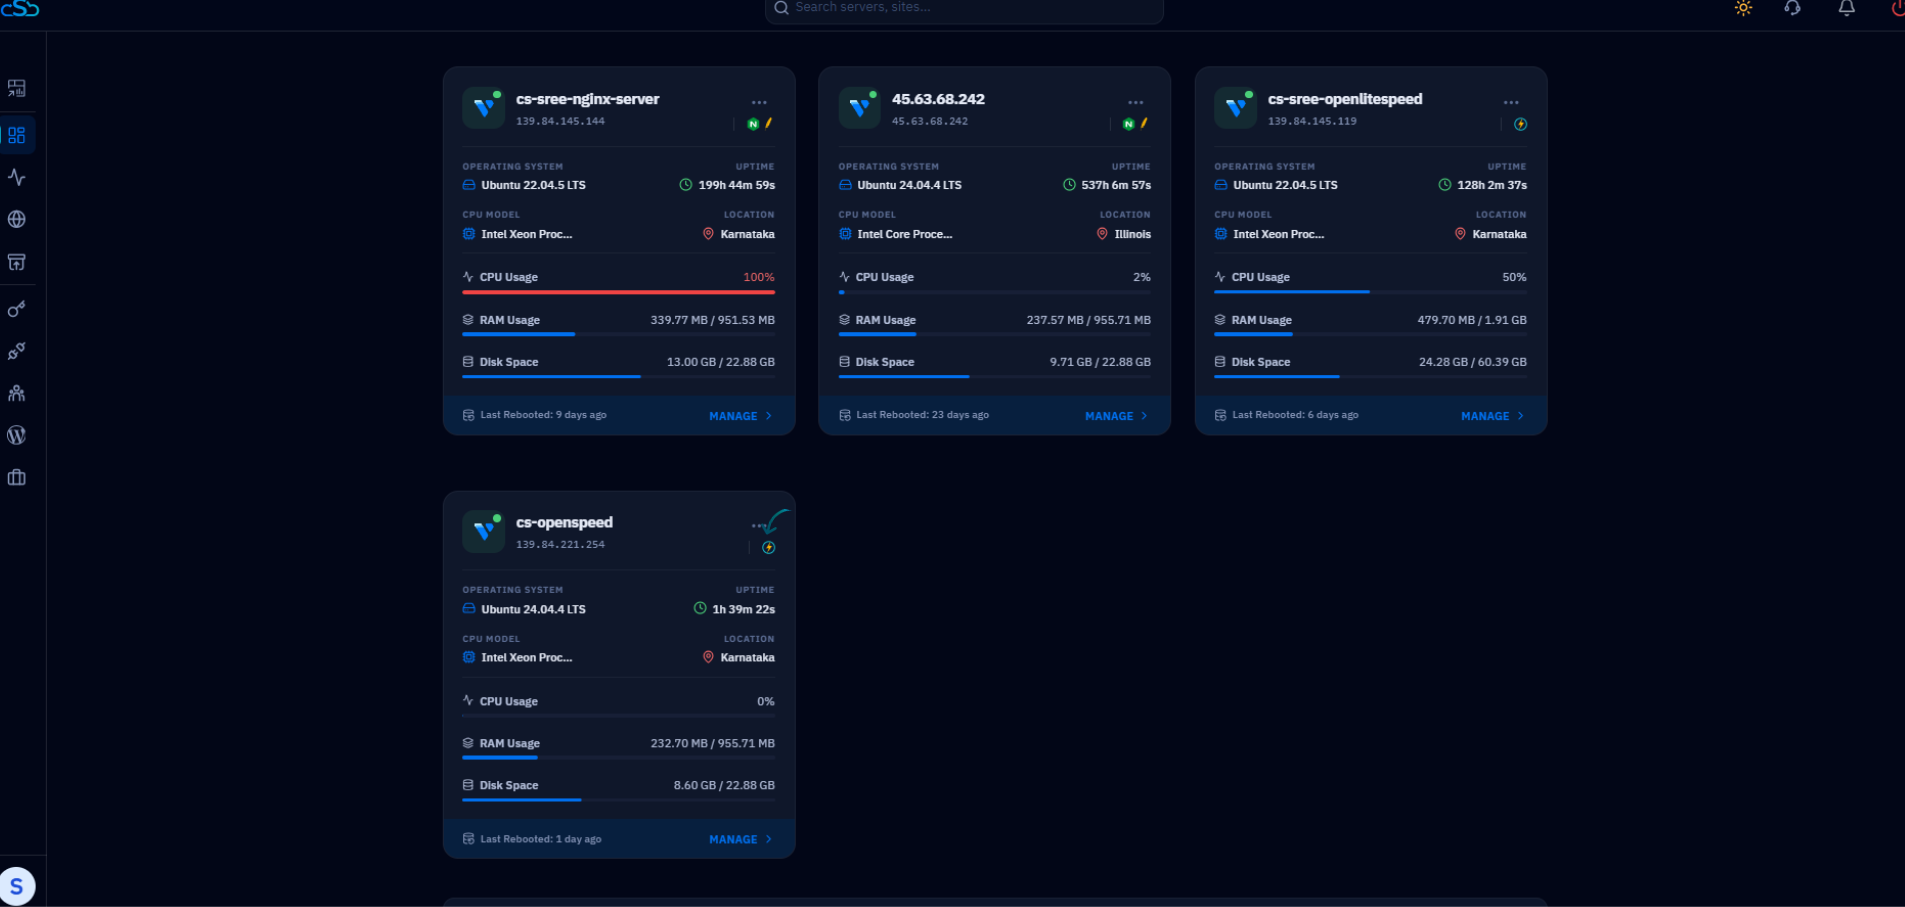
Fig. 01 — CloudStick dashboard showing connected servers. Click MANAGE on the target server to open its panel.
Step 2: Open the Server Panel
After clicking MANAGE, you are taken to the server overview page showing uptime, CPU, memory, disk usage, and quick-access resource cards. From here you will use the left-hand navigation to reach the EasyPHP section.
1. Confirm your server: Check the server name and IP address at the top of the panel to confirm you are managing the correct server.
2. Locate the left-hand navigation: The icon-based sidebar on the left provides access to all server management sections including Websites, Databases, EasyPHP, SSH Keys, Security, and more.
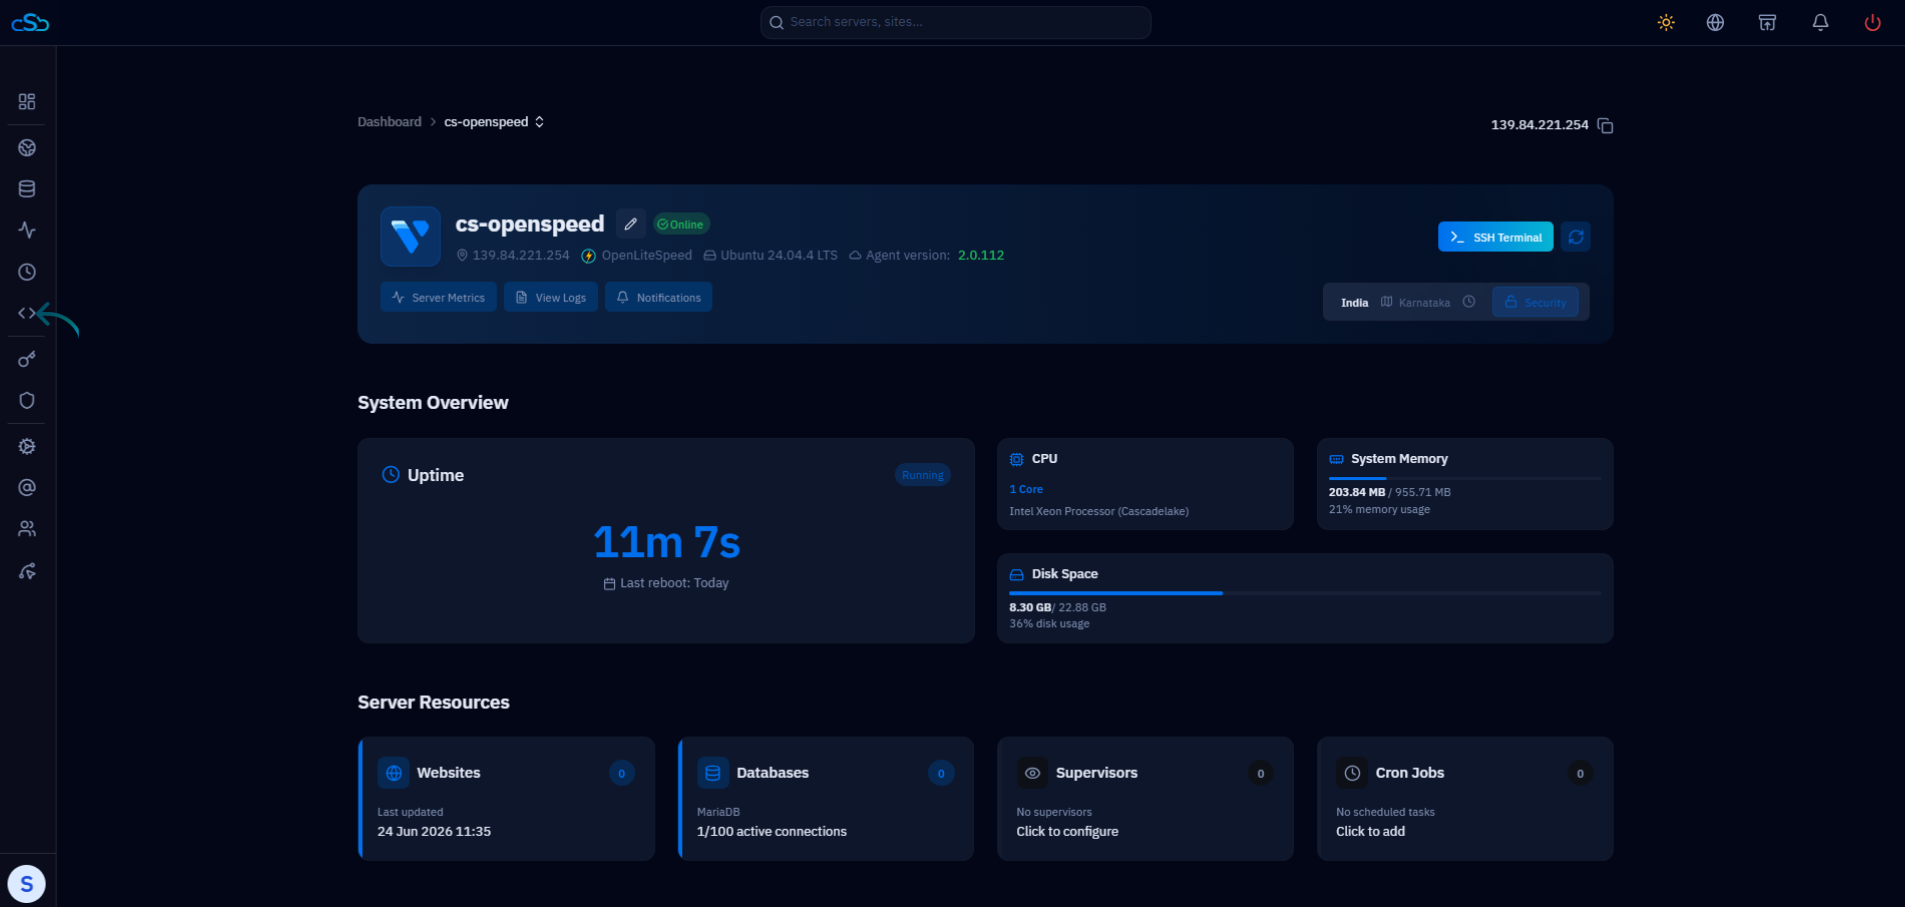
Fig. 02 — Server overview panel showing system metrics, uptime, and the left-hand navigation sidebar.
Step 3: Open EasyPHP and Install the PHP Version
EasyPHP is CloudStick's built-in PHP management tool. It displays all available PHP versions as selectable cards and lets you install any version with a single click — no command line required. PHP extensions for each installed version are also managed from this same page.
1. Click EasyPHP in the sidebar: In the left-hand navigation, click the code/bracket icon to open the EasyPHP page. The page heading reads 'EasyPHP' with a description of PHP extension management.
2. Review the PHP Versions panel: The PHP Versions section shows all available PHP versions (e.g. 8.1, 8.2, 8.3, 8.4, 8.5) as cards. Versions already installed on the server show a filled radio button. Versions not yet installed show a download/install icon.
3. Click the install icon for the desired version: Click the download icon on the PHP version card you want to install. CloudStick will immediately begin installing that PHP version on your server. No confirmation dialog is shown — the installation starts instantly.
Installation typically completes within 30–60 seconds. The page does not show a progress bar — navigate to the Services page (Step 4) after a moment to confirm the new PHP version is listed and running.
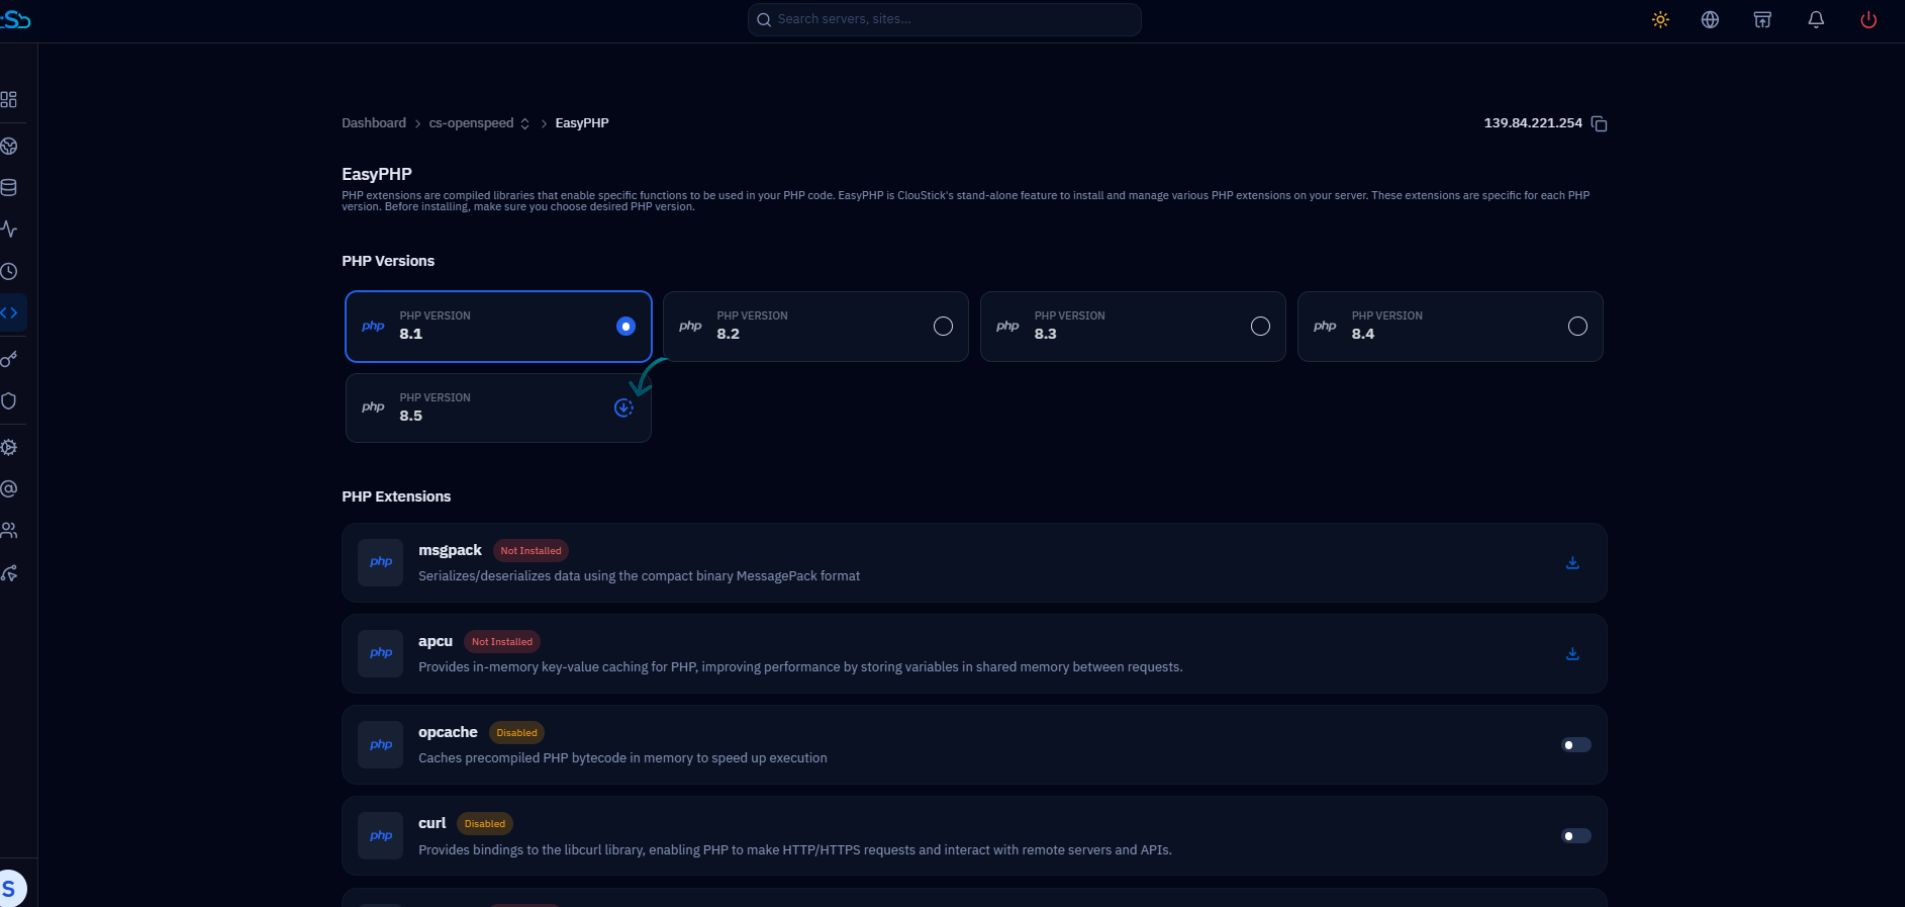
Fig. 03 — EasyPHP page showing PHP version cards. PHP 8.1 is selected; PHP 8.5 shows the install icon highlighted with an arrow.
Step 4: Verify the Installation on the Services Page
Once CloudStick has installed the new PHP version, it appears as a running service on the Services page. This page shows every service running on your server — including all PHP-FPM instances — so you can confirm the new version is active and consuming resources as expected.
1. Navigate to Services: In the left-hand navigation, click the settings/gear icon to open the Manage Server Services page.
2. Find your new PHP version: Scroll down to the PHP service cards. Each installed PHP version appears as a separate card (e.g. PHP8.1, PHP8.2, PHP8.3, PHP8.4, PHP8.5) with a green 'running' badge confirming it is active.
3. Assign it to a website: Your new PHP version is now available server-wide. To use it for a specific website, go to that website's settings in the Websites section and change its PHP version from the dropdown.
All installed PHP versions run as separate PHP-FPM services and are independently managed. You can stop, start, or restart any individual PHP version from the Services page using the three-dot menu on its card without affecting other versions.
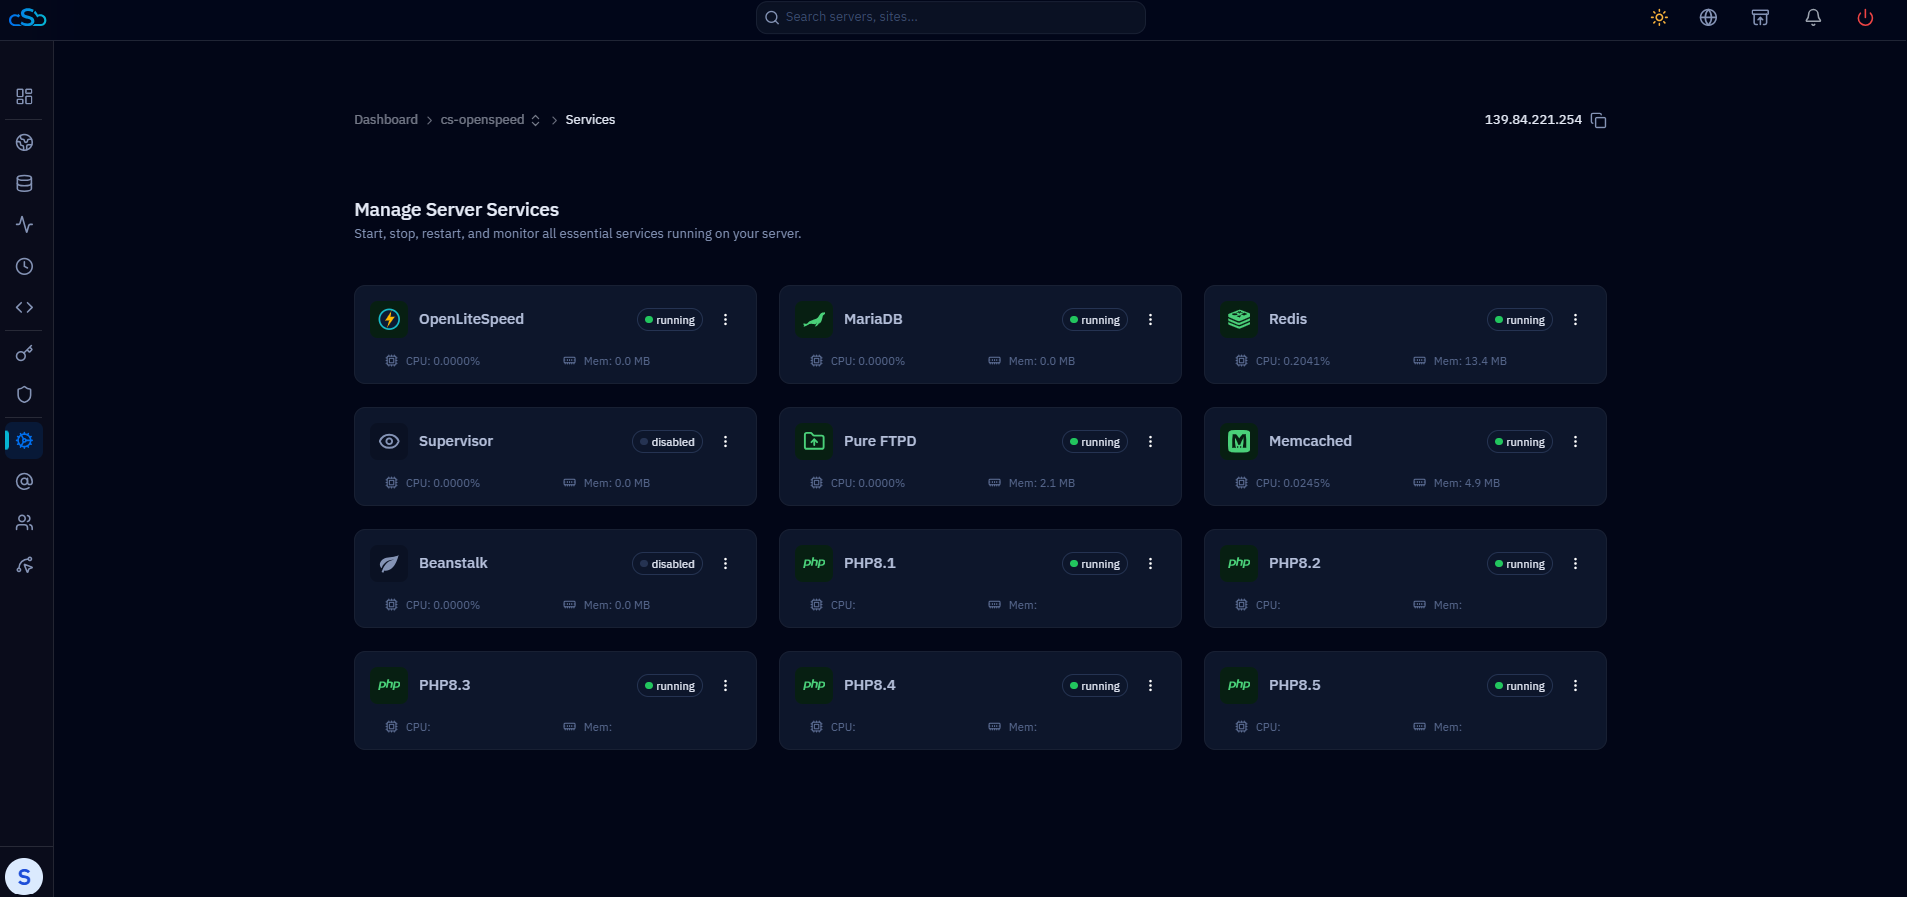
Fig. 04 — Manage Server Services page showing PHP 8.1 through PHP 8.5 all listed with a green 'running' status badge.