How to Deploy White Label in CloudStick
Overview
Deploying a White Label site in CloudStick means provisioning a fully branded control panel as a web application on your own server — giving you a dedicated login URL on your custom domain that clients and team members use to access the CloudStick-powered dashboard under your brand. This is distinct from Business Branding (which sets the logo and colors): deploying a White Label site creates the actual hosted application that serves your branded interface.
This guide covers the complete end-to-end process: selecting a server, navigating to Websites, choosing the White Label stack, filling in your domain and server configuration, monitoring the live installation, and securing the site with SSL so your clients can log in safely via HTTPS on your custom domain.
White Label deployment requires an active Business Plan. You must also have at least one server already connected in your CloudStick dashboard. If you have not yet connected a server, complete the Getting Started guides first. For configuring your brand name and logo, see the How to Set Up White-Label Branding article.
Step 1: Navigate to Your Server
White Label sites are deployed as web applications on a specific server in your account. Start by logging in and opening the server panel for the server you want to host the white-label control panel on.
1. Log in to your CloudStick Dashboard: Sign in at app.cloudstick.io. Your main dashboard shows all connected servers with real-time CPU, RAM, and disk usage at a glance.
2. Select your server: Locate the server card you want to use and click the MANAGE button at the bottom of the card. This opens the full server management panel.
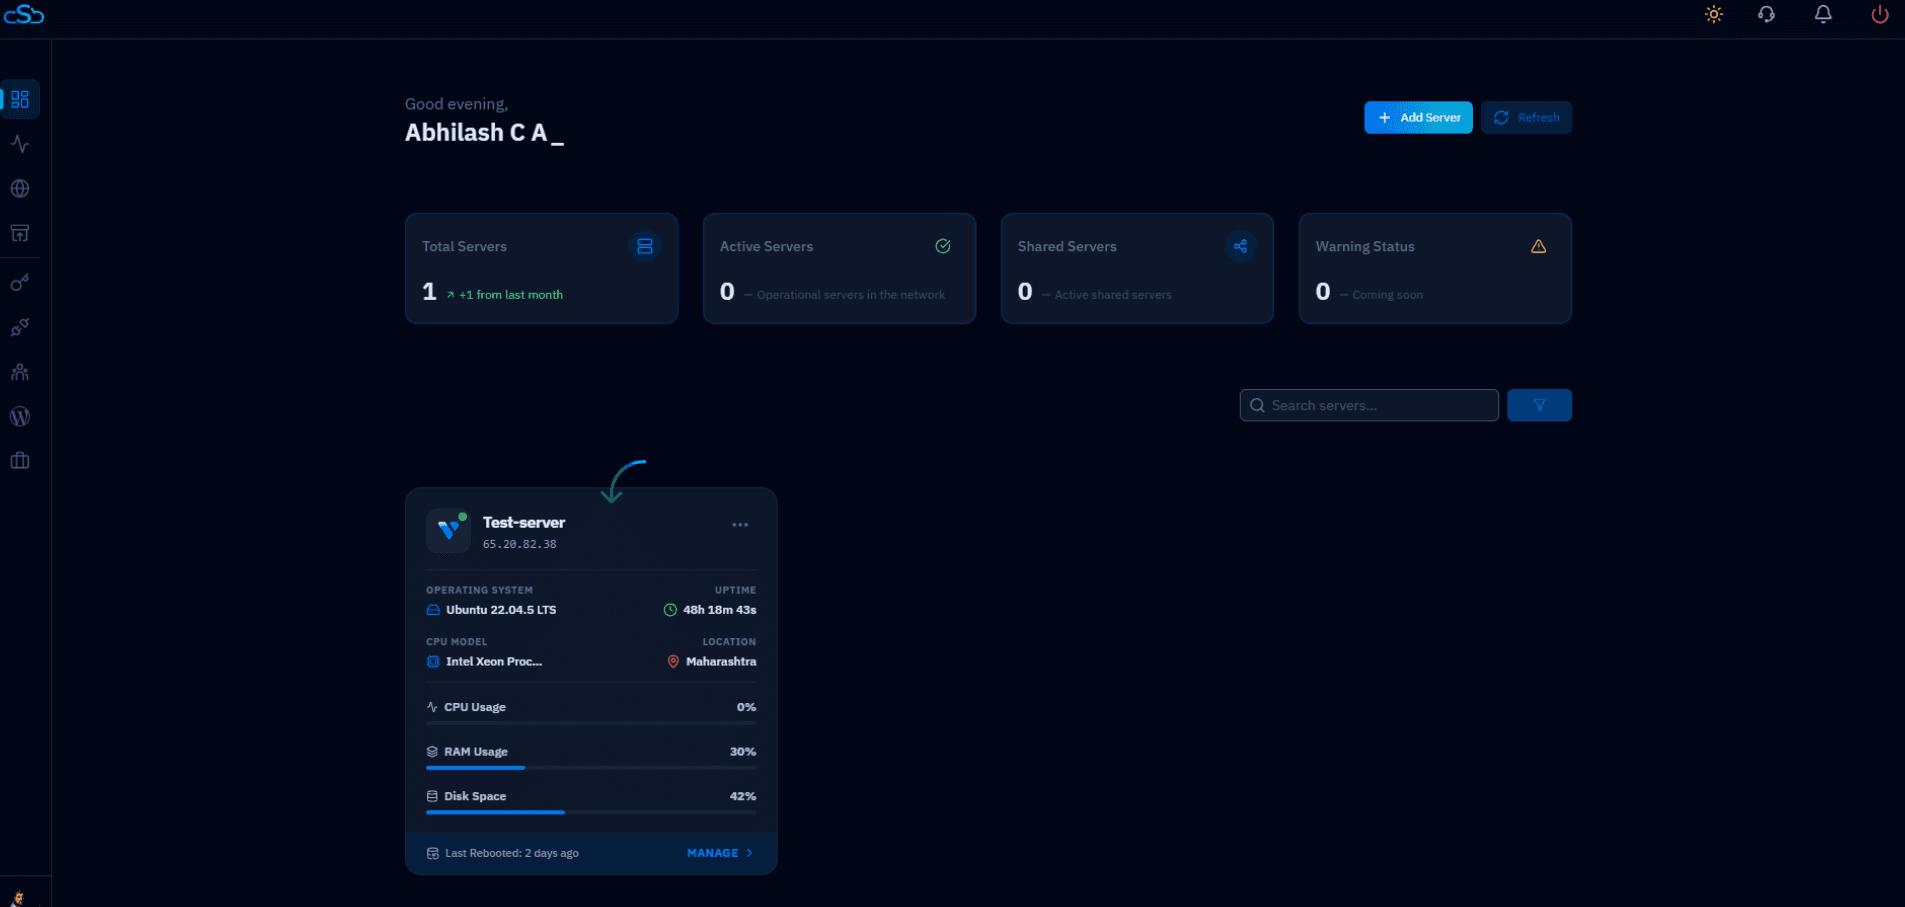
Fig. 01 — CloudStick main dashboard showing connected servers. Click MANAGE on the target server to open its management panel.
The server panel displays a full system overview — uptime, CPU, memory, disk usage — and quick-access resource tiles for Websites, Databases, Supervisors, and Cron Jobs.
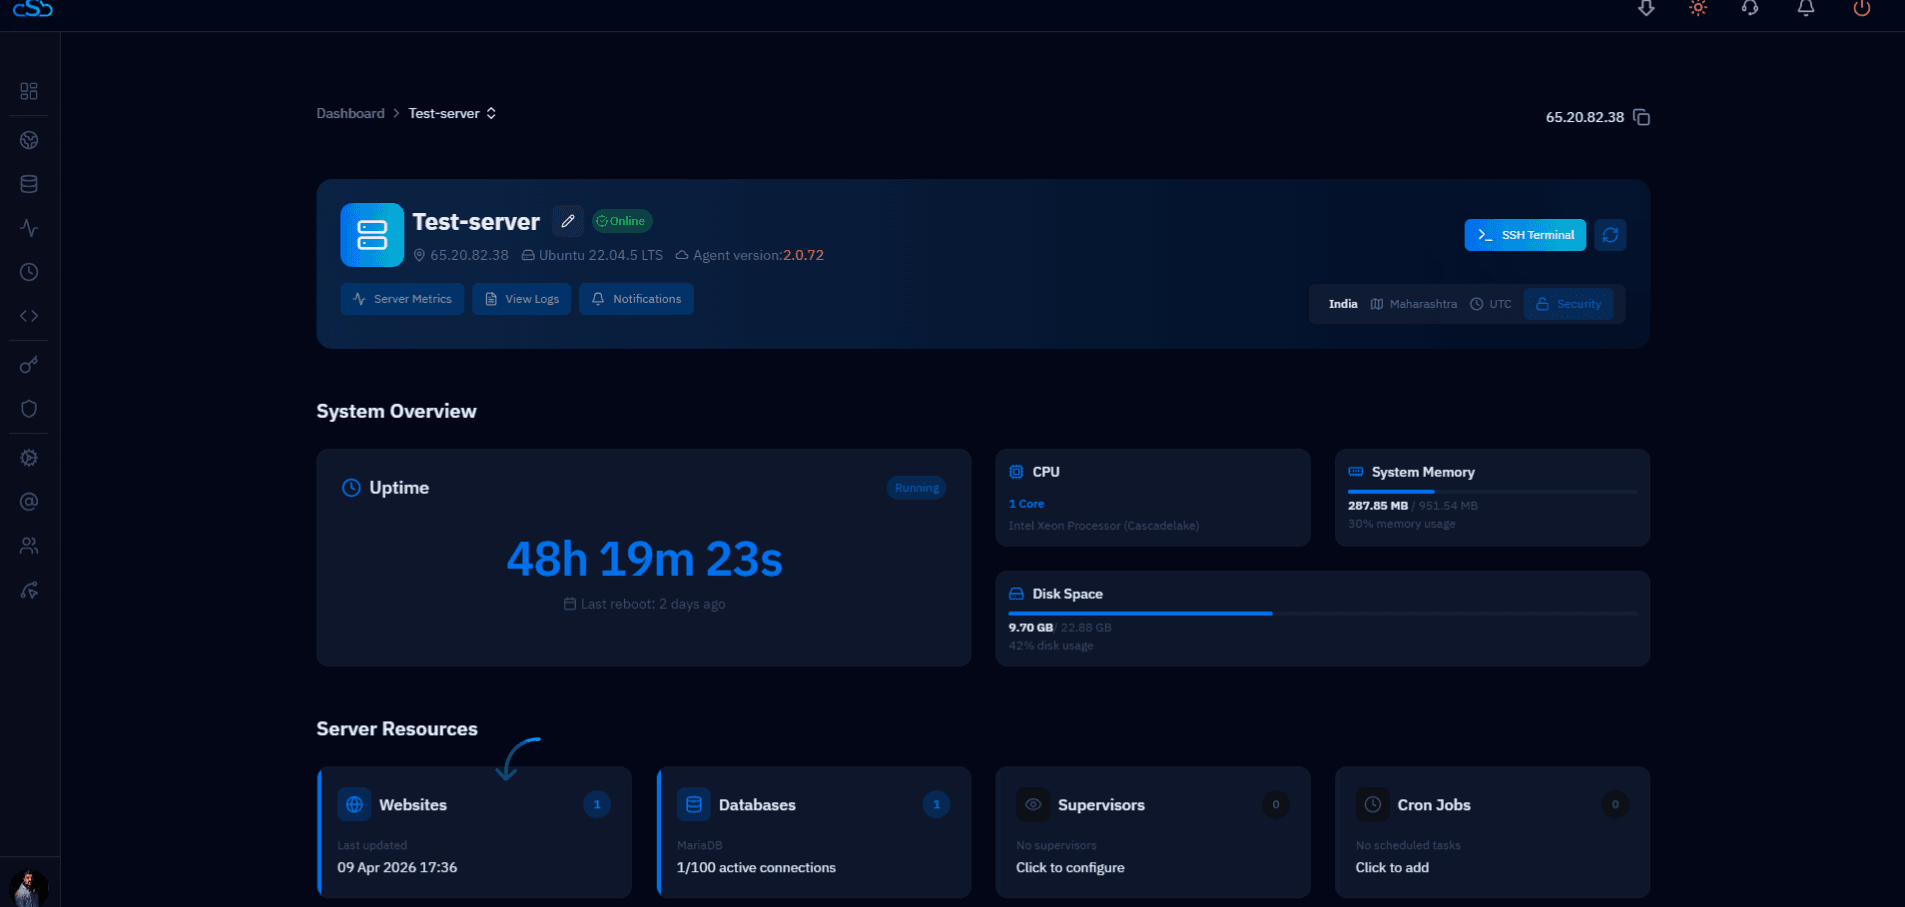
Fig. 02 — Server panel showing system overview and the Websites resource tile indicating the current number of hosted sites.
Step 2: Open Websites and Add New
With the server panel open, navigate to the Websites section to view your existing hosted web applications and start creating a new one.
1. Click Websites: In the left-hand navigation of the server panel, click the Websites icon. This opens the WebApp List showing all sites currently hosted on this server.
2. Click "+ Add Website": In the top-right corner of the WebApp List page, click the blue + Add Website button to launch the website creation wizard.
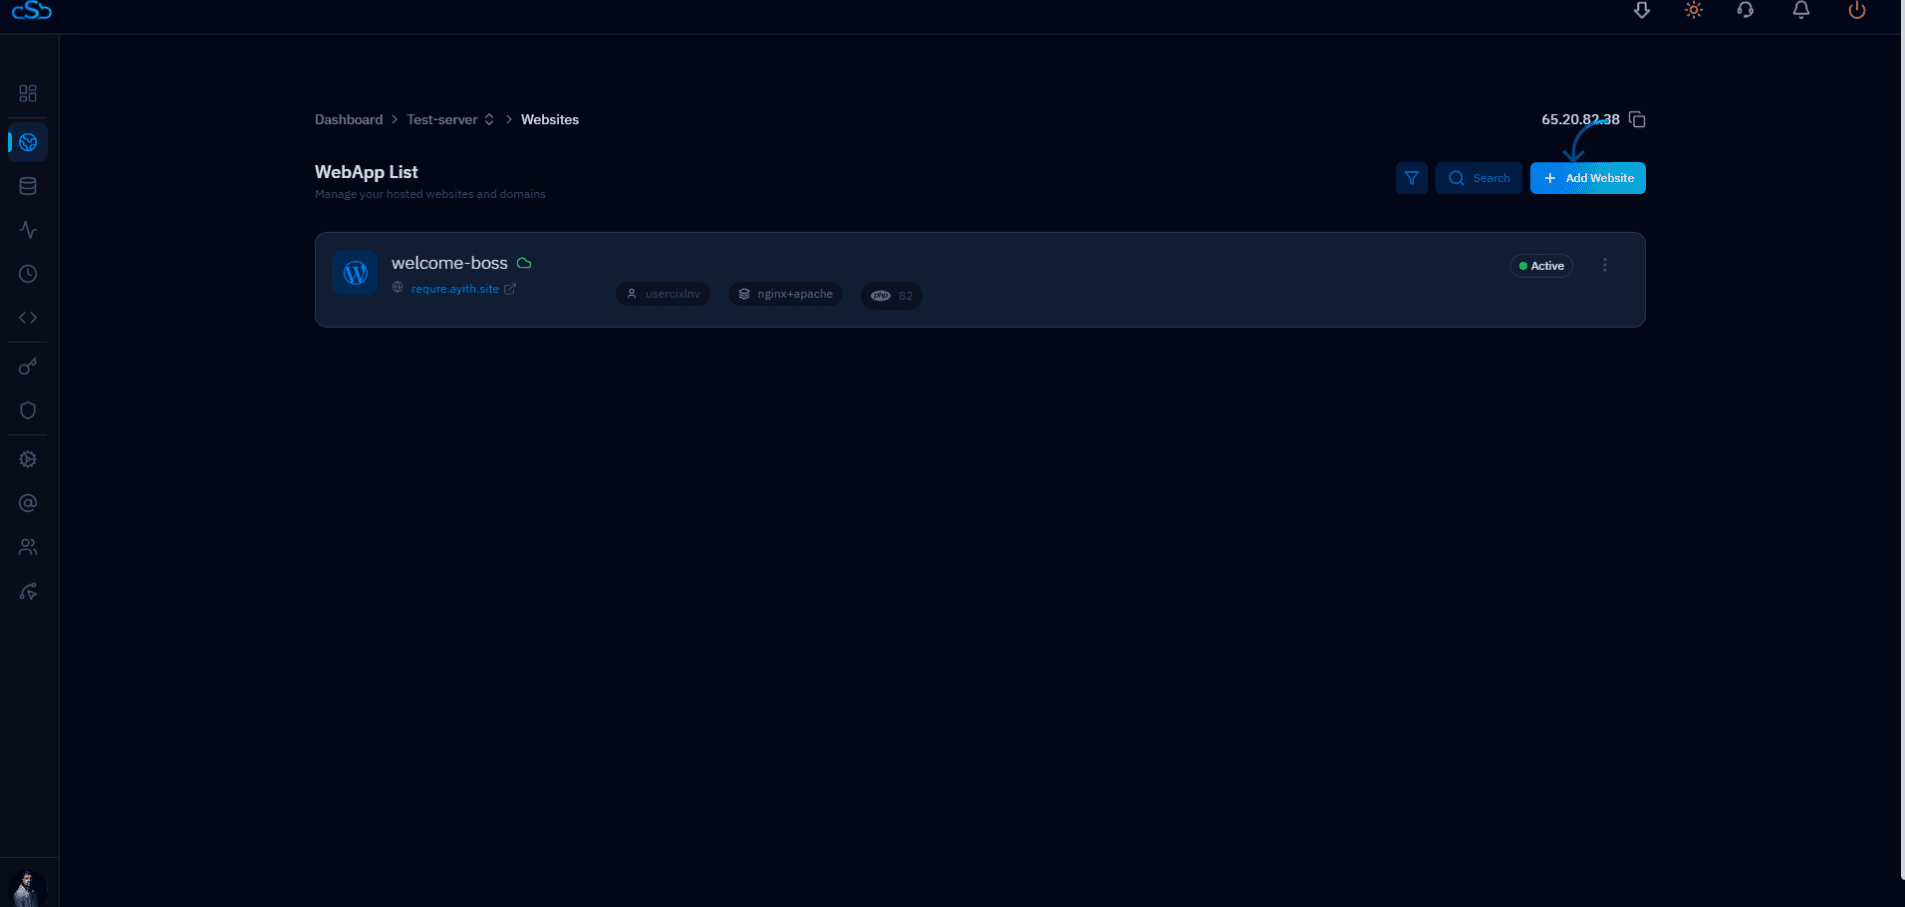
Fig. 03 — WebApp List showing existing websites on the server with the "+ Add Website" button in the top-right corner.
Step 3: Select the White Label Stack
After clicking + Add Website, CloudStick presents a "Select a stack to deploy" screen listing all supported application types. You need to choose the White Label stack from this grid.
1. Find the White Label card: The stack grid shows White Label, WordPress, Custom PHP, Proxy App, phpMyAdmin, NextCloud, Laravel, MediaWiki, WooCommerce, and more. White Label appears in the top-left position.
2. Click "Select →" on the White Label card: The White Label card is tagged as PHP Compatible. Click the Select → link to proceed to the configuration form.
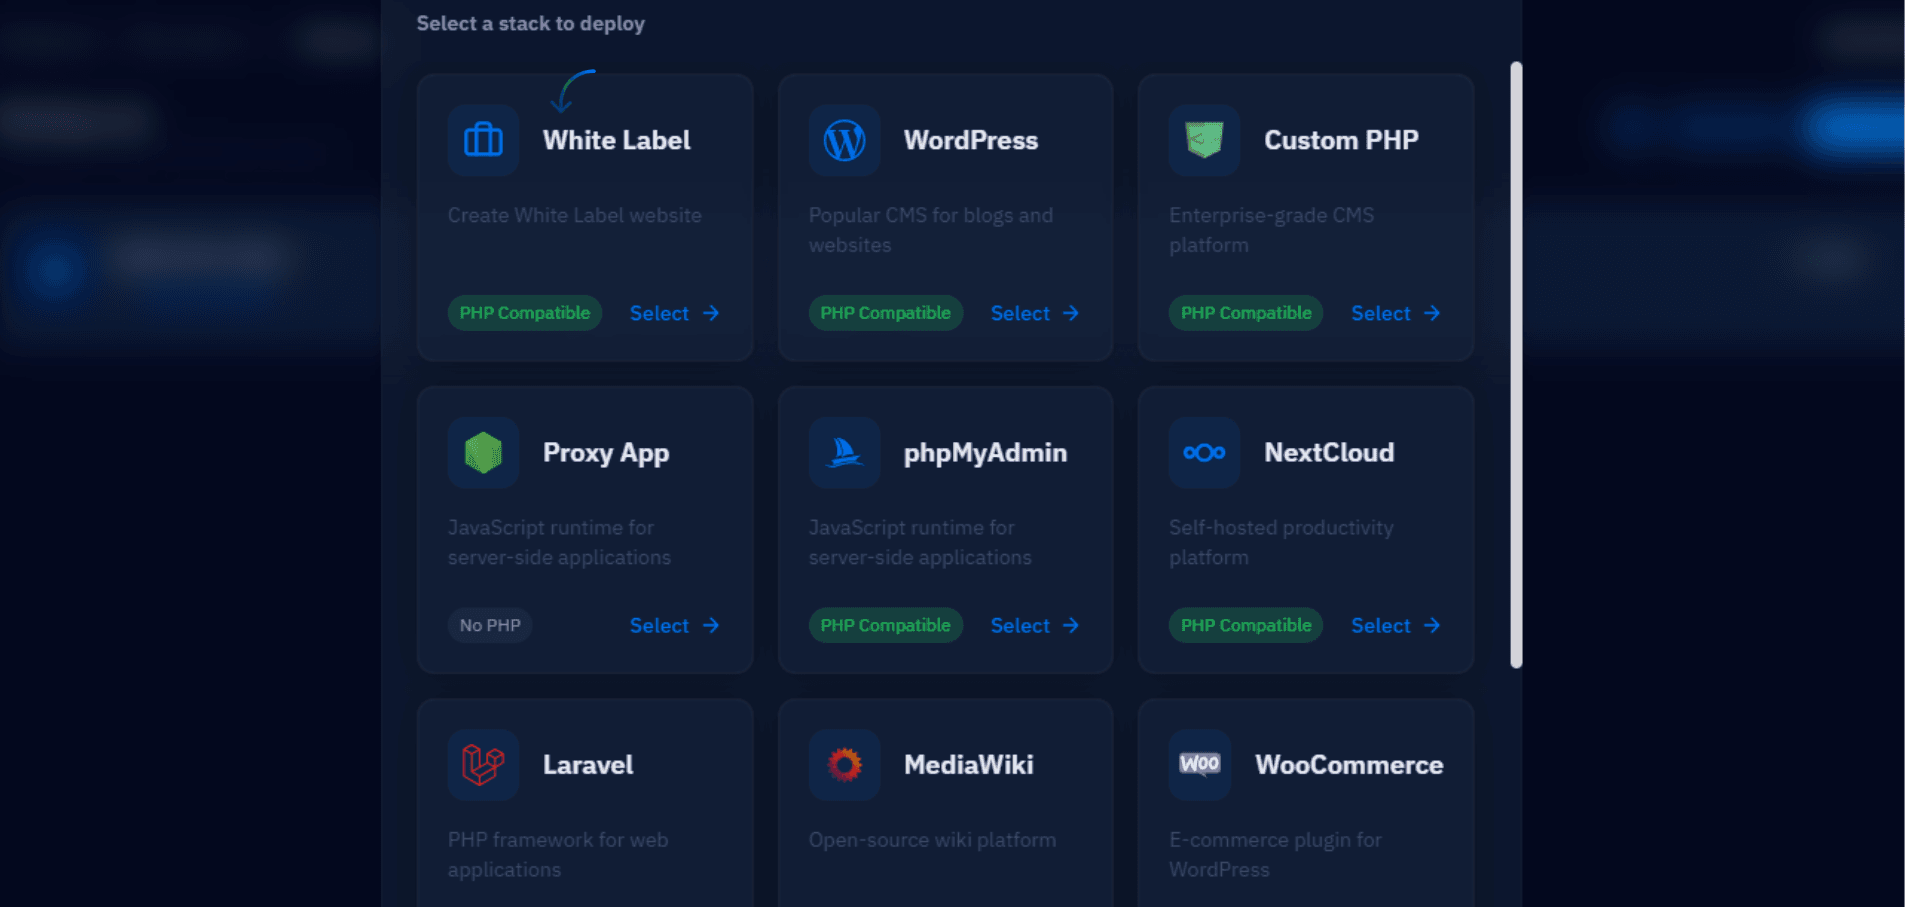
Fig. 04 — Stack selection grid with the White Label option in the top-left position, ready to be selected.
Step 4: Configure White Label Details
The White Label creation form collects all the information needed to provision the site. Fill in each field carefully — your domain becomes the URL clients use to access the branded control panel.
Identity & Domain
Email Address: Enter the admin email address associated with this White Label site.
Website Name: Enter an internal name for this web application (e.g. white-label). This is used as the identifier within CloudStick.
Domain Type: Select Use My Own Domain to deploy on your custom domain, or Use Temporary Domain for a quick test environment.
Domain Name(s): Enter your custom domain (e.g. panel.yourbrand.com). You can enter multiple domains comma-separated.
Cloudflare Account: Optionally link a connected Cloudflare account for automatic DNS management and edge protection.
Server Configuration
PHP Version: Select the PHP version from the dropdown. PHP 8.2 is recommended for best compatibility.
Web Application Server: Choose your web server stack (e.g. Nginx + Apache). This controls how the application is served to clients.
Security & Submission
Leave Clickjacking Protection, XSS Protection, and MIME Sniffing Protection enabled — these security headers are active by default and should remain on.
Click Advanced Settings if you need to configure a custom system user password or public path.
Once all fields are complete, click the blue Install White Label button at the bottom-right of the form to begin provisioning.
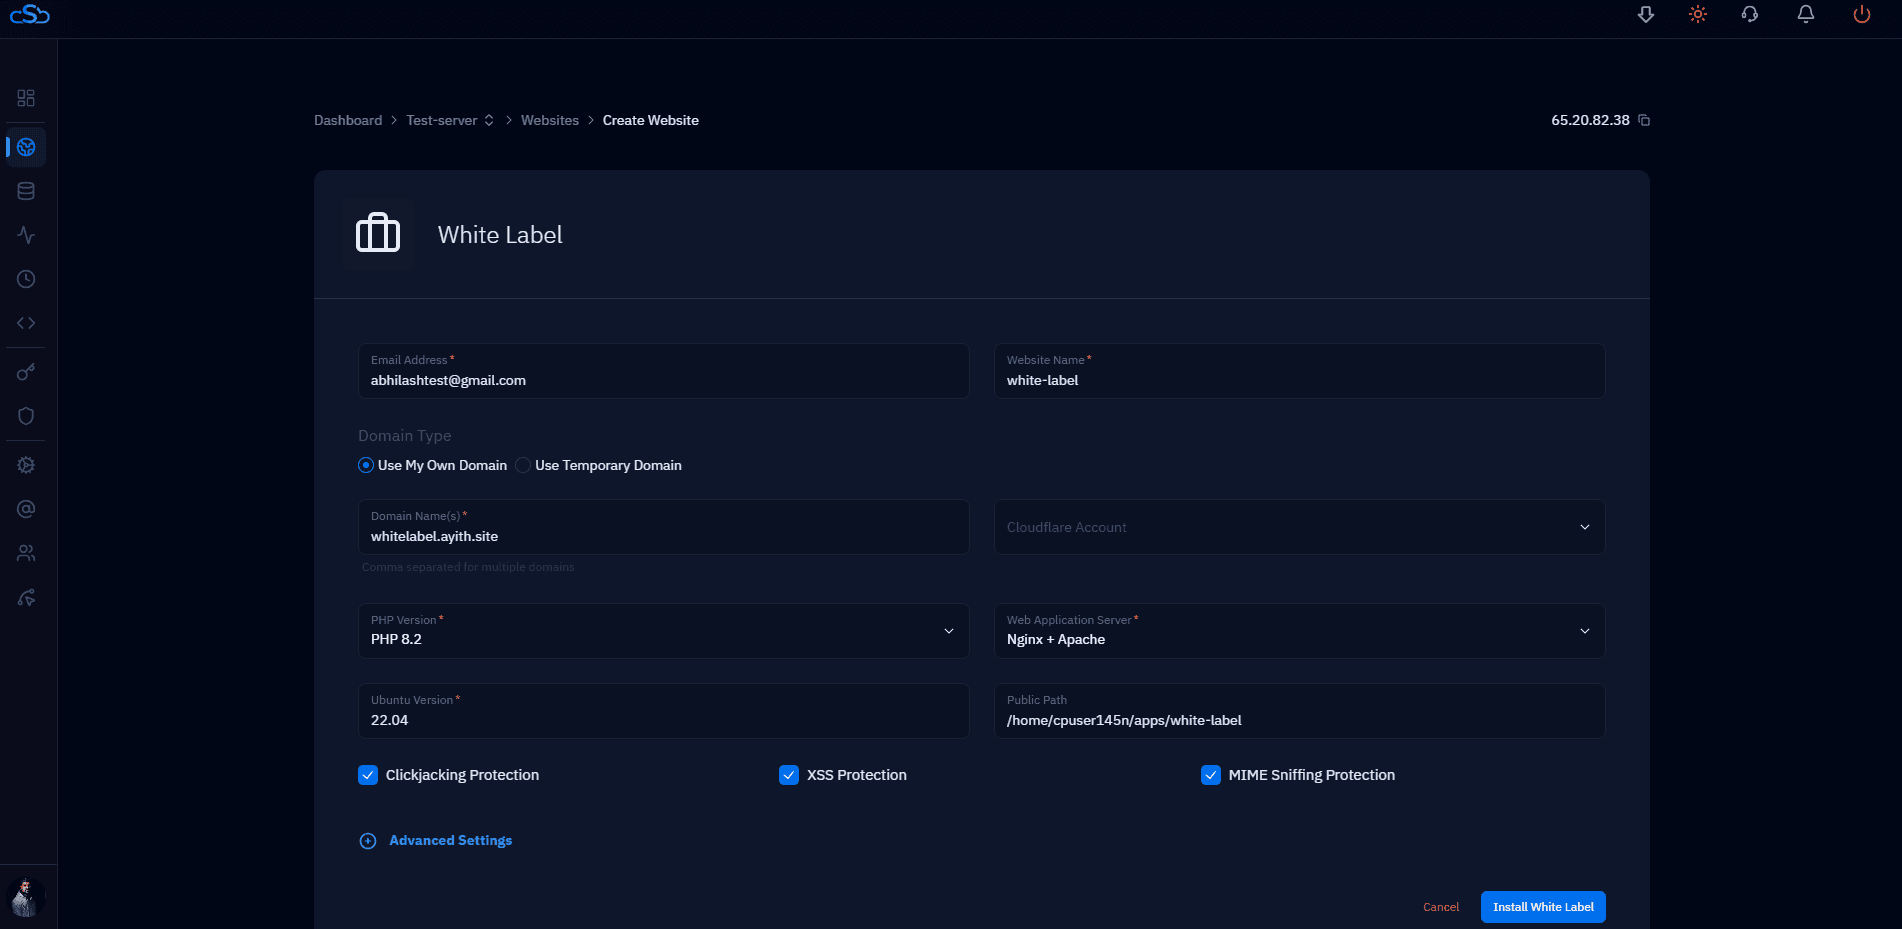
Fig. 05 — White Label configuration form with Email Address, Website Name, Domain Name, PHP Version, Web Server stack, and security options filled in.
Make sure your domain's DNS A record is already pointing to this server's IP address before installation. This ensures the SSL certificate can be issued correctly in the next step.
Step 5: Monitor Installation and Confirm Completion
After clicking Install White Label, CloudStick provisions the application on your server in real time. A live log stream shows each step as it completes.
Monitor the live log: Watch the installation log as it streams each provisioning step — file ownership setup, DKIM key generation, Exim4 configuration, mail user creation, and final site creation.
Watch for "Installation Complete": A green status indicator at the top of the screen updates to Installation Complete once all steps finish successfully.
Review the success modal: A modal overlay appears showing "Installation Successful — Your website has been set up and is ready to go" with a summary of the deployed site: Website name, Domain, System User, PHP Version, and Public Path.
Click "See Website Details": Click the green See Website Details button to be taken to the Website Summary page for your new White Label site.
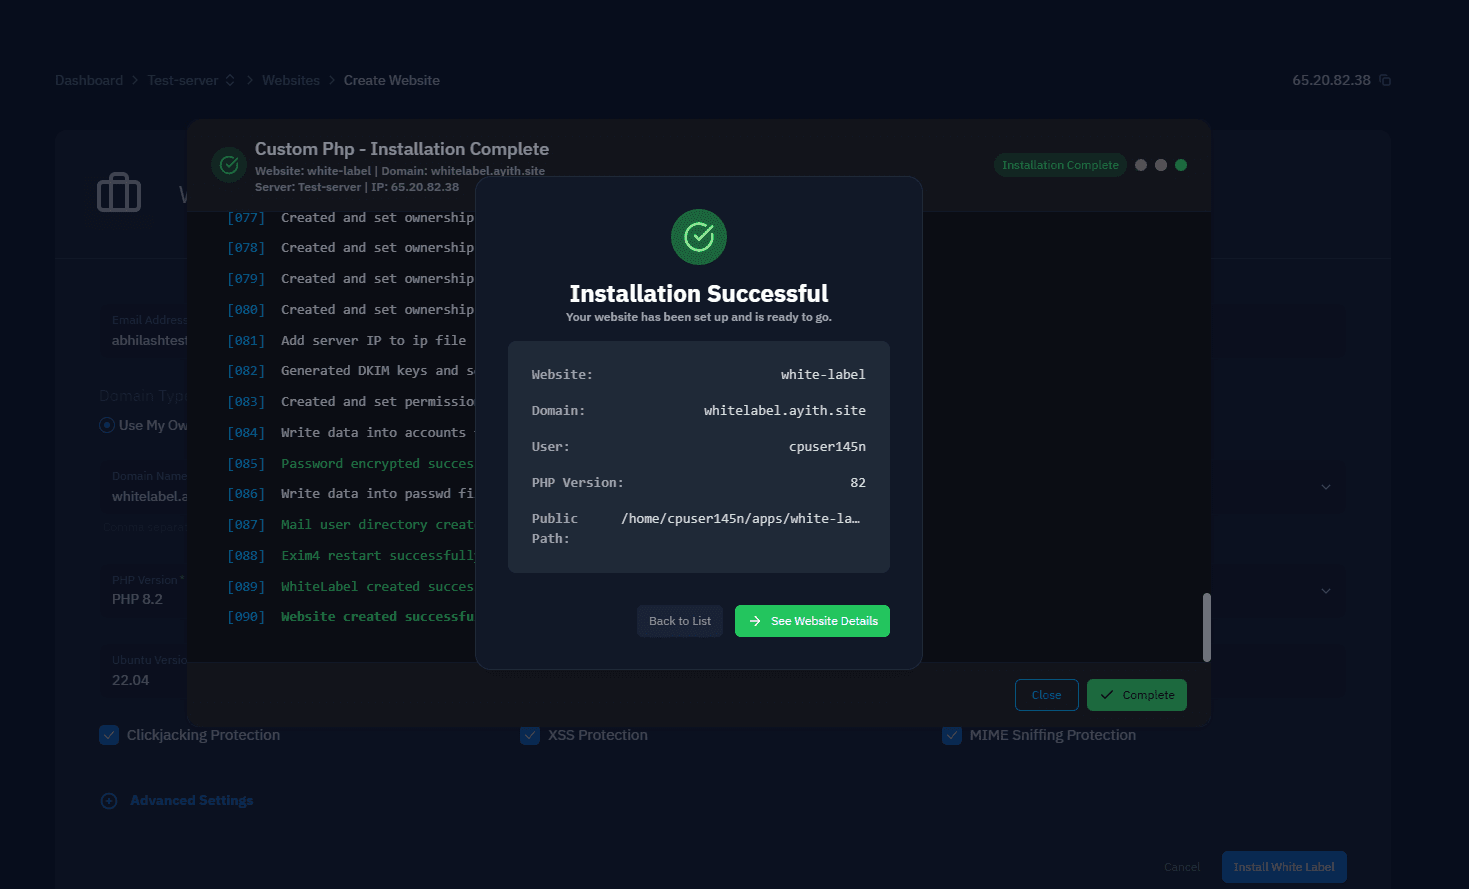
Fig. 06 — Installation Successful modal with site summary, with the live installation log visible in the background confirming all steps passed.
The Website Summary page confirms your site's full configuration — domain, PHP version, web server, disk usage, system user, and root path. The SSL Certificate will show as Inactive at this point; you will activate it in the next step.
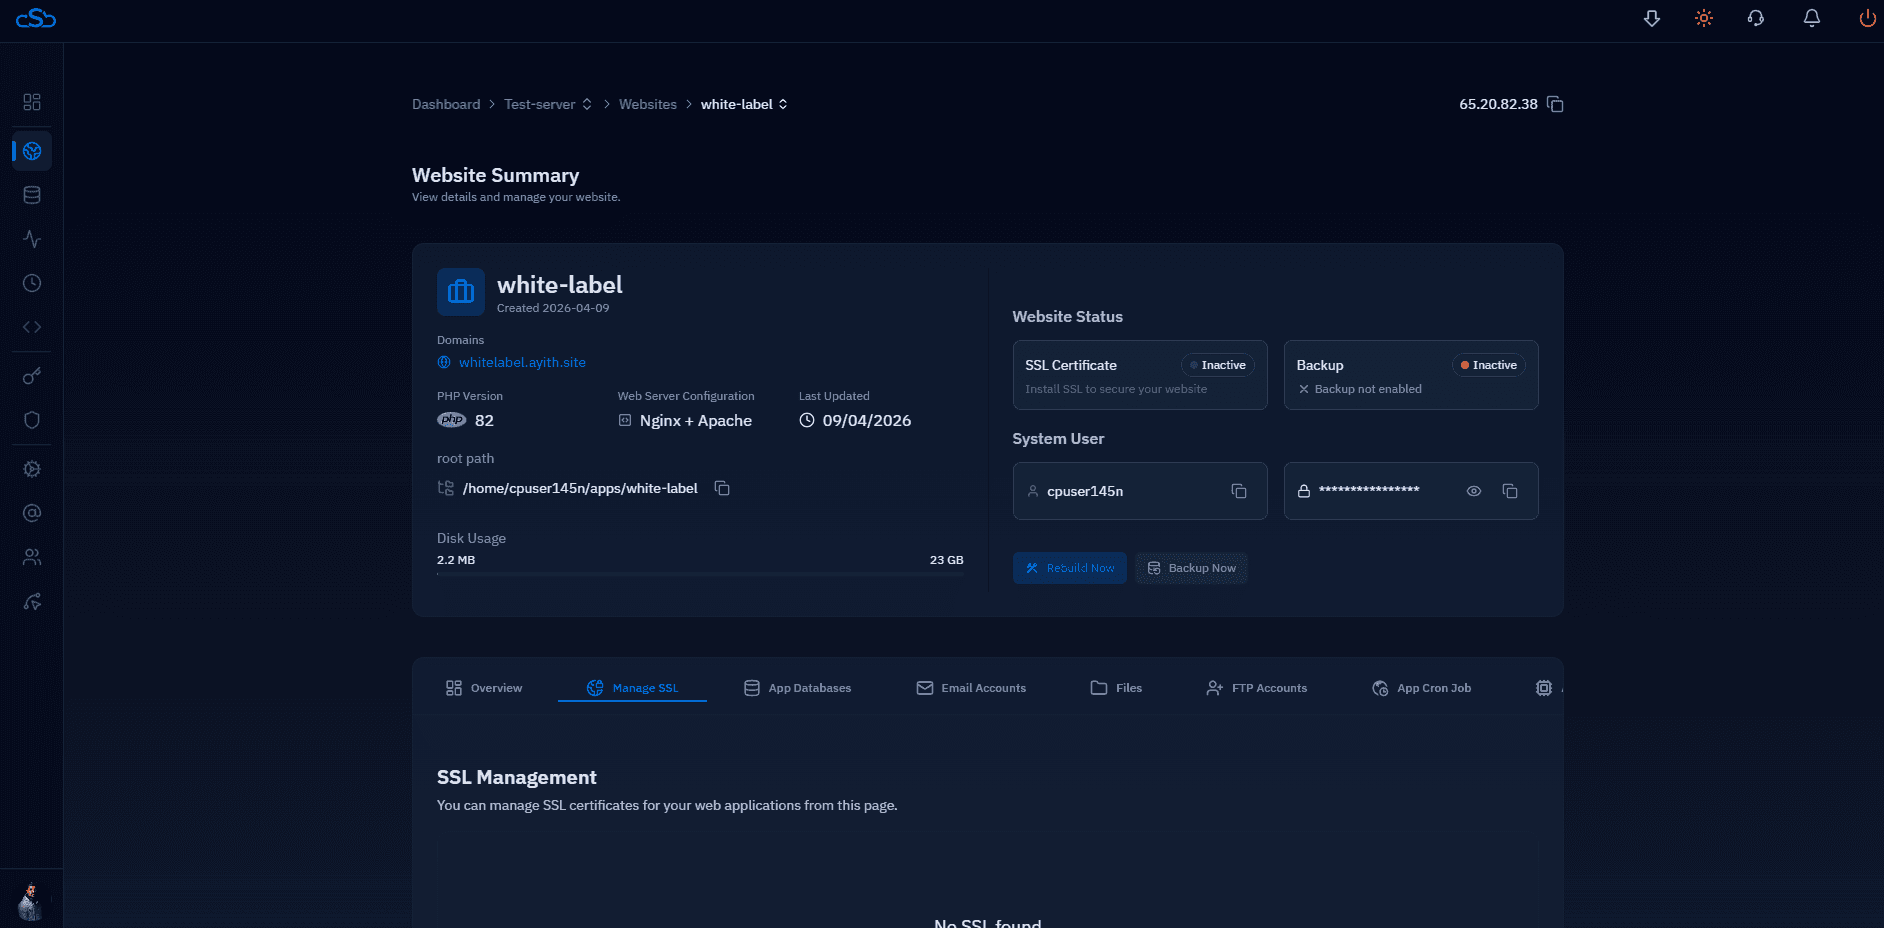
Fig. 07 — Website Summary page for the newly created white-label site showing configuration details and the Manage SSL tab.
Step 6: Install SSL and Access Your White Label Site
With the White Label site installed, the final step is securing it with an SSL certificate. This enables HTTPS on your custom domain and is required before clients can log in safely.
1. Click "Manage SSL": From the Website Summary page, click the Manage SSL tab in the horizontal tab bar below the site details card.
2. Click "Deploy": In the SSL Management section, click the Deploy button to issue and install a free Let's Encrypt SSL certificate for your domain. CloudStick handles the full certificate provisioning automatically — no manual configuration needed.
3. Wait for SSL deployment: Certificate issuance typically completes within a minute. Once done, the SSL Certificate status on the Website Summary updates from Inactive to Active.
4. Access your white-label login page: Your branded control panel is now live and accessible securely at your custom domain (e.g. https://panel.yourbrand.com/login). Clients can log in using their credentials.
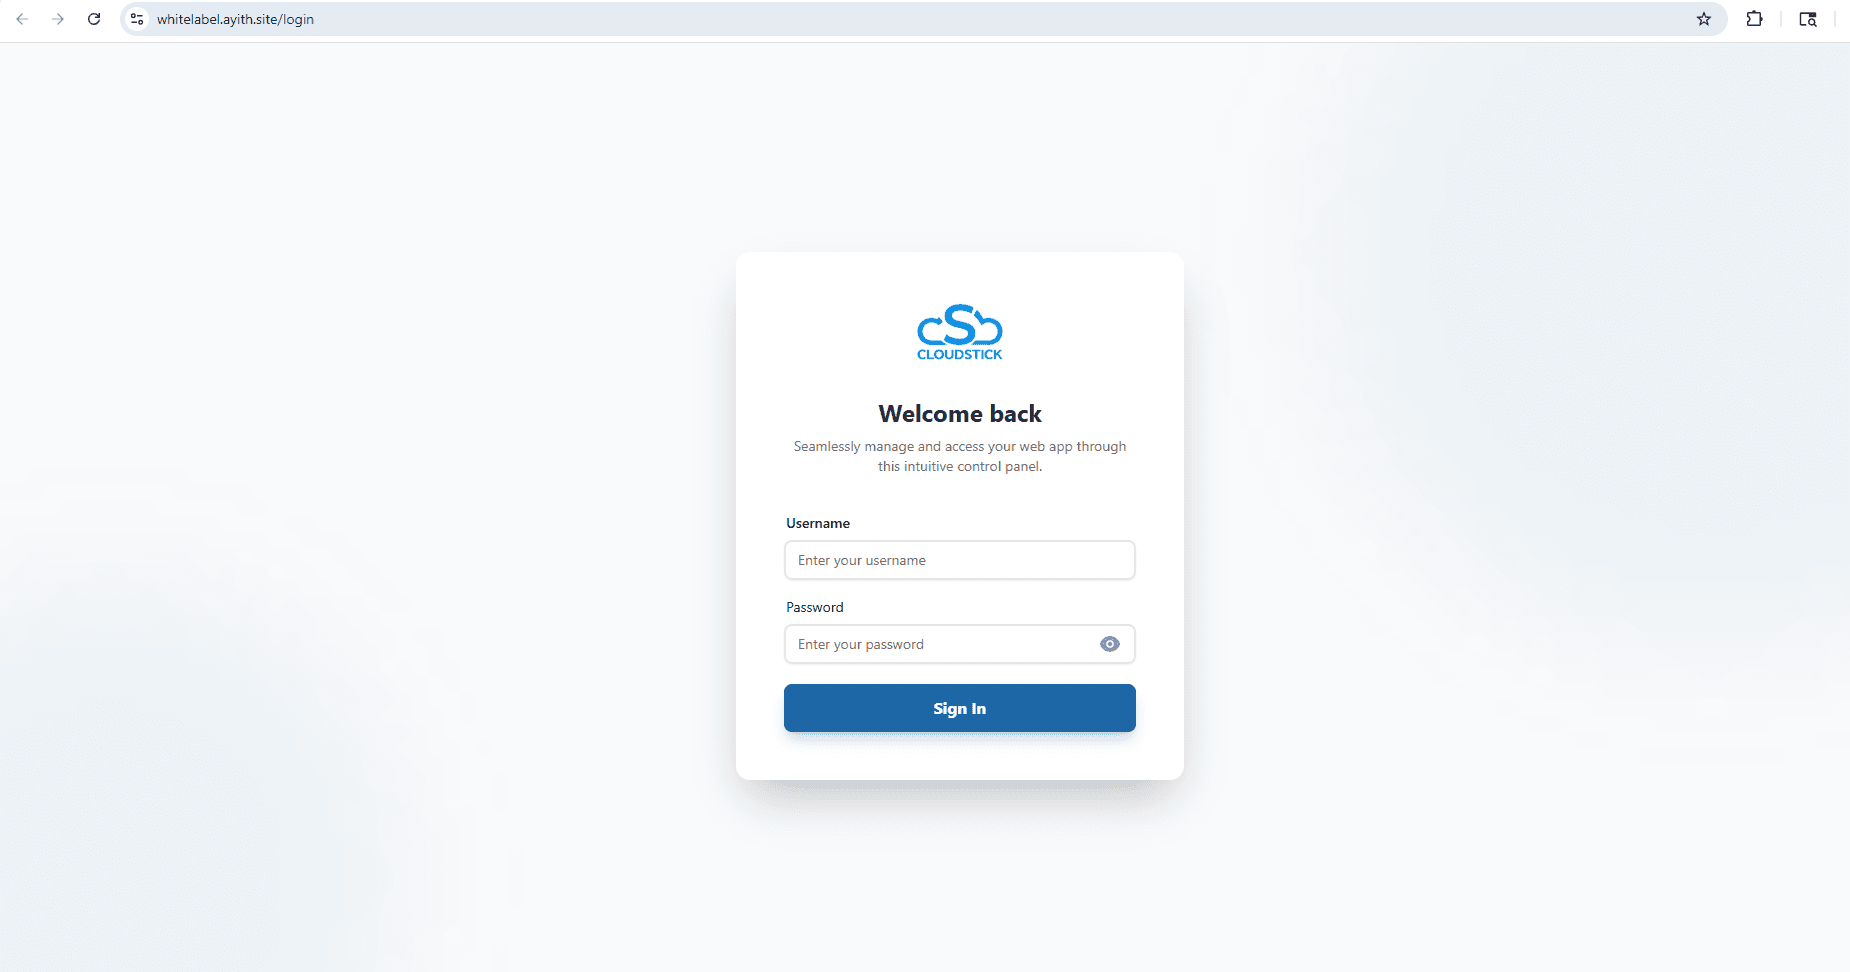
Fig. 08 — White-label login page accessible via HTTPS at the configured custom domain, showing the branded "Welcome back" sign-in screen.
To complete the brand experience for your clients, make sure you have also configured Business Branding (your company name, logo, and primary brand color) in the Business Setup section of your dashboard. See the How to Set Up White-Label Branding article for the full walkthrough.